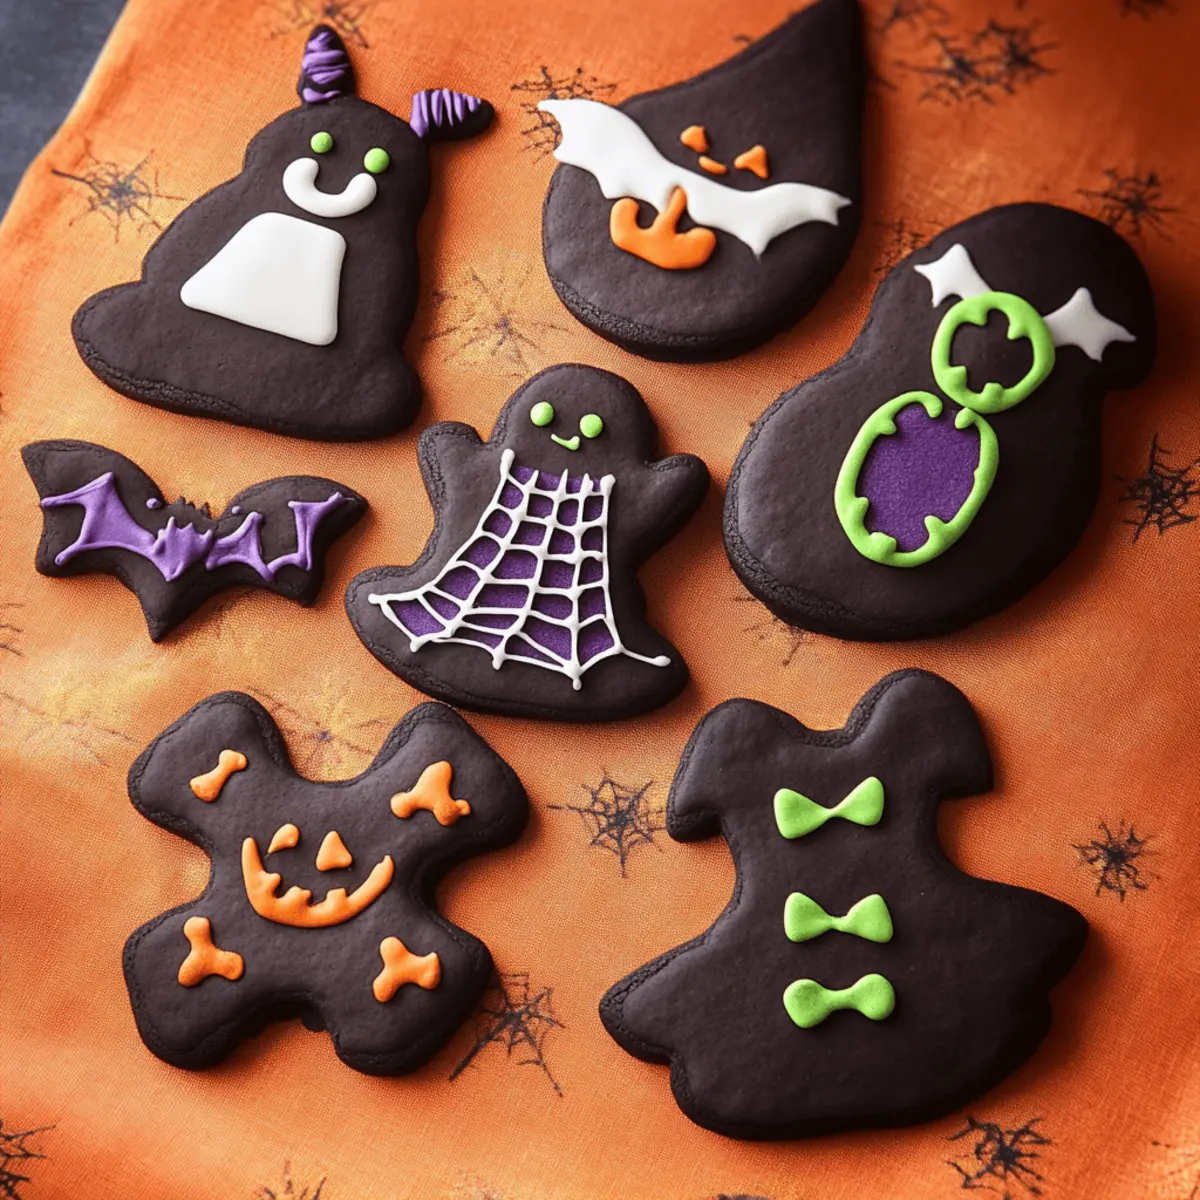
As I stood in the kitchen, the aroma of melting butter filled the air, instantly transporting me back to childhood Halloween parties. Those years were made a little sweeter by festive treats like these Halloween Decorated Cookies. With their whimsical shapes and vibrant icing, these cookies aren’t just a delight to admire; they also bring a sense of warmth and nostalgia to any gathering. Not only are they fun to decorate, making them an exciting activity for families or gatherings, but they also strike the perfect balance between soft and chewy—a crowd-pleasing texture that keeps everyone reaching for just one more. Ready to create some spooky magic? Let’s dive into this delightful recipe!

Why are These Cookies a Must-Bake?
Delightfully Festive: Transform your kitchen into a Halloween wonderland with these spooky-sweet treats that everyone will adore.
Fun for Everyone: Decorating is an activity that kids and adults alike will enjoy, turning baking into a memorable experience.
Perfect Texture: The combination of soft and chewy cookies pairs beautifully with the smooth royal icing.
Crowd-Pleasing Appeal: These cookies are an instant hit at Halloween parties, making you the star of any gathering. If you’re looking for more fun cookie ideas, don’t miss my recipes for Cranberry Pistachio Shortbread Cookies or Pineapple Upside Cookies.
Simplicity Made Sweet: With basic ingredients and easy steps, you’ll whip these up in no time, giving you more moments to enjoy this festive season!
Halloween Decorated Cookies Ingredients
For the Cookie Dough
- Butter – 1 cup, softened to provide that rich, creamy base for delightful cookies.
- Powdered Sugar – 2 cups, ensuring a sweet, melt-in-your-mouth texture.
- Egg – 1 large, to bind the ingredients together and add moisture.
- All-Purpose Flour – 2 ½ cups, for structure and a soft, chewy bite.
- Black Cocoa Powder – ½ cup, adding a deep, rich flavor that's perfect for Halloween vibes.
- Dutch Process Cocoa Powder – ½ cup, enhancing the chocolatey goodness with a smooth finish.
- Salt – ½ teaspoon, balancing the sweetness and elevating flavors.
For the Royal Icing
- Egg White – 1, providing the perfect consistency and shine for decorating.
- Powdered Sugar – 2-3 cups, mixed in for sweetness and to achieve a firm icing that dries beautifully.
- Vanilla Extract (optional) – 1 teaspoon, for a hint of warm flavor that complements the cookies.
These Halloween Decorated Cookies are not just a treat for the taste buds but also a feast for the eyes—let your creativity shine as you decorate!
Step‑by‑Step Instructions for Halloween Decorated Cookies
Step 1: Cream the Butter
In the bowl of a stand mixer fitted with the paddle attachment, beat 1 cup of softened butter on medium speed until creamy and smooth, about 2-3 minutes. You’ll know it’s ready when it looks pale and fluffy. This step ensures a rich base for your Halloween Decorated Cookies, so be patient and let the mixer work its magic.
Step 2: Incorporate the Sugar
Add 2 cups of powdered sugar to the creamed butter and beat on medium speed until fully combined, light, and fluffy. This should take about 2 minutes, and you’ll see a beautiful, snowy mixture forming. Scrape down the sides of the bowl as needed to ensure everything is well mixed and ready to infuse sweetness into your cookie dough.
Step 3: Add the Egg
Crack in 1 large egg and mix on medium speed until the egg is fully incorporated, roughly 1-2 minutes. The mixture will become smoother and glossy, signaling that your wet ingredients are unified. This step is crucial as the egg adds moisture and binds everything together for the perfect cookie texture in your Halloween Decorated Cookies.
Step 4: Combine Dry Ingredients
In a separate bowl, sift together 2 ½ cups of all-purpose flour, ½ cup of black cocoa powder, ½ cup of Dutch process cocoa powder, and ½ teaspoon of salt. Whisk until combined, breaking up any lumps. This mixture forms the dry ingredients that will give your cookies structure and rich flavor, so take care to ensure it’s well blended.
Step 5: Mix Wet and Dry Ingredients
Gradually add the dry mixture to the wet mixture in the stand mixer. Mix on low speed just until combined, about 30 seconds. The dough may look a bit crumbly, but that’s okay! Avoid overmixing, as we want to maintain the tender texture that makes Halloween Decorated Cookies so delightful.
Step 6: Shape the Dough
Turn the crumbly dough out onto a clean surface. Gently bring the dough together into a ball, kneading slightly until it forms a cohesive mass. Flatten the dough into a 1-inch-thick disc. This makes it easier to roll out later, and it’s super important for cutting perfect shapes for your Halloween Decorated Cookies.
Step 7: Chill the Dough
Wrap the dough disc tightly in plastic wrap and chill in the fridge for at least 30-45 minutes, or up to 2 days. Chilling solidifies the butter, which helps prevent the cookies from spreading too much while baking. This step is key for achieving the ideal cookie shape and texture in your Halloween Decorated Cookies.
Step 8: Roll the Dough
After chilling, place the dough between two sheets of parchment paper. Roll it out to a thickness of about 4 mm (over ⅛ inch) using a rolling pin. The parchment keeps the dough from sticking, making it easier to cut out those whimsical shapes that will make your Halloween Decorated Cookies a festive treat.
Step 9: Cut Shapes and Chill Again
Use cookie cutters to cut out fun shapes and place them on a lined baking tray. Cover the tray with plastic wrap and chill for another hour, or overnight if you’re prepping in advance. This extra chilling will help maintain their shape during baking and give your cookies that perfect Halloween flair.
Step 10: Preheat and Bake
Preheat your oven to 160°C (320°F) in a fan-assisted setting. Bake the cookies for about 10 minutes. They may look soft in the center, but resist the urge to overbake as they will continue to set while cooling. Perfectly baked Halloween Decorated Cookies should have a slight softness but still hold their shape beautifully.
Step 11: Cool the Cookies
Once baked, let the cookies cool on the baking sheets for 5 minutes. This helps them firm up without losing their delicate texture. Afterward, carefully transfer them to a cooling rack to cool completely. Allowing them to cool entirely will ensure they’re ready to be beautifully decorated.
Step 12: Prepare Royal Icing
In a clean bowl, beat 1 egg white until frothy. Gradually add 2-3 cups of powdered sugar and 1 teaspoon of vanilla (if using), continuing to mix until shiny peaks form. This will take about 3-5 minutes, and your icing should have a consistency akin to honey, perfect for adorning your Halloween Decorated Cookies.
Step 13: Color the Icing
Divide the royal icing into bowls and add gel food coloring as desired. Stir gently to incorporate the color. If you plan to use the icing later, cover each bowl with plastic wrap to prevent it from drying out. The vibrant colors will make your Halloween Decorated Cookies pop, adding a festive flair that’s sure to impress.
Step 14: Decorate the Cookies
Transfer the colored royal icing into piping bags and get creative as you decorate the cooled cookies. Allow your decorated icing to dry for 3 to 6 hours at room temperature. Watching the icing dry will build anticipation as these Halloween Decorated Cookies transform into delightful masterpieces ready for sharing!

How to Store and Freeze Halloween Decorated Cookies
Room Temperature: Store the cookies in an airtight container at room temperature for up to 5 days to maintain their freshness and soft texture.
Fridge: If you prefer, you can keep them in the fridge for up to 1 week, but be sure to let them come to room temperature before enjoying for the best flavor and texture.
Freezer: Freeze unbaked cookie dough in a tightly wrapped log for up to 3 months. Slice and bake directly from the freezer, adding an extra minute or so to the baking time.
Reheating: For decorated cookies, reheat in a low oven (around 150°F) for about 5-10 minutes to refresh the texture before serving.
Expert Tips for Halloween Decorated Cookies
Chill for Best Results: Always remember to chill your dough. This crucial step helps maintain the shape of your Halloween Decorated Cookies and prevents excess spreading when baked.
Don’t Overmix: When combining wet and dry ingredients, mix just until combined. Overmixing can make cookies tough rather than tender and chewy.
Perfect Icing Consistency: Ensure your royal icing is the right consistency—not too runny or too thick—by testing it on a plate. Aim for a smooth flow that drizzles down but holds its shape.
Creative Decor: Experiment with various food coloring to make your icing pop! Vibrant colors will make your Halloween Decorated Cookies more visually appealing and festive.
Patience is Key: Allow your decorated cookies to dry completely. Rushing this step can result in smudged designs, so give them at least 3-6 hours to set properly.
Use Quality Ingredients: Opt for high-quality cocoa powders and fresh eggs for the best flavor. The quality of your ingredients plays a vital role in transforming good cookies into extraordinary Halloween Decorated Cookies!
Make Ahead Options
These Halloween Decorated Cookies are perfect for busy home cooks looking to simplify their meal planning! You can prepare the cookie dough up to 2 days in advance by chilling it tightly wrapped in plastic wrap in the fridge. Additionally, after shaping and cutting your cookies, you can keep them on the baking tray covered with plastic wrap for up to 24 hours in the fridge. This extra chilling helps maintain their shape while baking. When you're ready to bake, simply preheat your oven and proceed with the baking instructions. By prepping ahead, you'll save precious time and still enjoy delicious, festive cookies that everyone will adore!
What to Serve with Halloween Decorated Cookies
As you gather your loved ones to relish in the magic of the season, nothing pairs better with these charming cookies than delightful accompaniments that enhance the festive spirit.
- Spiced Hot Apple Cider: The warm, sweet flavors of spiced apple cider create a cozy, autumnal atmosphere that perfectly complements the festive cookies.
- Pumpkin Soup: This creamy, savory soup is a deliciously warming option, offering a contrasting flavor and texture to your sweet treats. It’s a delightful way to start your spooky gathering.
- Cheese Platter: Include a variety of cheeses, fruits, and nuts for a well-rounded experience. Whether creamy brie or sharp cheddar, cheeses add richness that pairs beautifully with the sweetness of the cookies.
- Chocolate Milkshake: Thick and creamy, a chocolate milkshake satisfies everyone’s sweet tooth while adding a fun, indulgent vibe that perfectly matches the joyous occasion.
- Decorated Cupcakes: Add an extra touch to your dessert table with Halloween-themed cupcakes. Their sprinkles and icing will match the whimsical look of your Halloween Decorated Cookies and delight guests of all ages.
- Fruit Salad: Fresh fruits offer a refreshing contrast to the rich flavors of the cookies. Use vibrant seasonal fruits like apples and pomegranates for a colorful display that cleanses the palate.
- Halloween Punch: A spooky, colorful punch with fun floating fruit slices brings a festive flair and is great for both kids and adults. Opt for a mix of juices with a splash of soda for fizz!
- Caramel Dip and Apples: Serve sliced apples with a creamy caramel dip for a simple yet delightful pairing that echoes the fall harvest and adds variety to your treat table.
- Coffee or Espresso: A rich, warm cup of coffee elevates the whole experience, balancing the sweetness of the cookies with its robust flavor, making it the perfect end to a gracious meal.
Creating a charming spread not only enhances your celebration but also invites your guests to revel in the flavors of Halloween!
Halloween Decorated Cookies Variations & Substitutions
Feel free to unleash your creativity and customize these festive cookies to your heart's content!
-
Gluten-Free: Swap all-purpose flour with a gluten-free blend to make these cookies friendly for all dietary needs. The taste and texture will still be delightful!
-
Dairy-Free: Use plant-based butter or coconut oil instead of regular butter for a dairy-free version. These substitutes will still keep the cookies rich and moist.
-
Sugar-Free: Replace powdered sugar with a sugar substitute like erythritol for a low-calorie option. Enjoy the same sweetness without the guilt!
-
Spicy Kick: Add a dash of cinnamon or ginger to the dough for a warm and spicy note. It adds an unexpected twist that beautifully complements the chocolate flavor.
-
Chocolate Lovers: Incorporate chocolate chips or chunks into the dough for an extra chocolatey experience. The melty morsels with each bite will be irresistible!
-
Vegan: Replace the egg with a flaxseed or chia egg (1 tablespoon flaxseed or chia seeds mixed with 2.5 tablespoons water, let it sit for 5 minutes). You’ll love the results!
-
Orange Zest: Infuse some orange zest into the dough for a subtle citrus flavor that pairs wonderfully with chocolate. It adds a bright note that really pops!
-
Themed Decor: Swap royal icing for colored fondant or candy melts to create different textures and flavors. This will give your cookies a whole new look and fun taste!
These creative ideas will not only amp up the fun but also make these Halloween Decorated Cookies uniquely yours. For more cookie inspiration, check out my recipes for Lemon Sugar Cookies and Christmas Thumbprint Cookies!
Halloween Decorated Cookies Recipe FAQs
What should I look for when selecting cocoa powder?
Absolutely! When choosing cocoa powder for your Halloween Decorated Cookies, look for a rich, dark cocoa that has a deep chocolate flavor. The packaging should indicate whether it’s Dutch-process or natural; Dutch-process cocoa will give your cookies a smoother finish and a milder acidity, enhancing the overall flavor.
How should I store my Halloween Decorated Cookies?
You can store your cookies in an airtight container at room temperature for up to 5 days. To keep them fresher for a longer time, consider placing parchment paper between layers of cookies. If you’d like, you can refrigerate them for up to 1 week, but let them come back to room temperature for the perfect chewy texture before indulging!
Can I freeze the cookie dough or the baked cookies?
Yes, you can! For freezing unbaked cookie dough, wrap it tightly in plastic wrap and then place it in a freezer-safe bag. It will keep for up to 3 months. When you're ready to bake, slice the dough directly from the freezer, adding an extra minute or two to your baking time. For baked cookies, you can freeze them in an airtight container for up to 3 months. Thaw in the fridge overnight, and they’ll be delightful!
What if my royal icing is too runny?
No worries! If your royal icing is too runny, you can easily thicken it by gradually adding more powdered sugar, about a tablespoon at a time, until you reach your desired consistency. Aim for a flow that drizzles nicely but holds its shape when piped. If it’s too thick, you can add a few drops of water to loosen it slightly.
Are these cookies safe for people with egg allergies?
If you're looking to modify this Halloween Decorated Cookies recipe for someone with an egg allergy, you can substitute the egg in the dough with a flax egg (1 tablespoon ground flaxseed mixed with 2.5 tablespoons water) or applesauce (¼ cup). For the royal icing, consider using meringue powder instead of egg whites, which can be mixed with water according to package instructions for a safe and effective ingredient.
How long do the decorated cookies take to dry?
Generally, allow the decorated cookies to dry for about 3 to 6 hours at room temperature. This time depends on the thickness of your icing and the humidity in your kitchen. Make sure they’re on a flat surface to avoid smudging, and resist the temptation to touch them until they’re fully set!

Spooky-Sweet Halloween Decorated Cookies You'll Adore
Equipment
- stand mixer
- Rolling Pin
- cookie cutters
- Baking tray
- Parchment Paper
Ingredients
For the Cookie Dough
- 1 cup Butter softened
- 2 cups Powdered Sugar to ensure a sweet texture
- 1 large Egg to bind ingredients
- 2.5 cups All-Purpose Flour for structure and texture
- 0.5 cup Black Cocoa Powder for rich flavor
- 0.5 cup Dutch Process Cocoa Powder for enhanced chocolate goodness
- 0.5 teaspoon Salt to balance sweetness
For the Royal Icing
- 1 large Egg White for icing consistency
- 2-3 cups Powdered Sugar to achieve firm icing
- 1 teaspoon Vanilla Extract optional, for additional flavor
Instructions
Preparation
- Cream the butter until pale and fluffy, about 2-3 minutes.
- Incorporate powdered sugar, beating until fully combined.
- Add the egg and mix until smooth and glossy.
- Sift and combine flour, cocoa powders, and salt in a separate bowl.
- Gradually mix the dry ingredients with the wet mixture until just combined.
- Shape the dough into a disc, wrap it, and chill for at least 30-45 minutes.
- Roll the dough between parchment papers to 4 mm thickness.
- Cut shapes using cookie cutters and chill again for an hour.
- Preheat oven to 160°C (320°F) and bake cookies for about 10 minutes.
- Cool cookies on the sheets for 5 minutes before transferring to a rack.
Royal Icing
- Beat egg white until frothy, then gradually add powdered sugar.
- Mix until shiny peaks form, adding vanilla if desired.
- Divide and color the icing as desired with gel food coloring.
- Decorate cooled cookies, allowing icing to dry for 3 to 6 hours.