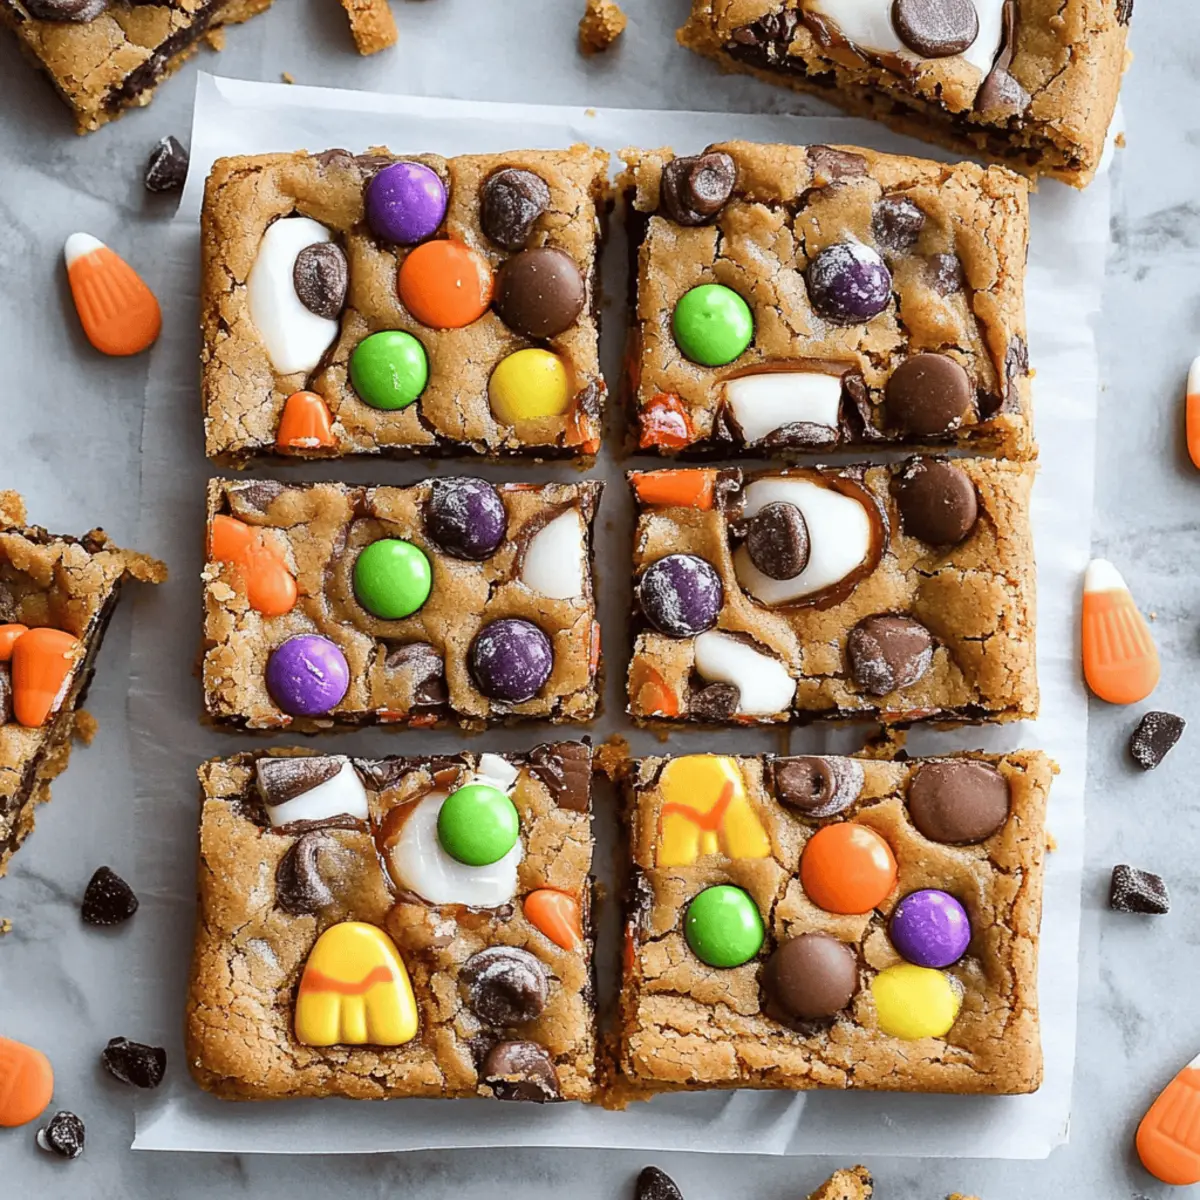
As I tossed another handful of leftover Halloween candy into the mixing bowl, I couldn’t help but grin at the delicious chaos unfolding. Those sweet remnants from trick-or-treating are about to transform into something extraordinary: Halloween Candy Cookie Bars. This recipe not only breathes new life into candy that would otherwise sit on the shelf collecting dust, but it also offers a quick prep time, making it the perfect choice for any baking enthusiast. With just 15 minutes of prep, you’ll create a mouthwatering treat that’s bound to please both family and friends alike. Whether you’re looking to impress at a potluck or simply want to indulge in some homemade goodness, these festive bars are sure to become a new favorite. Curious about how to bring this delightful creation to life? Let’s dive right in!
Why Are These Cookie Bars So Special?
Irresistible flavors: The blend of leftover Halloween candy adds a delightful twist, creating a cookie bar that’s bursting with sweet surprises.
Quick and easy: With only 15 minutes of prep time, even novice bakers can whip these up for any occasion.
Crowd-pleaser: Perfect for potlucks or gatherings, these bars are sure to bring smiles and satisfy sweet cravings.
Nostalgic fun: Transforming childhood favorites like Reese's and M&M's into a cozy treat will spark joy in everyone.
Versatile goodness: Feel free to mix in your favorite candies or experiment with toppings to match your taste! For more delightful recipes, check out these Lemon Raspberry Bars or Edible Cookie Dough.
Halloween Candy Cookie Bars Ingredients
Transform your leftovers into something magical!
For the Cookie Base
- Unbleached all-purpose flour – gives the bars a sturdy yet soft texture.
- Baking soda – helps the cookie bars rise and provides that perfect chewy bite.
- Kosher salt – enhances the sweetness of the cookies, making each bite irresistible.
- Unsalted butter – use at room temperature for easy mixing and a rich flavor.
- Dark brown sugar – adds moisture and a deep, caramel-like sweetness.
- Granulated sugar – balances the dark brown sugar for a delightful sweetness.
- Large eggs – bind the ingredients together and contribute to a fluffy texture.
- Real vanilla extract – infuses a warm, inviting flavor that complements the candies.
For the Candy Mix-Ins
- Reese's Pieces – provides a crunchy, peanut buttery burst in every bite.
- Chocolate M&M's – adds a pop of color and sweetness, perfect for a festive touch.
- Leftover Halloween candy (e.g., Reese's peanut butter cups, Hershey bars, KitKat bars, Snickers, Butterfinger) – bring your own favorites to create a unique mix!
For the Garnish
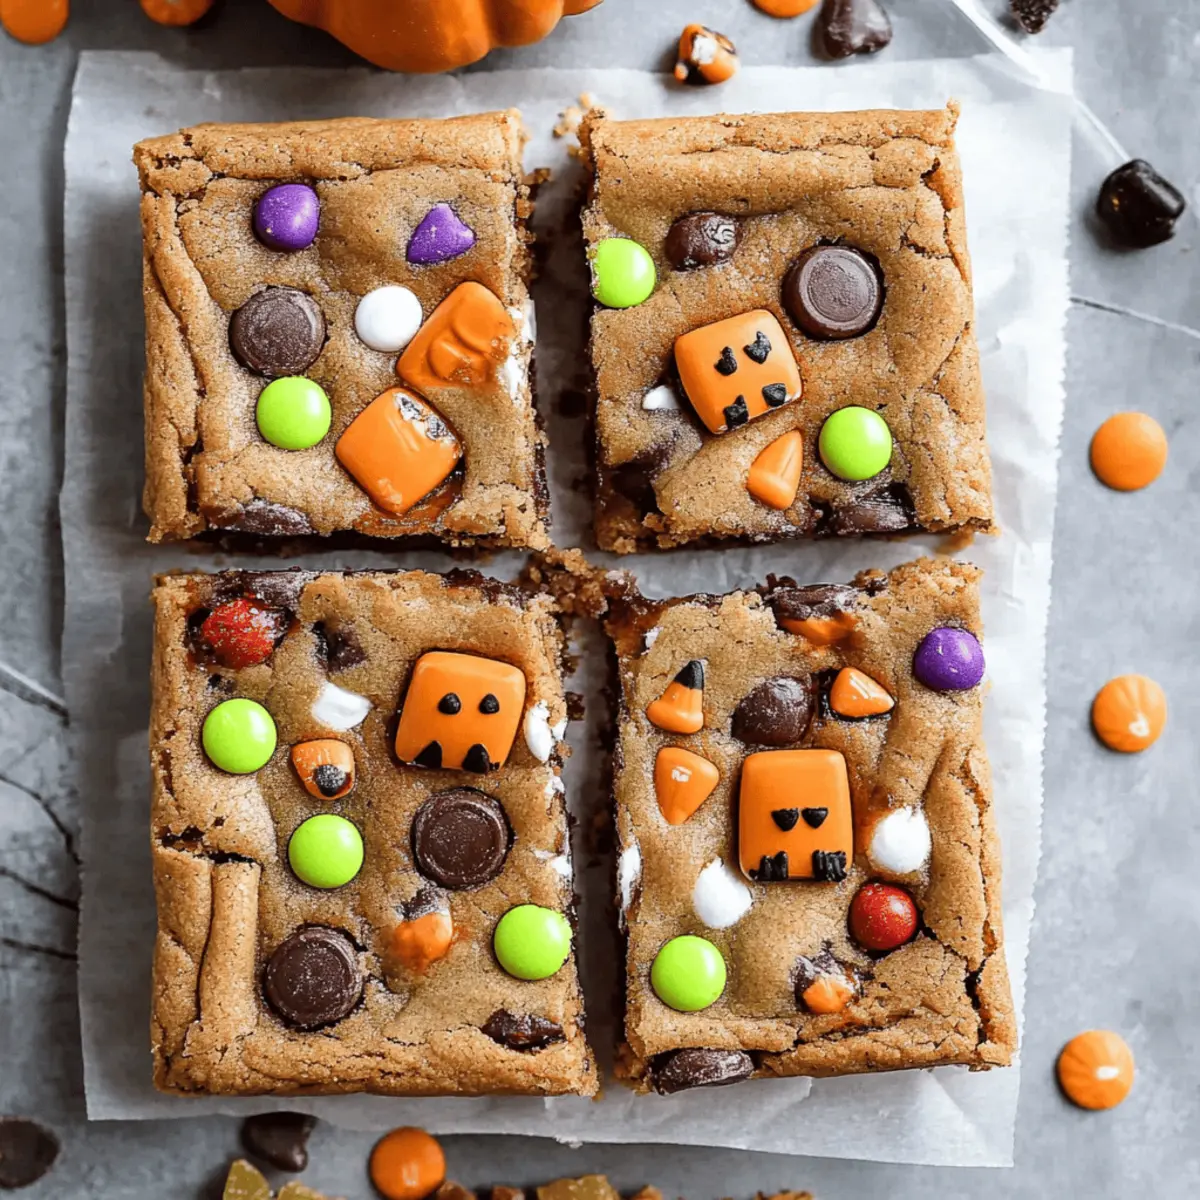
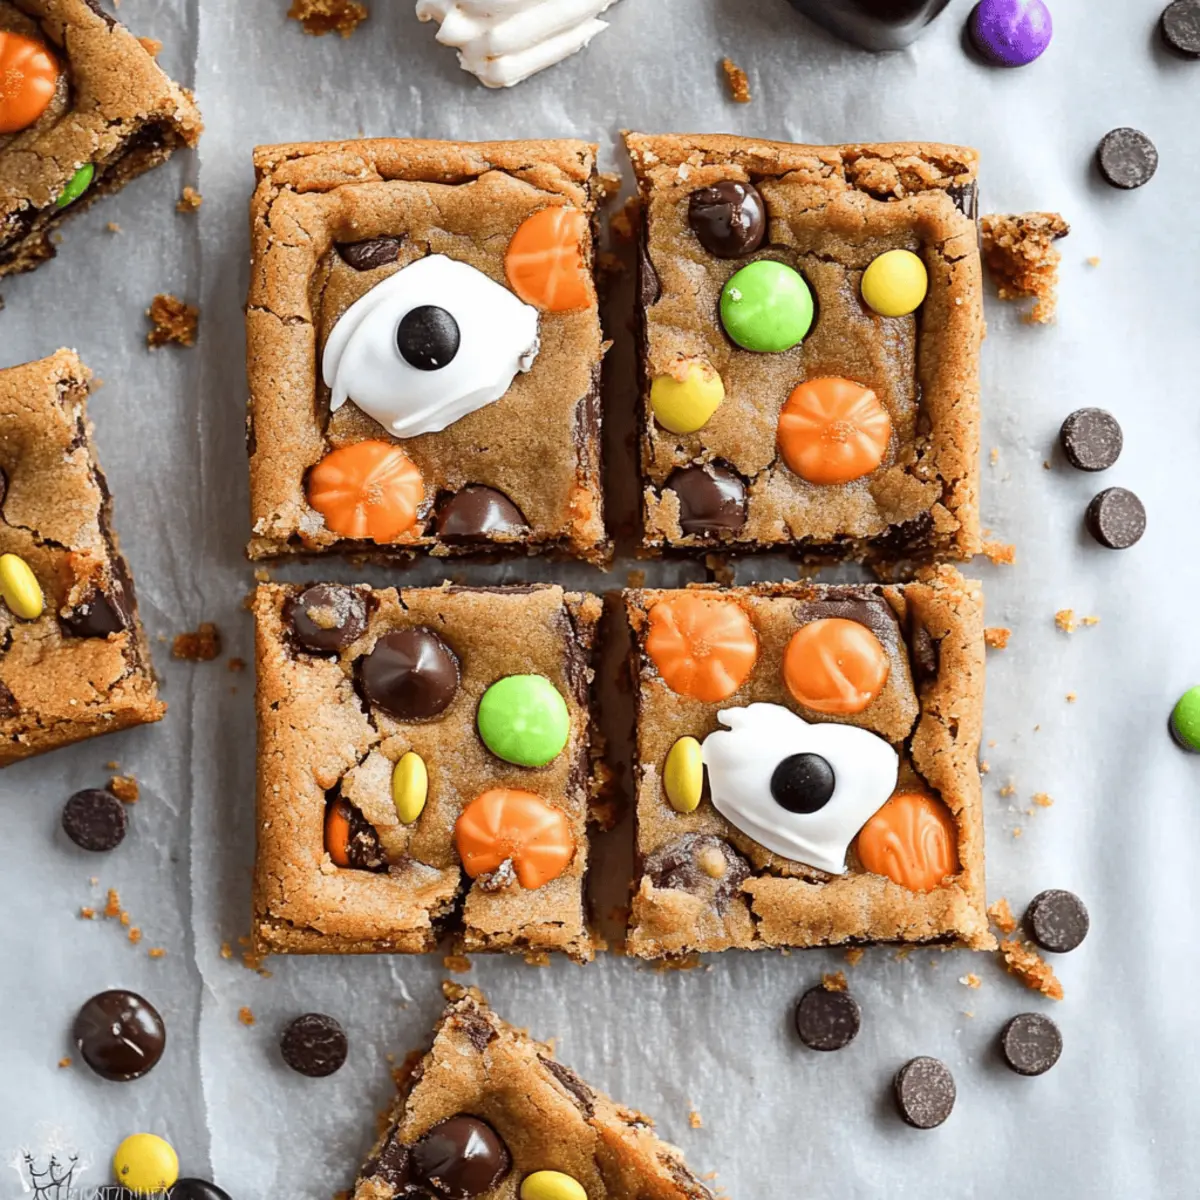
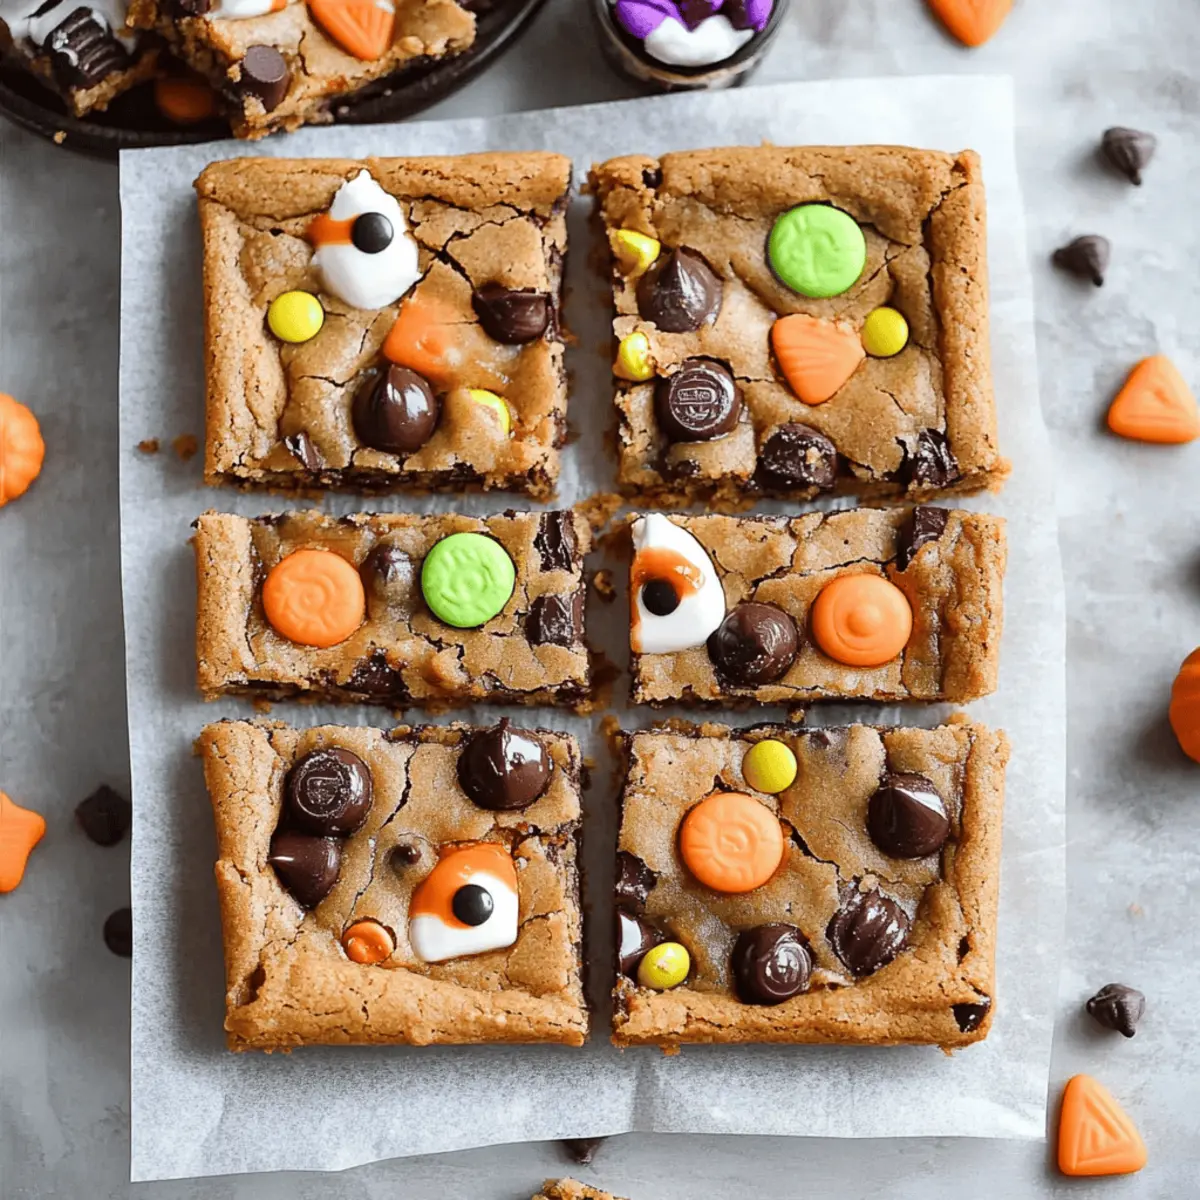
- Candy eyes – add a spooky touch to your cookie bars, making them perfect for Halloween!
Step‑by‑Step Instructions for Halloween Candy Cookie Bars
Step 1: Preheat and Prepare
Begin by preheating your oven to 350℉ (or 180℃). While the oven warms up, line a 9 x 13 x 2 inch baking pan with parchment paper and spray it lightly with nonstick spray. This will ensure the Halloween Candy Cookie Bars release easily once baked. Set the prepared pan aside, ready to hold your delicious creation.
Step 2: Combine Dry Ingredients
In a medium-sized mixing bowl, combine 2¼ cups of unbleached all-purpose flour, 1 teaspoon of baking soda, and ¾ teaspoon of kosher salt. Use a whisk to mix these dry ingredients thoroughly, ensuring there are no lumps. Once well combined, set the mixture aside as you move on to preparing the wet ingredients for the cookie bars.
Step 3: Cream Butter and Sugars
In the bowl of a stand mixer, add ¾ cup of room temperature unsalted butter, ¾ cup of dark brown sugar, and ¾ cup of granulated sugar. Mix these ingredients on medium speed until the mixture is creamy and fluffy, which should take about 2 to 3 minutes. Make sure to stop occasionally to scrape down the sides of the bowl for a uniformly mixed base for your Halloween Candy Cookie Bars.
Step 4: Add Eggs and Vanilla
Once you have a creamy mixture, add the two large eggs one at a time, mixing well after each addition. Follow this by adding 1½ teaspoons of real vanilla extract with the last egg. This will infuse your dough with a lovely aroma. Remember to scrape down the sides and bottom of the bowl one final time to ensure all ingredients are well incorporated before moving to the next step.
Step 5: Mix in Flour Mixture
With your wet ingredients ready, gradually add half of the pre-mixed flour mixture to the bowl. Mix on low speed just until combined. Then, add the remaining flour mixture and continue mixing gently until no dry flour is visible. Avoid overmixing to keep your Halloween Candy Cookie Bars tender. Scrape down the sides of the bowl for a final mix, making sure everything is evenly combined.
Step 6: Fold in Candy
Fold in ½ cup of Reese’s Pieces and ½ cup of chocolate M&M's into the cookie dough using a spatula or wooden spoon. Mix by hand until the candy is evenly distributed throughout the dough for a delightful burst of color and flavor in every bite. This step truly enhances the fun aspect of your Halloween Candy Cookie Bars!
Step 7: Transfer Dough to Pan
Transfer the cookie dough to your prepared baking pan, spreading it evenly across the entire surface. Use lightly greased fingers or a piece of parchment paper to push the dough down gently until it's uniformly level in the pan. This will help your Halloween Candy Cookie Bars bake evenly and gives them a beautiful finish.
Step 8: Bake the Cookie Bars
Place the pan on the middle rack of your preheated oven and bake for 18 to 20 minutes. About halfway through, rotate the pan for even baking. The bars are done when they turn a lovely golden brown and a toothpick inserted into the center comes out clean or with a few moist crumbs.
Step 9: Prepare Extra Candy
While the Halloween Candy Cookie Bars bake, take this time to unwrap, break, and chop any leftover Halloween candy you plan to decorate the bars with. This could include peanut butter cups, Snickers, or any mix of your favorites! Set the prepared candy aside and get ready for the next delicious step.
Step 10: Top with Candy
Once the cookie bars are finished baking, remove them from the oven and immediately press your prepared pieces of candy into the top of the warm bars. This ensures that the candy adheres nicely as they cool, transforming your bars into a spooky and delicious treat.
Step 11: Cool and Slice
Let the Halloween Candy Cookie Bars cool completely in the pan on a wire rack. This should take about 30 minutes. Once cool, slice them into squares for serving. Enjoy the delightful mix of flavors and textures, perfect for sharing or treating yourself!
Halloween Candy Cookie Bars Variations
Feel free to get creative with these cookie bars, tailoring them to your taste and dietary needs!
-
Gluten-Free: Substitute all-purpose flour with a 1:1 gluten-free baking blend for delightful gluten-free bars.
-
Nuts Galore: Add ½ cup of chopped nuts like pecans or walnuts for a crunchy twist, enhancing the texture and flavor of your cookie bars.
-
Pumpkin Spice: Mix in 1 teaspoon of pumpkin spice for a seasonal twist that’s perfect for fall. This unique flavor combination will warm your heart!
-
Vegan: Swap butter for coconut oil and eggs for flax eggs to create a completely vegan version. The result will still be gooey and delicious!
-
Dairy-Free: Use dairy-free chocolate candies and dairy-free margarine for a cookie bar that's friendly to lactose-intolerant friends!
-
Heat it Up: Sprinkle in a pinch of cayenne pepper or crushed red pepper flakes for a surprising spicy kick that beautifully counteracts the sweetness.
-
Choco-Tastic: Double the chocolate by swapping M&Ms for chocolate chunks or adding dark chocolate chips to create a richer experience.
-
Fruity Fun: Toss in ½ cup of dried cranberries or chopped dried apricots for a chewy fruit addition that elevates each bite.
For more delightful recipes check out these scrumptious Lemon Brownie Bars or the ever-popular Biscoff Cheesecake Bars.
Expert Tips for Halloween Candy Cookie Bars
-
Choose Wisely: Use a mix of leftover Halloween candy that complements each other; chocolate with peanut butter or caramel adds delightful layers of flavor.
-
Don’t Overmix: When combining the flour mixture with wet ingredients, mix just until incorporated to ensure your Halloween Candy Cookie Bars stay soft and chewy.
-
Even Baking: Always rotate your baking pan halfway through the baking process to encourage even cooking and prevent unevenly baked cookie bars.
-
Cool Before Slicing: Allow the cookie bars to cool completely in the pan before slicing to ensure they hold their shape and don't crumble apart.
-
Add a Twist: Experiment with other mix-ins like chopped nuts or dried fruits for added texture and sweetness, personalizing your Halloween Candy Cookie Bars!
Make Ahead Options
These Halloween Candy Cookie Bars are perfect for meal prep enthusiasts! You can prepare the cookie dough up to 24 hours in advance and store it in an airtight container in the refrigerator to maintain its freshness. Just remember to press a piece of plastic wrap directly onto the surface to prevent the dough from drying out. When you're ready to bake, simply spread the dough into the prepared baking pan, add the mix-ins, and bake as directed. Additionally, you can chop any leftover Halloween candy and store it in a separate container at room temperature, ready to top the bars once they come out of the oven. These tips ensure that your bars will be just as delicious and ready to impress your family and friends, saving you precious time on busy weeknights!
How to Store and Freeze Halloween Candy Cookie Bars
Room Temperature: Store your Halloween Candy Cookie Bars in an airtight container at room temperature for up to 3 days. This keeps them soft and chewy for indulgent snacking.
Fridge: If you'd like to extend their freshness, refrigerate the bars in a sealed container for up to a week. Just allow them to reach room temperature before enjoying again.
Freezer: For longer storage, freeze the cookie bars by wrapping them tightly in plastic wrap and then placing them in a freezer-safe bag. They can last up to 2 months in the freezer.
Reheating: To enjoy frozen bars, thaw overnight in the refrigerator and then reheat in the microwave for 10-15 seconds or until soft.
What to Serve with Halloween Candy Cookie Bars
Transform your festive treat experience and elevate those sweet cookie bars into a spectacular meal moment!
- Vanilla Ice Cream: This classic pairing adds a creamy contrast, balancing the sweet, chewy cookie bars perfectly with each bite.
- Pumpkin Spice Latte: A cozy drink that complements the autumn vibes of Halloween while enhancing the rich flavors of the cookie bars.
- Chocolate Milk: An indulgent choice for both kids and adults, the thick cocoa richness pairs delightfully with the playful candies in the bars.
- Apple Slices: Crisp, fresh apple slices provide a refreshing crunch, offering a sweet yet tangy contrast to the sugary sweetness of the cookie bars.
- Whipped Cream: A fluffy dollop on top creates a delightful texture contrast and adds a light, airy touch to the decadent cookie bars.
- Coffee: The bitterness of freshly brewed coffee cuts through the rich sweetness, enhancing the overall flavor experience with each nibble.
- Caramel Sauce: Drizzling warm caramel sauce elevates the bars into a gooey, decadent treat that’s truly irresistible.
- Fresh Berries: The tartness of berries, like raspberries or strawberries, adds vibrant color and a delightful burst of freshness to balance the sweet treat.
- Milkshakes: A rich chocolate or peanut butter milkshake turns dessert into an extraordinary indulgence, perfectly pairing with your Halloween Candy Cookie Bars!
Halloween Candy Cookie Bars Recipe FAQs
How do I choose the best candies for my cookie bars?
Absolutely! Choosing the right candies can elevate your Halloween Candy Cookie Bars. I recommend selecting a mix that complements each other, like chocolate with peanut butter or caramel. For instance, Reese's peanut butter cups paired with M&M's or Snickers can create a delightful flavor explosion. Get creative and include your favorites to make these bars uniquely yours!
What’s the best way to store leftover cookie bars?
Very! To enjoy your Halloween Candy Cookie Bars at their best, place them in an airtight container at room temperature for up to 3 days. If you want to extend their deliciousness, refrigerate them in a sealed container for up to a week. Just remember to let them come to room temperature before diving in again.
Can I freeze these cookie bars, and how?
Of course! Freezing your Halloween Candy Cookie Bars is a great way to make them last longer. Wrap each bar tightly in plastic wrap, and then place them in a freezer-safe bag to protect against freezer burn. They can last up to 2 months in the freezer. When you’re ready to enjoy, just thaw overnight in the refrigerator and reheat in the microwave for 10-15 seconds for that fresh-baked softness.
What should I do if my cookie bars are too crumbly?
A common issue! If your Halloween Candy Cookie Bars turn out too crumbly, it might be due to overmixing the flour or not using enough butter. To help with this, make sure you’re mixing just until combined and not letting the dough dry out. If they do crumble, you can easily repurpose them into a delicious cookie crust for pie or as a topping for ice cream!
Are these cookie bars safe for pets or anyone with allergies?
Absolutely! While Halloween Candy Cookie Bars are a joy for humans, they aren't safe for pets, especially since chocolate can be toxic to dogs and cats. Additionally, watch out for common allergens like nuts or gluten. If you’re baking for someone with allergies, consider substituting with allergy-friendly candies and using gluten-free flour to keep everyone safe and happy!
Irresistible Halloween Candy Cookie Bars for Cozy Treats
Equipment
- Oven
- Mixing bowls
- stand mixer
- Baking Pan
- Parchment Paper
Ingredients
For the Cookie Base
- 2.25 cups unbleached all-purpose flour
- 1 teaspoon baking soda
- 0.75 teaspoon kosher salt
- 0.75 cups unsalted butter room temperature
- 0.75 cups dark brown sugar
- 0.75 cups granulated sugar
- 2 large eggs
- 1.5 teaspoons real vanilla extract
For the Candy Mix-Ins
- 0.5 cups Reese's Pieces
- 0.5 cups chocolate M&M's
- leftover Halloween candy e.g., Reese's peanut butter cups, Hershey bars, KitKat bars, Snickers, Butterfinger
For the Garnish
- candy eyes for decoration
Instructions
Step‑by‑Step Instructions for Halloween Candy Cookie Bars
- Preheat your oven to 350℉ (or 180℃). Line a 9 x 13 x 2 inch baking pan with parchment paper and spray lightly with nonstick spray.
- Combine 2¼ cups of unbleached all-purpose flour, 1 teaspoon of baking soda, and ¾ teaspoon of kosher salt in a mixing bowl and whisk thoroughly.
- In the stand mixer, cream together ¾ cup unsalted butter, ¾ cup dark brown sugar, and ¾ cup granulated sugar until creamy.
- Add the large eggs one at a time, mixing well after each, followed by 1½ teaspoons of real vanilla extract.
- Gradually mix in the dry flour mixture until just combined to keep the bars tender.
- Fold in ½ cup of Reese’s Pieces and ½ cup of chocolate M&M's into the cookie dough until evenly distributed.
- Transfer the cookie dough to the prepared baking pan, spreading it evenly and pressing it down gently.
- Bake for 18 to 20 minutes, rotating halfway through until golden brown and a toothpick comes out clean.
- Unwrap and chop extra Halloween candy while the cookie bars bake.
- Press prepared candy into the top of the warm cookie bars after removing them from the oven.
- Cool the cookie bars completely in the pan on a wire rack for about 30 minutes, then slice into squares.