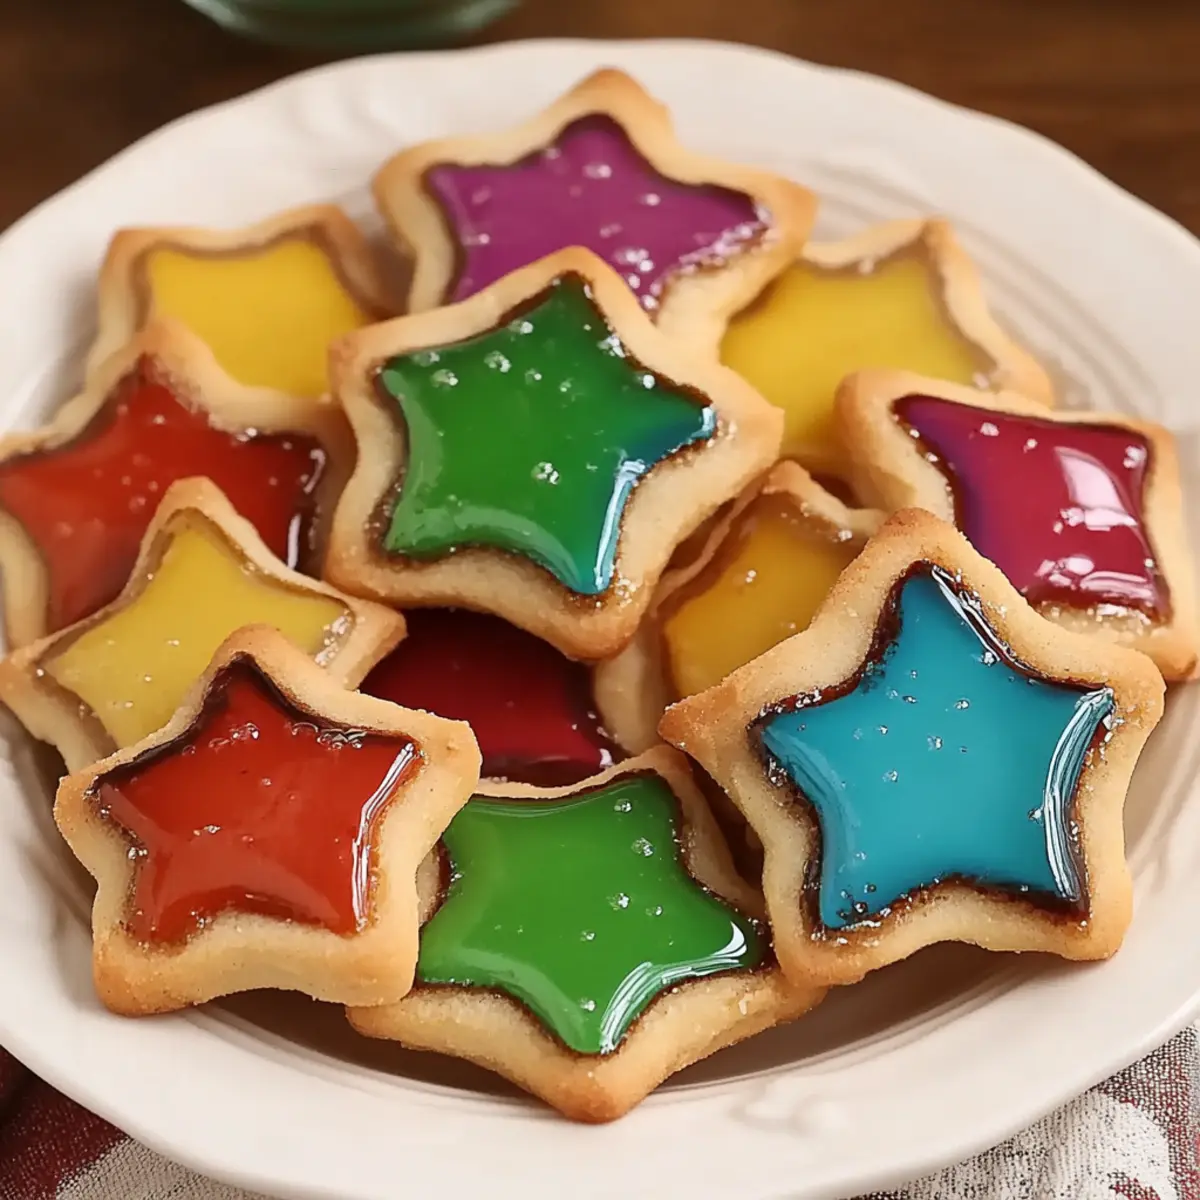
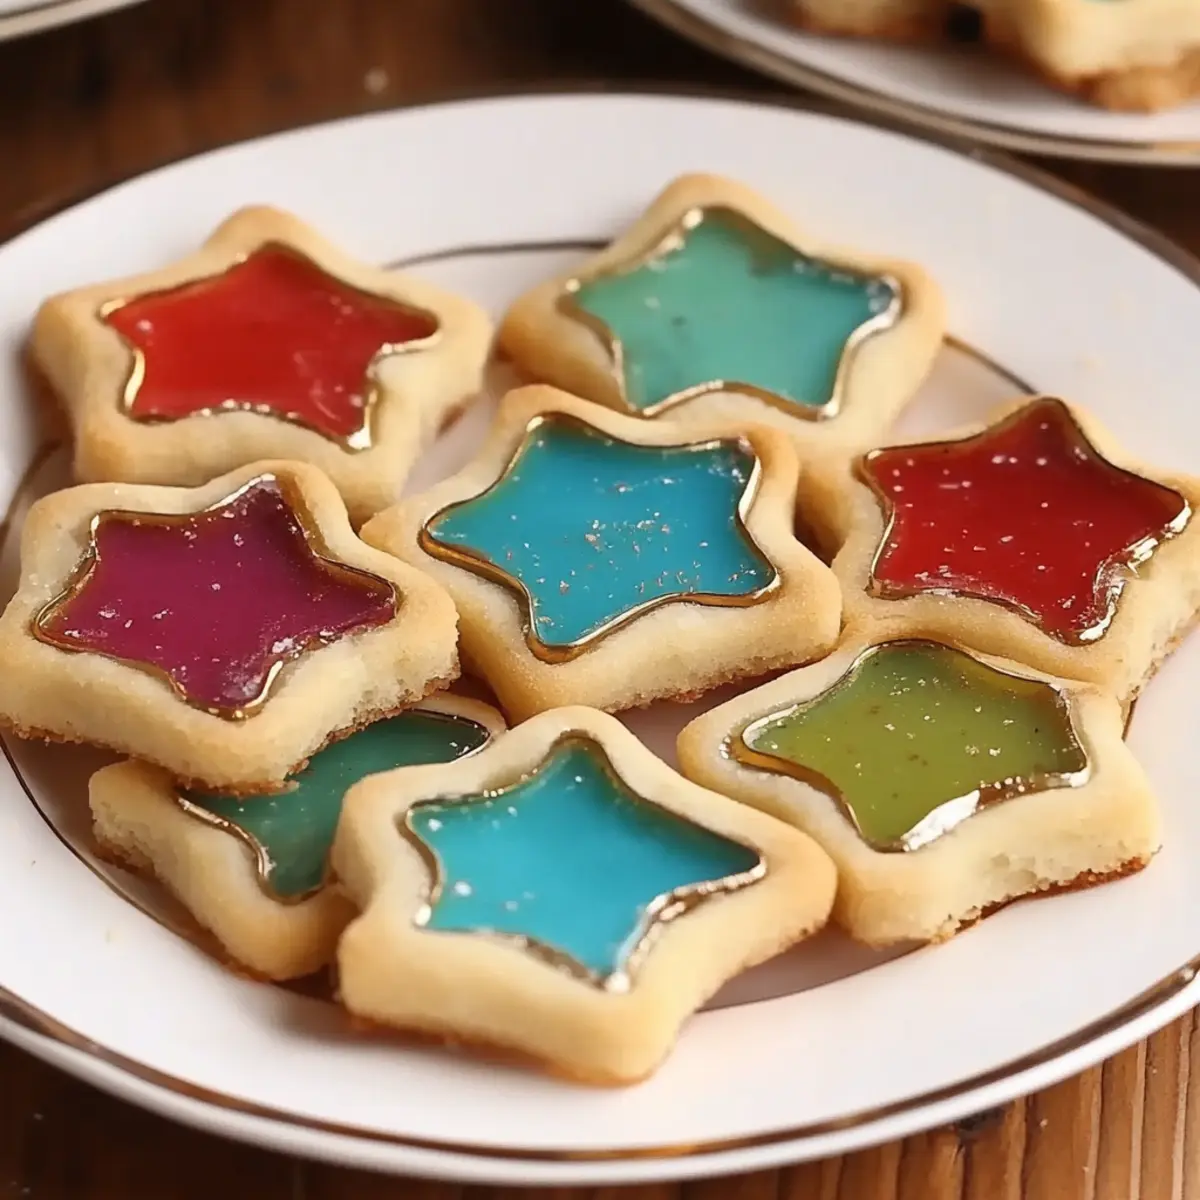
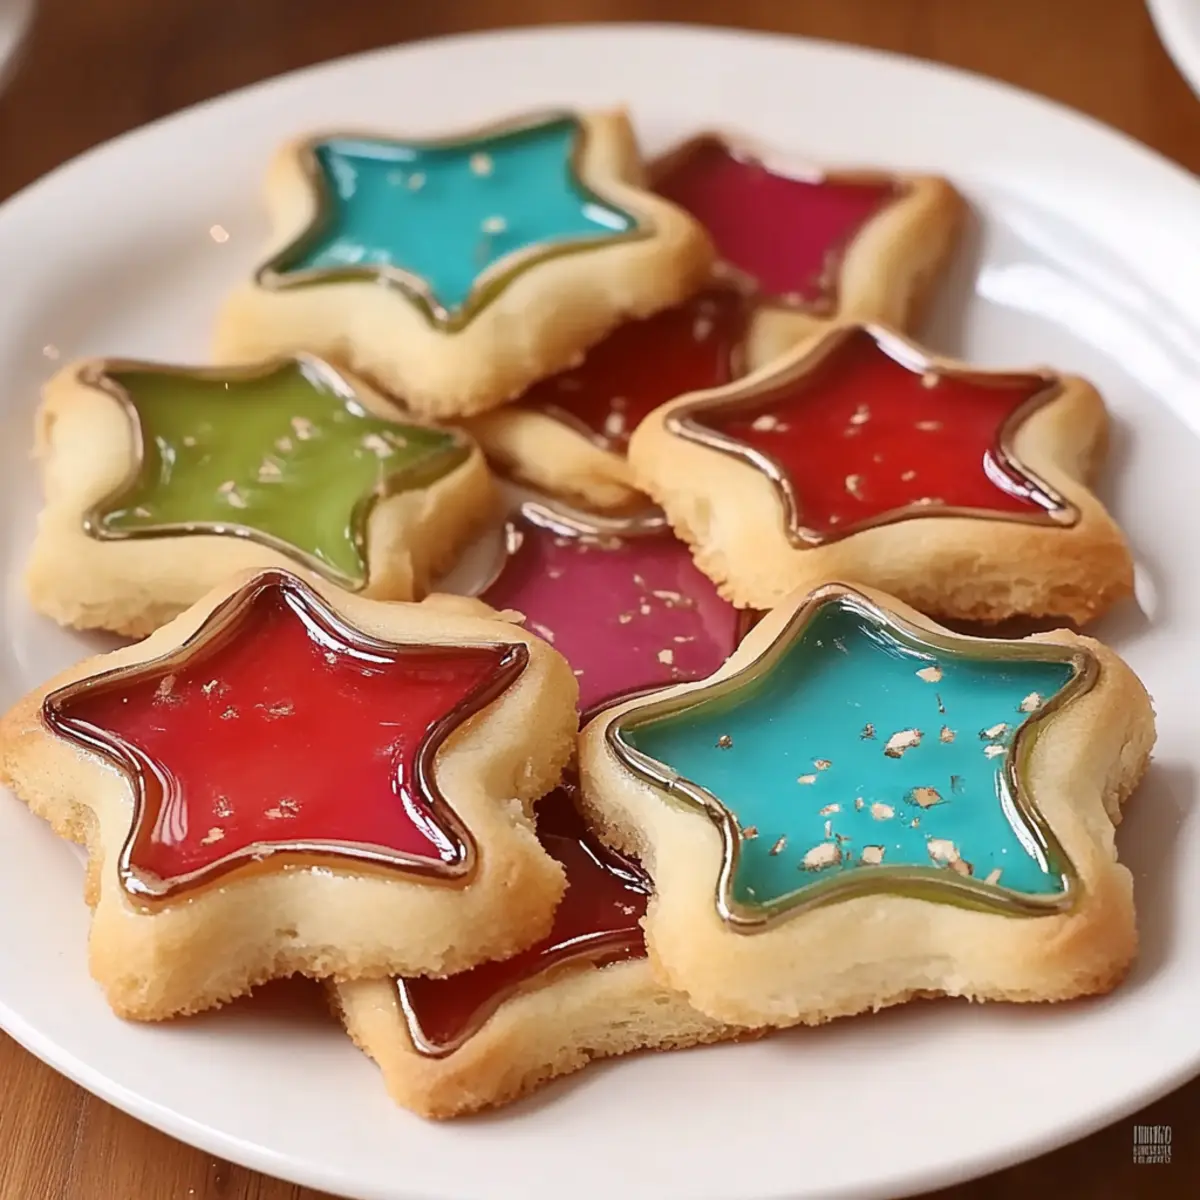
As I sift through my pantry, my eyes land on a vibrant assortment of hard candies, each one a potential artwork just waiting to be transformed. This is the magic of Stained Glass Cookies—an irresistible blend of buttery cookie goodness and colorful candy that melts into a dazzling centerpiece. Not only do these cookies impress with their eye-catching appeal, but they also bring the joy of baking to any kitchen. With minimal prep time and the allure of a fun homemade activity, they’re perfect for gatherings or simply indulging your inner child. So, grab your cookie cutters and let’s dive into creating these delicious, window-like treats that are bound to brighten up your day. What colors will you choose for your edible masterpiece?

Why Are Stained Glass Cookies So Special?
Visual Appeal: These cookies are not just tasty; they’re stunning! When the hard candies melt, they create a beautiful stained glass effect that delights both the eyes and the taste buds.
Fun to Make: Baking these cookies is a creative activity that the whole family can enjoy. Let your kids help choose and crush the candies for a delightful baking experience.
Versatile Options: You can customize the colors and flavors of these cookies by choosing different hard candies, making them perfect for any occasion!
Crowd-Pleaser: Whether it's a birthday party or a simple afternoon treat, these cookies are guaranteed to impress guests and keep them coming back for more.
Quick and Easy: With just 30 minutes of total time (including chilling), you can whip up a batch of these gorgeous treats without spending hours in the kitchen. For more fun cookie ideas, check out our best cookie recipes.
Stained Glass Cookies Ingredients
For the Cookie Dough
- All-purpose flour – 2 ¾ cups, a staple for achieving the perfect cookie texture.
- Baking powder – 1 teaspoon, to help the cookies rise and stay fluffy.
- Salt – ¼ teaspoon, enhancing the overall flavor of the dough.
- Unsalted butter – 1 cup, softened for a rich and creamy cookie base.
- Granulated sugar – 1 cup, sweetening up our delicious Stained Glass Cookies.
- Large egg – 1, binding the ingredients together and adding moisture.
- Vanilla extract – 2 teaspoons, infusing a warm and inviting flavor.
- Almond extract (optional) – ½ teaspoon, for a delightful twist on traditional flavor!
For the Candy Filling
- Assorted hard candies – as needed, choose your favorite colors to make the cookie centers truly pop!
Step‑by‑Step Instructions for Stained Glass Cookies
Step 1: Mix Dry Ingredients
In a medium bowl, whisk together 2 ¾ cups of all-purpose flour, 1 teaspoon of baking powder, and ¼ teaspoon of salt. This combination is crucial for your Stained Glass Cookies' structure and flavor. Set the bowl aside, ensuring the ingredients are evenly mixed for the perfect cookie texture.
Step 2: Cream Butter and Sugar
In a large mixing bowl, cream together 1 cup of softened unsalted butter and 1 cup of granulated sugar using an electric mixer on medium speed for about 2-3 minutes, until light and fluffy. This process adds air to the mixture, ensuring your cookies are soft and tender.
Step 3: Add Wet Ingredients
Next, add 1 large egg, 2 teaspoons of vanilla extract, and, if desired, ½ teaspoon of almond extract to the creamed butter and sugar. Mix well on low speed until all the ingredients are fully combined and smooth. The addition of these flavors creates a delicious base for your Stained Glass Cookies.
Step 4: Combine Dry and Wet Mixtures
Gradually add the prepared dry ingredients from Step 1 to the wet mixture, mixing on low speed just until combined. Be careful not to overmix; the dough should come together without streaks of flour, resulting in a soft and pliable cookie dough that's ready for chilling.
Step 5: Chill the Dough
Divide the cookie dough in half and shape each portion into a disc. Wrap each disc tightly with plastic wrap and refrigerate for at least 1 hour or until firm. Chilling the dough is crucial for easier rolling and cutting, ensuring your Stained Glass Cookies maintain their shape during baking.
Step 6: Preheat Oven and Prepare Baking Sheets
While the dough chills, preheat your oven to 350°F (175°C) and line your baking sheets with parchment paper. This step prepares your oven for baking, which is key to achieving that light golden edge on your cookies.
Step 7: Roll Out the Dough
On a lightly floured surface, roll out one disc of chilled dough to about ¼ inch thick. Use fun cookie cutters to cut out shapes, and remember to use a smaller cutter in the center to create the 'glass' shape. The vibrant colors of the filling will shine through once baked!
Step 8: Fill with Crushed Candy
Crush your assorted hard candies into small pieces using a zip-top bag and a rolling pin for a fun task. Fill the centers of each cookie cutout with the crushed candies, ensuring not to overfill, as the candy will melt during baking and create that stunning stained glass effect.
Step 9: Bake the Cookies
Place the filled cookies in your preheated oven and bake for 8-10 minutes. Keep an eye on them, baking until the edges are lightly golden. This step allows the candy to melt and form beautiful, colorful centers in your Stained Glass Cookies— the highlight of your homemade treats!
Step 10: Cool and Transfer
Once baked, allow the cookies to cool completely on the baking sheets for a few minutes before carefully transferring them to a wire rack. This cooling process ensures that your Stained Glass Cookies set perfectly and are easy to handle once they are cool.
What to Serve with Stained Glass Cookies
Indulging in these whimsical treats opens up a world of delightful possibilities for your perfect dessert table.
- Rich Hot Chocolate: A warm cup of rich hot chocolate brings out the sweetness in these cookies, creating a cozy pairing.
- Classic Milk: There’s something nostalgic about dipping these colorful cookies in cold milk, enhancing that buttery flavor.
- Vanilla Ice Cream: A scoop of vanilla ice cream adds creaminess and balances the sweetness, perfect for a luscious treat.
- Fruit Salad: A fresh fruit salad made with melons and berries contrasts the sugary cookies, adding a refreshing twist.
- Festive Cheeses: Pair with mild cheeses like brie, which offsets the sugary nature of the cookies and adds a savory note.
- Nutty Biscotti: Crunchy biscotti with almond notes adds a satisfying texture, making for a fun snack experience.
- Sparkling Lemonade: The effervescent citrus notes of chilled sparkling lemonade create a bright contrast to the sweetness of the cookies.
- Chocolate Drizzle: Drizzling warm chocolate over your cookies adds a decadence that will be adored by all chocolate lovers.
- Caramel Sauce: A dollop of warm caramel sauce creates a luscious layer of flavor that complements the cookie's buttery essence.
- Red Wine: For a mature twist, sip on a light-bodied red wine, enhancing the flavors of the cookies while elevating your dessert experience.
Expert Tips for Stained Glass Cookies
Chill the Dough: Keep the dough refrigerated for at least an hour, helping it to firm up and making it easier to roll out without sticking.
Choose Candies Wisely: Use hard candies that melt well, like Jolly Ranchers or Life Savers. Avoid candies with chewy centers, as they won't provide the glassy effect.
Don’t Overfill: When adding the crushed candies, fill the centers just enough to coat the dough without overflowing; this helps prevent mess during baking and ensures a beautiful result.
Golden Edges: Watch closely while baking—remove cookies when the edges are lightly golden to avoid overbaking and risking a hard texture.
Experiment with Shapes: Feel free to use various cookie cutter shapes for festive themes. The more unique the shape, the more fun your Stained Glass Cookies will be!
Make Ahead Options
These delightful Stained Glass Cookies are fantastic for meal prep, saving you time during busy weeks! You can prepare the cookie dough up to 24 hours in advance; simply follow the instructions until Step 5, and then wrap the shaped discs in plastic wrap and refrigerate. Additionally, you can also pre-chop the assorted hard candies up to 3 days ahead, storing them in an airtight container at room temperature to maintain their crunch. When you're ready to bake, roll out the dough, cut out the shapes, fill the centers with the crushed candies, and bake as directed. This way, your Stained Glass Cookies will be just as delicious and vibrant, making them the perfect sweet treat anytime!
Stained Glass Cookies Variations
Feel free to play with these delightful variations to make your Stained Glass Cookies even more special!
-
Gluten-Free: Swap all-purpose flour for a gluten-free blend, such as almond or oat flour. This allows those with dietary restrictions to enjoy the fun without missing out.
-
Nutty Twist: Add ½ cup finely chopped nuts to the dough for a delightful crunch. Walnuts or pecans pair wonderfully with the sweetness of the cookies.
-
Citrus Zest: Incorporate 1 tablespoon lemon or orange zest into the dough for a refreshing burst of citrus flavor. The bright notes enhance the sweetness and make each bite more exciting.
-
Chocolate-Candy Delight: Use mini chocolate chips or M&M's mixed with the crushed hard candies for added flavor and texture. This will make your cookies a decadent treat that appeals to chocolate enthusiasts.
-
Spicy Surprise: Add 1 teaspoon of cinnamon or ginger to the dough for a warm and spicy kick. This is a perfect way to differentiate your cookies for holiday gatherings!
-
Chewy Glass: Use soft caramels in place of hard candies for a chewy center. You'll create chewy stained glass cookies that offer a delightful contrast in texture.
-
Colorful Fun: Experiment with themed candy colors for holidays or special occasions, like red and green for Christmas or pastels for Easter. This adds a festive touch to your baking!
-
Higher Heat: For an extra touch of crunch, bake your cookies at 375°F (190°C) for the last minute or so for a crispier edge while maintaining that gooey center.
Explore these variations based on your preferences, and soon you'll have a batch of Stained Glass Cookies that's unique to you! For more inspiration, check out our best cookie recipes.
How to Store and Freeze Stained Glass Cookies
Room Temperature: Store cookies in an airtight container at room temperature for up to 3 days. This helps maintain their soft texture and vibrant stained glass effect.
Fridge: If you want to prolong freshness, keep your Stained Glass Cookies in the refrigerator for up to 1 week in a sealed container. This prevents them from drying out.
Freezer: For longer storage, freeze cookies for up to 3 months. Wrap them tightly in plastic wrap and place in a freezer-safe bag to prevent freezer burn.
Reheating: To enjoy frozen cookies, thaw them in the fridge overnight and warm in a 300°F (150°C) oven for 5-7 minutes for a fresh-baked feel.
Stained Glass Cookies Recipe FAQs
How do I choose the right hard candies for Stained Glass Cookies?
Absolutely! When selecting hard candies, opt for varieties like Jolly Ranchers or Life Savers, as they melt beautifully and create that stunning stained glass effect. Avoid candies with chewy centers, as they won't give the desired look and texture. The more vibrant the colors, the more enticing your cookies will be!
How should I store Stained Glass Cookies?
You can store your cookies at room temperature in an airtight container for up to 3 days. This keeps them fresh and maintains their delicious texture. If you want to extend their shelf life, refrigerate them in a sealed container for up to a week, which helps prevent drying out.
Can I freeze Stained Glass Cookies?
Yes, you can absolutely freeze these delightful cookies! Wrap them tightly in plastic wrap and store them in a freezer-safe bag to prevent freezer burn. They will stay fresh for up to 3 months. To enjoy, simply thaw overnight in the fridge and rewarm them in a 300°F (150°C) oven for about 5-7 minutes for that fresh-baked taste!
What should I do if my cookie dough is too sticky?
If your dough feels too sticky, don't worry! This can happen, especially if the butter is too warm. Try chilling the dough in the refrigerator for an extra 15-20 minutes, which should help it firm up. If it’s still sticky after chilling, you can lightly flour your rolling surface and your rolling pin while working with the dough.
Are there any dietary considerations I should keep in mind with Stained Glass Cookies?
Great question! For those with allergies, always check the ingredient labels of your hard candies, as some may contain nut-based products or gluten. If you or your guests have specific dietary restrictions, you can use allergy-friendly baking substitutes, like dairy-free butter and gluten-free flour, to accommodate. Just be sure to adjust baking times accordingly!
Delightful Stained Glass Cookies for Your Sweet Tooth
Equipment
- Mixing bowls
- Electric mixer
- cookie cutters
- Parchment Paper
- Rolling Pin
Ingredients
For the Cookie Dough
- 2 ¾ cups all-purpose flour for achieving the perfect cookie texture
- 1 teaspoon baking powder to help the cookies rise and stay fluffy
- ¼ teaspoon salt enhancing the overall flavor of the dough
- 1 cup unsalted butter softened for a rich and creamy cookie base
- 1 cup granulated sugar sweetening up our delicious Stained Glass Cookies
- 1 large egg binding the ingredients and adding moisture
- 2 teaspoons vanilla extract infusing a warm and inviting flavor
- ½ teaspoon almond extract optional for a delightful twist on traditional flavor
For the Candy Filling
- assorted hard candies choose your favorite colors to make the cookie centers truly pop!
Instructions
Step‑by‑Step Instructions
- In a medium bowl, whisk together the all-purpose flour, baking powder, and salt. Set aside.
- In a large mixing bowl, cream together the softened unsalted butter and granulated sugar using an electric mixer for about 2-3 minutes until light and fluffy.
- Add the large egg, vanilla extract, and almond extract to the creamed mixture. Mix well until combined and smooth.
- Gradually add the dry ingredients to the wet mixture, mixing on low speed just until combined. Do not overmix.
- Divide the dough in half, shape into discs, wrap in plastic wrap, and refrigerate for at least 1 hour.
- Preheat the oven to 350°F (175°C) and line baking sheets with parchment paper.
- Roll out one disc of chilled dough to about ¼ inch thick, cut shapes with cookie cutters, and cut out centers with a smaller cutter.
- Crush assorted hard candies in a zip-top bag, fill cookie cutouts with crushed candies, being careful not to overfill.
- Bake in the preheated oven for 8-10 minutes until the edges are lightly golden.
- Allow cookies to cool on baking sheets for a few minutes before transferring to a wire rack.