Walking into my kitchen, a delightful aroma immediately envelops me, whisking my thoughts back to sweet celebrations filled with laughter and joy. Today, I'm thrilled to share my take on Starbucks Copycat Birthday Cake Pops, a recipe that captures the essence of those festive moments in a fun and portable form! These Birthday Cake Pops not only offer a quick and playful way to satisfy any sweet tooth, but they also make for a fantastic party treat that everyone will adore—trust me, they disappear in no time! With simple ingredients and an easy process, you’ll find yourself reaching for these delightful bites again and again. Ready to bring a little birthday magic to your home? Let’s dive into this delightful DIY adventure!
Why are Birthday Cake Pops so irresistible?
Adorable, these Birthday Cake Pops not only look great but also pack a punch of flavor that will elevate any occasion. Quick to make, with simple steps and minimal ingredients, you can whip up a batch in no time—even if you’re a beginner! Versatile and fun, customize them with your favorite sprinkles or colors to match any party theme. Crowd-pleasing, these treats are always a hit, making them perfect for gatherings or a sweet surprise for loved ones. Ready to take a break from fast food? Check out our tips on making homemade treats to keep your kitchen buzzing with joy!
Birthday Cake Pops Ingredients
Get ready to create the most delightful Birthday Cake Pops!
For the Cake
• Vanilla cake mix – this is the base for our sweet, fluffy pops.
• Neutral oil (⅓ cup) – adds moisture; feel free to use avocado or canola.
• Milk (1 cup) – gives richness to the batter for that perfect flavor.
• Large eggs (4) – essential for binding and creating a light texture.
• Unsalted butter (¼ cup, softened) – brings a buttery richness to the cake.
For the Buttercream
• Powdered sugar (1 cup) – sweetens and thickens the frosting.
• Vanilla extract (1 teaspoon) – elevates the flavors of the buttercream.
• Pinch salt – balances the sweetness for a more complex flavor.
• Milk (1 teaspoon, add more if needed) – adjust for desired consistency.
For the Coating
• Candy melts (12 oz) – this is the colorful coating that makes the pops irresistible.
• White nonpareils or sprinkles – a fun finishing touch that brings joy to every bite!
With these simple ingredients, you’re well on your way to making unforgettable Birthday Cake Pops that’ll wow your friends and family!
Step‑by‑Step Instructions for Birthday Cake Pops
Step 1: Preheat and Prepare
Preheat your oven to 325-350°F (162-175°C). While the oven heats, prepare a baking pan by greasing or lining it with parchment paper. This will ensure your delicious Birthday Cake Pops release easily after baking. Gather all your ingredients to streamline the process.
Step 2: Mix the Batter
In a large mixing bowl, combine the vanilla cake mix, neutral oil, milk, eggs, and softened butter. Stir together until the batter is smooth and well-blended, taking care to remove any lumps. Pour the batter into the prepared baking pan, spreading it out evenly to ensure even baking.
Step 3: Bake the Cake
Slide the cake into the preheated oven and bake for 25-30 minutes, or until a toothpick inserted in the center comes out clean. It’s crucial not to overbake—keep an eye on it and check for doneness 2-4 minutes before the timer goes off. Once done, let it cool for a few minutes in the pan.
Step 4: Crumble the Cake
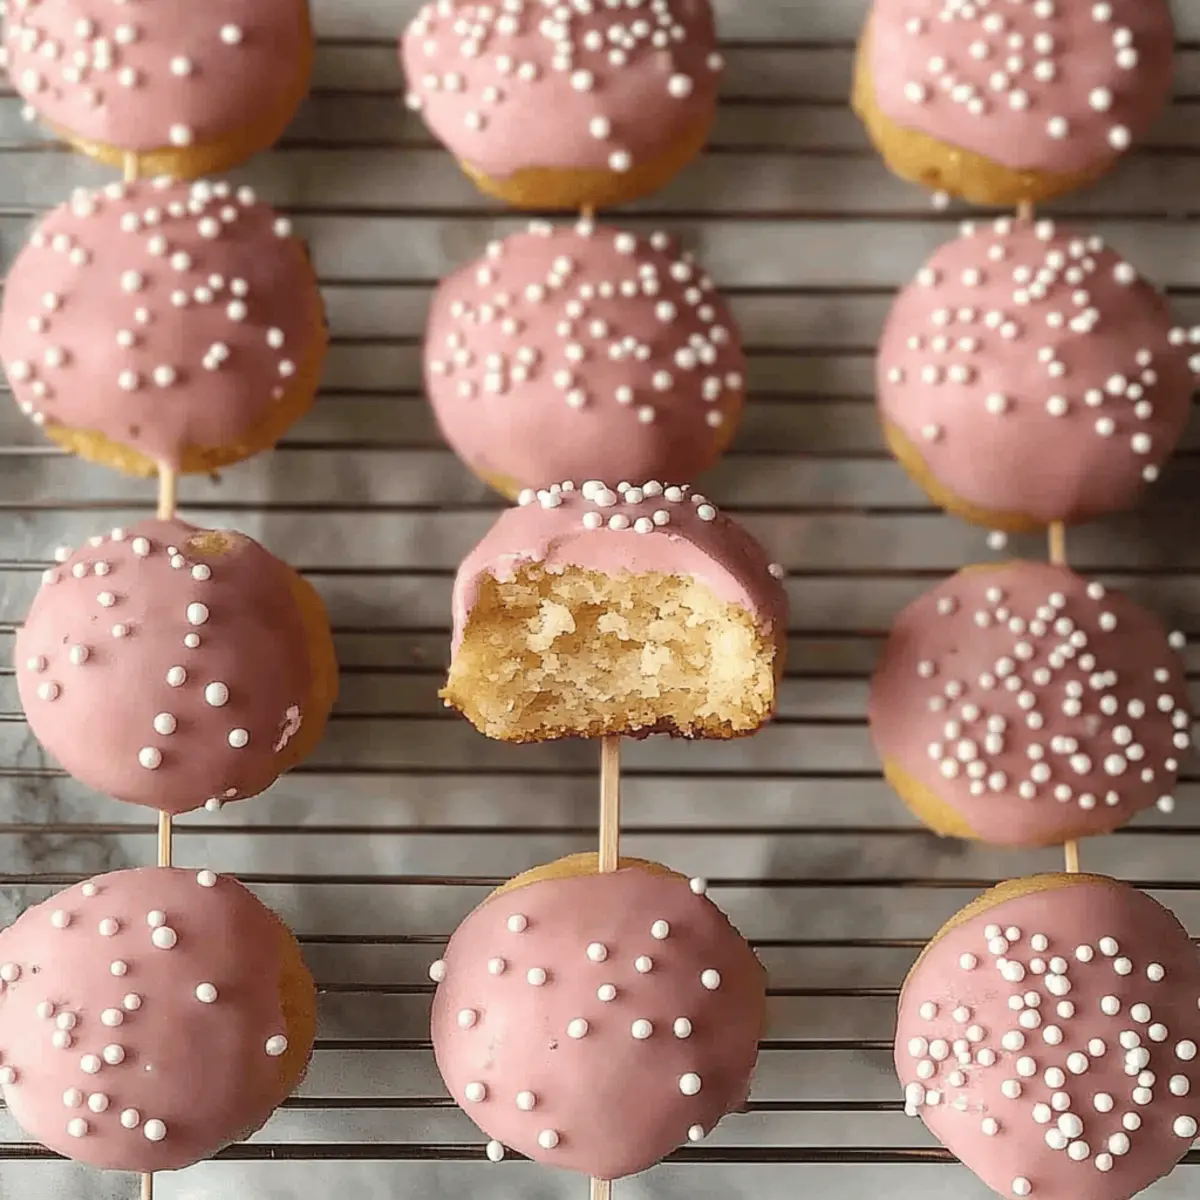
Carefully turn the cooled cake out onto a large mixing bowl while it’s still warm, as this helps with crumbling. Using either a stand mixer or your hands, crumble the cake until no large pieces remain. The texture should resemble fine crumbs to create the perfect base for your Birthday Cake Pops.
Step 5: Prepare the Buttercream
In a separate small mixing bowl, combine the powdered sugar, vanilla extract, pinch of salt, and milk. Stir until the buttercream is smooth and creamy, adjusting the milk if necessary to achieve a spreadable consistency. This buttery frosting will enhance the flavor of your Birthday Cake Pops.
Step 6: Combine Mixtures
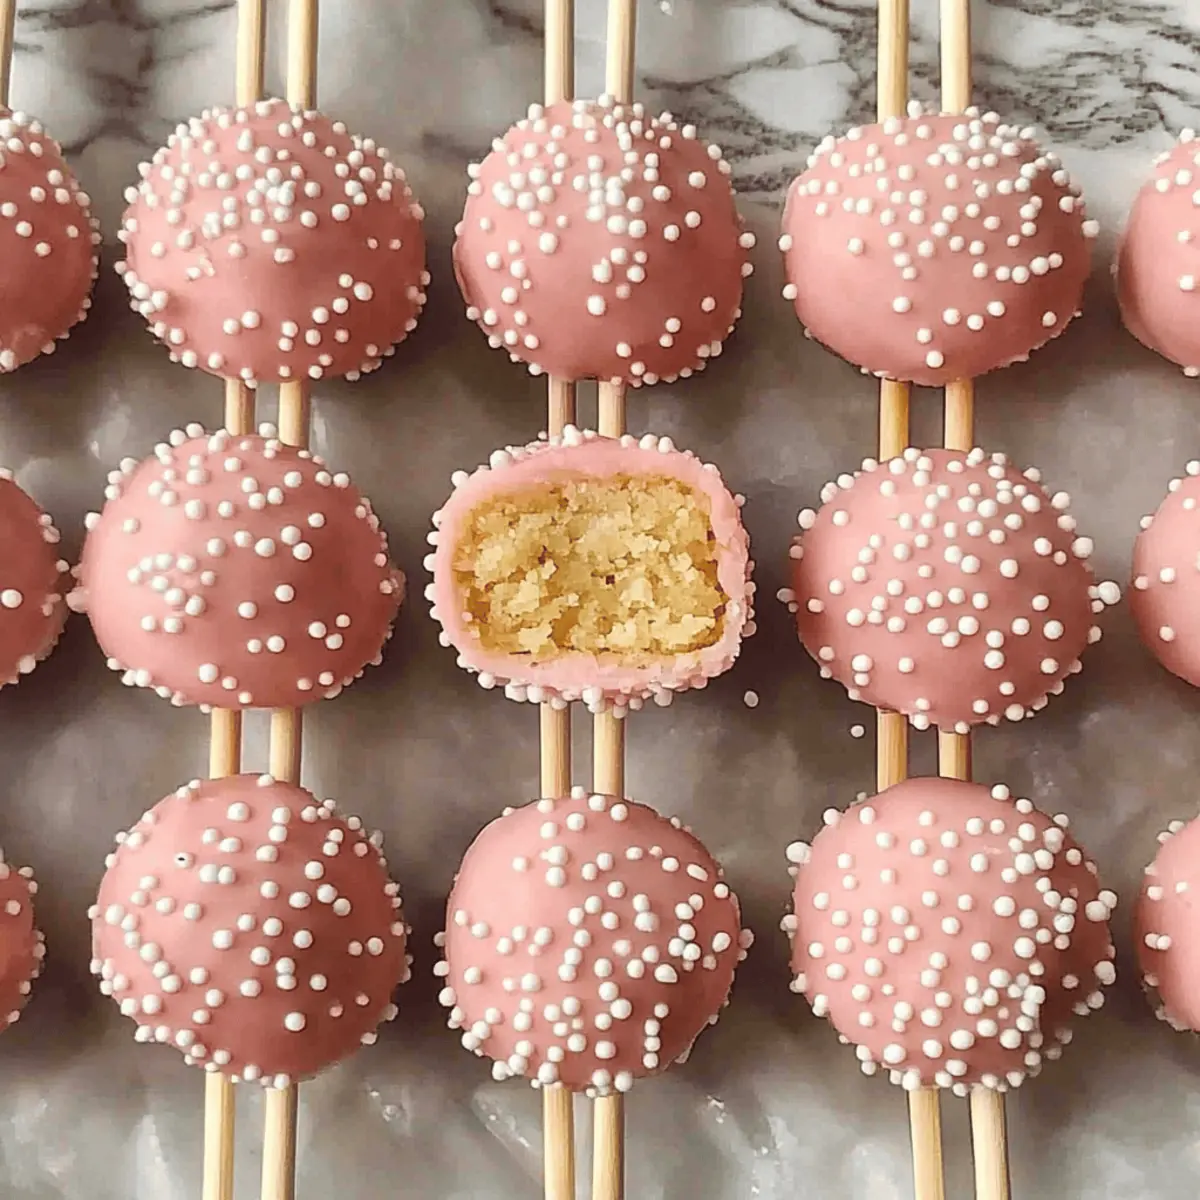
Add the buttercream to the crumbled cake mixture, using your hands or a spatula to mix until fully incorporated. The mixtures should meld together to form a moldable dough-like texture, creating a rich flavor profile for your Birthday Cake Pops. Once combined, take a moment to enjoy the delightful aroma.
Step 7: Shape the Cake Balls
Roll the combined mixture into balls, approximately 1¼ inches in diameter (about 30g each). This size is perfect for the pops! Once shaped, lay them out on a lined baking sheet and chill the cake balls in the freezer for 15 minutes to firm up, making them easier to work with.
Step 8: Prepare the Candy Coating
While the cake balls chill, melt a small amount of pink candy melts in the microwave. Follow the package instructions, typically heating in 30-second intervals and stirring until smooth. This coating will provide a beautiful and tasty finish to your Birthday Cake Pops.
Step 9: Insert Lollipop Sticks
After the cake balls are chilled, dip the tip of each lollipop stick into the melted candy melts. Insert the sticks halfway into the chilled cake balls to help secure them during coating. This step is essential for ensuring your Birthday Cake Pops are sturdy and ready for dipping.
Step 10: Chill Again
Return the dipped cake balls to the freezer for another 15 minutes. This helps the pink candy melts set slightly, creating a stronger bond between the stick and the cake ball. Use this time to clean up your workspace or prepare your decorating supplies.
Step 11: Bring to Room Temperature
Remove the cake pops from the freezer and let them sit at room temperature for 10 minutes. This slight warming will make them easier to coat. While they rest, melt the remaining candy melts in a microwave-safe bowl until completely smooth and free of lumps.
Step 12: Dip the Cake Pops
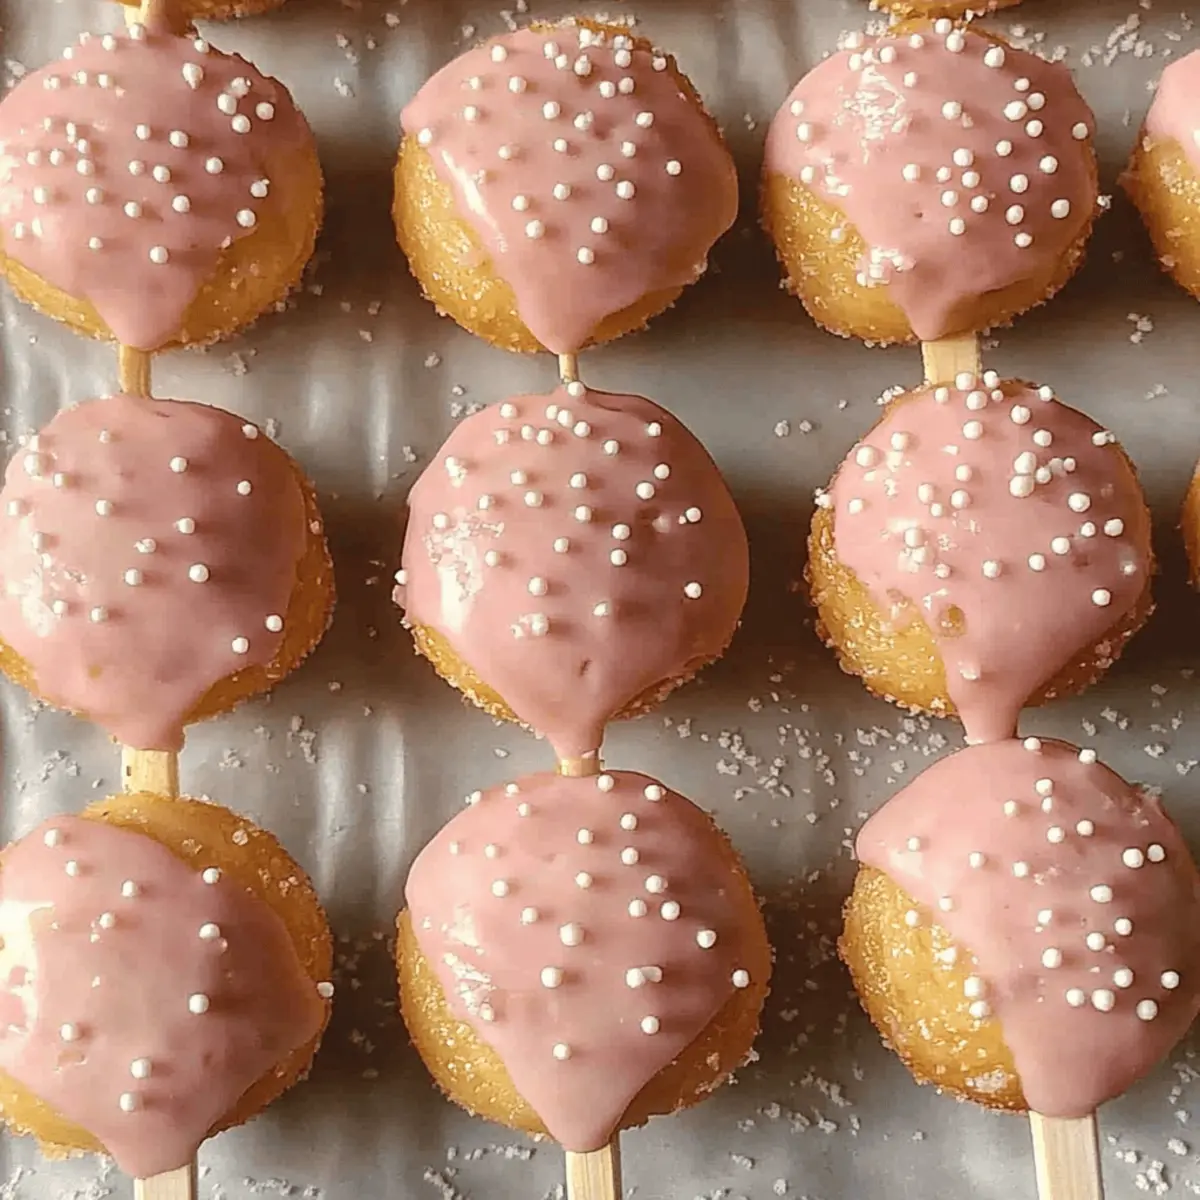
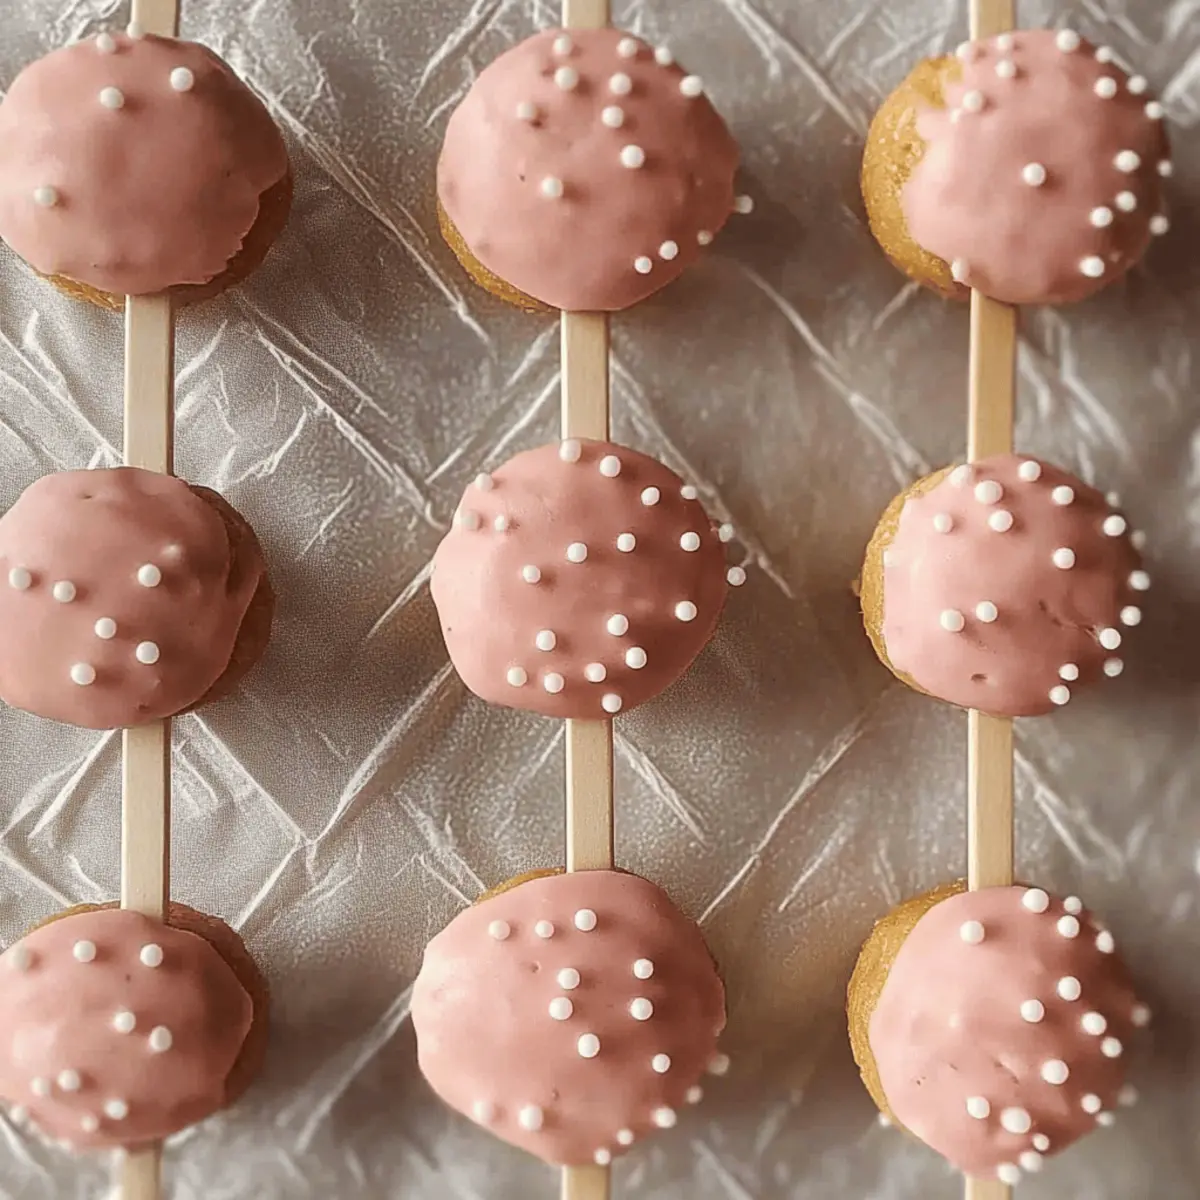
Carefully dip each cake pop into the melted candy melts, ensuring they are submerged all the way to the stick. Swirl gently to coat evenly and avoid pooling. The vibrant coating is what will make these Birthday Cake Pops visually stunning!
Step 13: Remove Excess Coating
Gently tap the lollipop stick against the edge of the bowl to remove excess melted candy. This ensures a smooth, even layer on your Birthday Cake Pops while preventing drips. Avoid re-dipping to keep the coating flawless.
Step 14: Add Sprinkles
Immediately sprinkle your favorite nonpareils or sprinkles onto the wet candy coating. Working quickly is key, as the candy melts will dry fast. This fun addition not only enhances the flavor but also makes these Birthday Cake Pops irresistible and festive!
Step 15: Let Dry
Finally, place the decorated cake pops upright into a styrofoam block or a tall glass to allow them to dry completely. This will help them maintain their shape while setting. Once dried, marvel at your delightful creations ready to be shared and enjoyed!
Birthday Cake Pops: Flavorful Twists Await!
Feel free to get creative with these Birthday Cake Pops and make them your own—each variation is deliciously unique!
-
Gluten-Free: Swap vanilla cake mix with a gluten-free blend. Your pops will still be delightful, just minus the gluten!
-
Vegan: Use plant-based milk, egg replacers, and vegan butter. These cake pops will be just as scrumptious and everyone can enjoy!
-
Chocolate Lovers: Substitute half the cake mix with chocolate cake mix for a rich, dual-flavored treat. It’s a decadent twist that will surprise and delight.
-
Nutty Addition: Mix in a handful of chopped nuts like almonds or walnuts. This adds a delightful crunch and a new flavor profile to your cake pops!
-
Coconut Bliss: Add shredded coconut to the cake batter for a tropical flair that's sure to please coconut fans. Plus, roll the pops in coconut for a finishing touch.
-
Spicy Kick: Infuse your buttercream with a dash of cinnamon or cayenne pepper for a flavor burst that'll intrigue brave taste buds.
-
Festive Royale: Use colored candy melts to coat your pops according to seasonal themes. Bring joy to holidays or birthdays with eye-catching hues!
-
Cheesecake Style: Incorporate cream cheese into the cake mixture for a tangy, creamy texture. This will take your pops to a new decadent level!
Recipe customization is part of the fun! Want more sweet inspiration? Discover tips on baking with seasonal flavors and keep every dessert exciting.
Expert Tips for Birthday Cake Pops
Texture Matters: Ensure your cake is crumbled finely for uniform cake pops; large pieces can lead to uneven shapes.
Chill Well: After shaping the cake balls, chilling is crucial. This step keeps them firm during dipping and prevents breaking.
Coating Control: Don’t over-dip! Tap excess candy coating off gently to avoid drips and achieve a smooth finish on your Birthday Cake Pops.
Colorful Customization: Experiment with different colors of candy melts and sprinkles to match the theme of your celebration or personal preference.
Clean Workstation: Keep your workspace tidy while crafting; it makes decorating and assembly easier and more enjoyable!
Make Ahead Options
These Birthday Cake Pops are perfect for meal prep enthusiasts! You can prepare the cake base up to 24 hours in advance by baking it, then crumbling and mixing with the buttercream. Store the mixture in an airtight container in the refrigerator to keep it fresh. Additionally, you can roll the cake balls and freeze them for up to 3 days. Just remember to thaw them in the fridge before dipping. When ready to finish, simply melt the candy melts, dip each cake pop, and decorate with sprinkles before letting them dry. This way, you'll have delightful treats on hand with minimal last-minute effort!
How to Store and Freeze Birthday Cake Pops
Room Temperature: Keep your Birthday Cake Pops in an airtight container at room temperature for up to 3 days for the best flavor and freshness.
Fridge: If you prefer, store them in the fridge for up to a week. Just ensure they are in an airtight container to avoid drying out.
Freezer: For longer storage, freeze your Birthday Cake Pops by placing them in a single layer in a freezer-safe container, separated by parchment paper, for up to 2 months.
Reheating: To enjoy your frozen cake pops, allow them to thaw in the fridge overnight, then let them sit at room temperature for a few minutes before devouring!
What to Serve with Birthday Cake Pops
Elevate your celebration with delightful pairings that bring out the joy in every bite!
-
Sweet Fruit Platter: A colorful array of fresh fruits balances the sweetness of your cake pops, offering a refreshing contrast. The mix of juicy strawberries, tangy pineapple, and ripe bananas complements the rich flavors perfectly.
-
Chocolate Dipped Strawberries: Indulge in this classic treat; the luscious chocolate and tart strawberries are heavenly together. Each bite harmonizes beautifully with the sweet birthday cake flavors.
-
Fluffy Whipped Cream: Light and airy, whipped cream is a lovely topping that adds creaminess without overwhelming sweetness. A dollop alongside your cake pops can create a delightful experience.
-
Sparkling Water with Citrus: Refreshing and bubbly, sparkling water infused with lemon or lime offers a palate-cleansing sip. This light drink complements the birthday vibes while balancing the sweetness of the cake pops.
-
Vanilla Ice Cream: Creamy and comforting, vanilla ice cream is an ideal accompaniment to the playful morsels. Enjoying one of each in a single bite is an experience that feels like a tasty hug.
-
Chocolate Milk: For a nostalgic twist, serve chilled chocolate milk. Its chocolaty goodness resonates well with the cake pops and brings back sweet childhood memories.
-
Mini Cupcakes: Create a dessert table by adding mini cupcakes in various flavors. These treats provide a fun texture and flavor variety, keeping your guests smiling with every bite.
-
Milkshakes: Creamy milkshakes in vanilla or strawberry flavors pack a delightful punch of sweetness. Their thickness makes for a decadent pairing that pairs wonderfully with the soft cake inside.
-
Coffee or Espresso: For a touch of sophistication, serve your cake pops alongside a cup of rich coffee or espresso. The bitter notes balance out the sweetness and enhance the flavor of the cake pops, perfect for adult gatherings!
Birthday Cake Pops Recipe FAQs
What’s the best way to select ripe ingredients for my Birthday Cake Pops?
Absolutely! When it comes to selecting eggs, look for ones that are clean and uncracked. For milk, choose fresh, well-sealed containers, preferably with a date further in the future. The vanilla cake mix should be within the expiration date printed on the box, ensuring you get the fluffy texture you want in your pops.
How should I store leftover Birthday Cake Pops?
Very simple! Store your Birthday Cake Pops in an airtight container at room temperature for up to 3 days for optimal flavor. If you’d like to extend their freshness, transfer them to the fridge where they can last for about a week. Always be sure they are sealed properly to prevent drying out—no one wants a stale treat!
Can I freeze my Birthday Cake Pops, and if so, how?
Absolutely! Freezing is a great option for longer storage. To freeze your Birthday Cake Pops, place them on a baking sheet lined with parchment paper and freeze until solid—about 1-2 hours. Once frozen, transfer them to a freezer-safe container, placing parchment paper between layers to prevent sticking. They can be stored for up to 2 months. To enjoy them, simply thaw in the fridge overnight before serving!
What should I do if my cake pops are crumbling or falling off the stick?
Very common challenge! If your Birthday Cake Pops are crumbling or falling off, it could be due to not mixing the cake and buttercream thoroughly. Ensure the cake is crumbled into fine pieces before adding the frosting. Also, chilling the cake balls enough (around 15-30 minutes) helps firm them up for easier dipping. If they are still falling, try using sturdier lollipop sticks or make sure to dip the stick in the melted coating before inserting it into the cake ball—the coating helps to bond them together.
Are these Birthday Cake Pops safe for kids with allergies?
Great question! These Birthday Cake Pops contain eggs, milk, and wheat (from the cake mix), which are common allergens. If you’re making them for children with food allergies, consider using allergy-friendly ingredients such as egg replacers, dairy-free milk, and gluten-free cake mix alternatives. Always check labels carefully to ensure safety!
How long do Birthday Cake Pops last after baking?
Typically, your freshly baked Birthday Cake Pops can stay tasty for 3 days at room temperature. However, if you store them in the fridge, they can last up to a week. Keeping them in airtight containers is key to preserving their deliciousness, allowing you to enjoy that celebratory feeling for days to come!
Irresistible Birthday Cake Pops That Wow Every Party!
Equipment
- Mixing bowl
- Baking Pan
- spatula
- Microwave
- Freezer
- Styrofoam Block or Glass
Ingredients
For the Cake
- 1 box Vanilla cake mix
- ⅓ cup Neutral oil Use avocado or canola if desired
- 1 cup Milk Gives richness
- 4 large Eggs Essential for binding
- ¼ cup Unsalted butter Softened
For the Buttercream
- 1 cup Powdered sugar
- 1 teaspoon Vanilla extract
- Pinch salt Balances sweetness
- 1 teaspoon Milk Adjust for desired consistency
For the Coating
- 12 oz Candy melts Colorful coating
- White nonpareils or sprinkles Fun finishing touch
Instructions
Preparation Steps
- Preheat your oven to 325-350°F (162-175°C) and prepare a baking pan by greasing or lining with parchment paper.
- In a large mixing bowl, combine the vanilla cake mix, neutral oil, milk, eggs, and softened butter. Stir until smooth.
- Pour the batter into the prepared baking pan and bake for 25-30 minutes, or until a toothpick comes out clean.
- Once baked, cool the cake for a few minutes in the pan, then crumble the cooled cake into fine crumbs in a large bowl.
- In a separate bowl, combine powdered sugar, vanilla extract, salt, and milk, stirring until the buttercream is smooth and creamy.
- Add the buttercream to the crumbled cake and mix until fully incorporated, creating a moldable dough-like texture.
- Roll the mixture into balls about 1¼ inches in diameter and place them on a lined baking sheet. Chill in the freezer for 15 minutes.
- While the cake balls chill, melt a small amount of candy melts in the microwave until smooth.
- Dip the tip of each lollipop stick into the melted candy and insert halfway into the chilled cake balls.
- Chill the dipped cake balls again for 15 minutes to set the candy coating slightly.
- Remove the cake pops and let them sit at room temperature for 10 minutes before dipping them in the remaining melted candy melts.
- Dip each cake pop into the melted candy melts, ensuring they are fully coated, then tap to remove excess coating.
- Immediately sprinkle your favorite nonpareils or sprinkles onto the wet candy coating.
- Place the decorated cake pops upright into a styrofoam block or glass to dry completely.