The kitchen fills with a sweet aroma as I roll out my Christmas Pinwheel Cookies, a delightful combination of rich chocolate and festive vanilla. This holiday season, I wanted to create something that would not only please the eyes but also bring joy to the taste buds. These cookies are a magical blend of colors and flavors that transform any gathering into a celebration, making them a perfect addition to your holiday cookie platter. With a quick prep time and the fun of rolling dough, they’re a delightful project for both seasoned bakers and kitchen novices alike. Plus, the cheerful sprinkle topping gives a touch of whimsy that everyone will love, and they freeze beautifully, so you can save some for later! Are you ready to learn how to craft these vibrant treats that will surely become a nostalgic favorite?
What Makes These Cookies So Special?
Bold colors and delightful flavors make these Christmas Pinwheel Cookies a festive showstopper! Easy to make, even beginner bakers can join in the fun as they roll, slice, and bake their way to holiday joy. Versatile options let you switch up the toppings with sprinkles or crushed peppermint candies for added flair, making them perfect for any gathering. Freezable and shareable, these cookies are perfect for batch-making to share with friends and family. Plus, aromas from the oven will transport you to a winter wonderland, adding magic to your holiday gatherings.
Christmas Pinwheel Cookies Ingredients
• Get ready to create festive delights!
For the Dough
- Unsalted butter – this key ingredient provides a rich, creamy base for the cookies.
- Granulated sugar – sweetens the dough, helping achieve a light and fluffy texture.
- Large egg – binds the ingredients together for more cohesive dough.
- Vanilla extract – adds a warm, sweet aroma that complements the holiday spirit.
- All-purpose flour – forms the structure of the cookies, providing that perfect chewy texture.
- Baking powder – gives the cookies a lightness and helps them rise in the oven.
- Salt – enhances the flavors of the other ingredients, balancing the sweetness.
For the Chocolate Variation
- Unsweetened cocoa powder – introduces rich chocolatey flavor to the cookie dough, making them even more festive.
For the Topping
- Red and green sprinkles (or colored sugar) – adds a cheerful, colorful touch that’s perfect for Christmas.
- Crushed peppermint candies – a fun variation to introduce a bit of minty freshness to your treats.
These Christmas Pinwheel Cookies will surely be a hit at your gatherings!
Step‑by‑Step Instructions for Christmas Pinwheel Cookies
Step 1: Preheat the Oven
Start your cookie adventure by preheating your oven to 350°F (175°C). While the oven warms, line two baking sheets with parchment paper, creating a non-stick surface for your delightful Christmas Pinwheel Cookies. This preparation will ensure an even bake and easy transfer once your cookies are ready.
Step 2: Cream Butter and Sugar
In a large mixing bowl, add 1 cup of softened unsalted butter and 1 ½ cups of granulated sugar. Using a hand mixer or a stand mixer, cream the mixture on medium speed until it transforms into a light, fluffy texture, about 2-3 minutes. This step is crucial for ensuring your cookies will rise beautifully in the oven.
Step 3: Incorporate Egg and Vanilla
Next, beat in 1 large egg and 1 teaspoon of vanilla extract into the butter-sugar mixture. Continue mixing until all ingredients are well combined and the batter is smooth and creamy. The addition of egg and vanilla creates a rich flavor base for your Christmas Pinwheel Cookies.
Step 4: Combine Dry Ingredients
In a separate bowl, whisk together 2 ½ cups of all-purpose flour, 1 teaspoon of baking powder, and ¼ teaspoon of salt. This dry mixture adds structure and rise to your cookies. Once combined, gradually add this flour mixture to your wet ingredients in the large bowl, stirring until just incorporated to avoid overmixing.
Step 5: Divide the Dough
Take the cookie dough and divide it into two equal portions. Keep one half as is for the vanilla layer, and set it aside. In the other portion, sprinkle in ⅓ cup of unsweetened cocoa powder. Mix this chocolate powder into the dough until fully integrated, giving you a rich chocolate base alongside the vanilla.
Step 6: Roll Out the Dough
On a floured surface, place the plain dough between two sheets of parchment paper. Roll it out into a rectangle that's about ¼ inch thick, making sure to maintain an even thickness. Do the same with the chocolate dough, ensuring both layers are of similar size, which is essential for a perfect pinwheel effect.
Step 7: Layer the Doughs
Once you have both layers rolled out, carefully peel away the top layer of parchment from the chocolate dough. Gently lay it sticky-side down over the plain dough, aligning the edges. This step is where your Christmas Pinwheel Cookies begin to take shape with their beautiful contrasting colors.
Step 8: Roll Up the Dough
Starting from one long side, gradually roll the layered dough into a tight log, using the parchment paper to help you keep the roll even. Be sure not to compress the dough too much; a snug roll is key to achieving that delightful pinwheel appearance when sliced.
Step 9: Chill the Dough
Wrap the dough log tightly in plastic wrap and place it in the refrigerator for at least 30 minutes. Chilling the dough allows it to firm up, making it much easier to slice evenly when you’re ready to bake your Christmas Pinwheel Cookies.
Step 10: Slice the Cookies
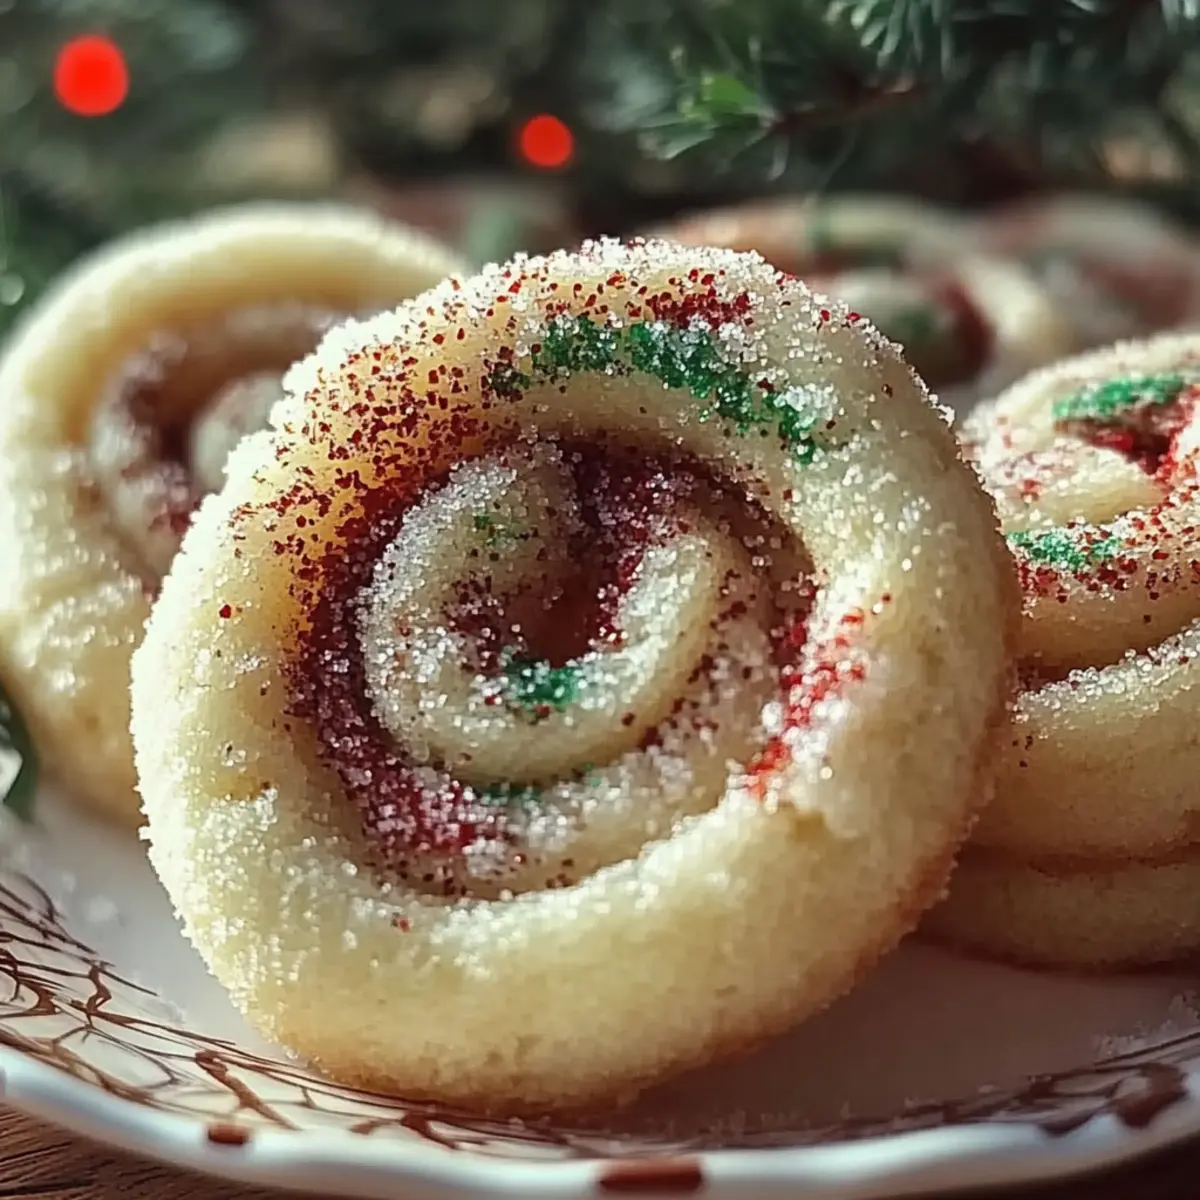
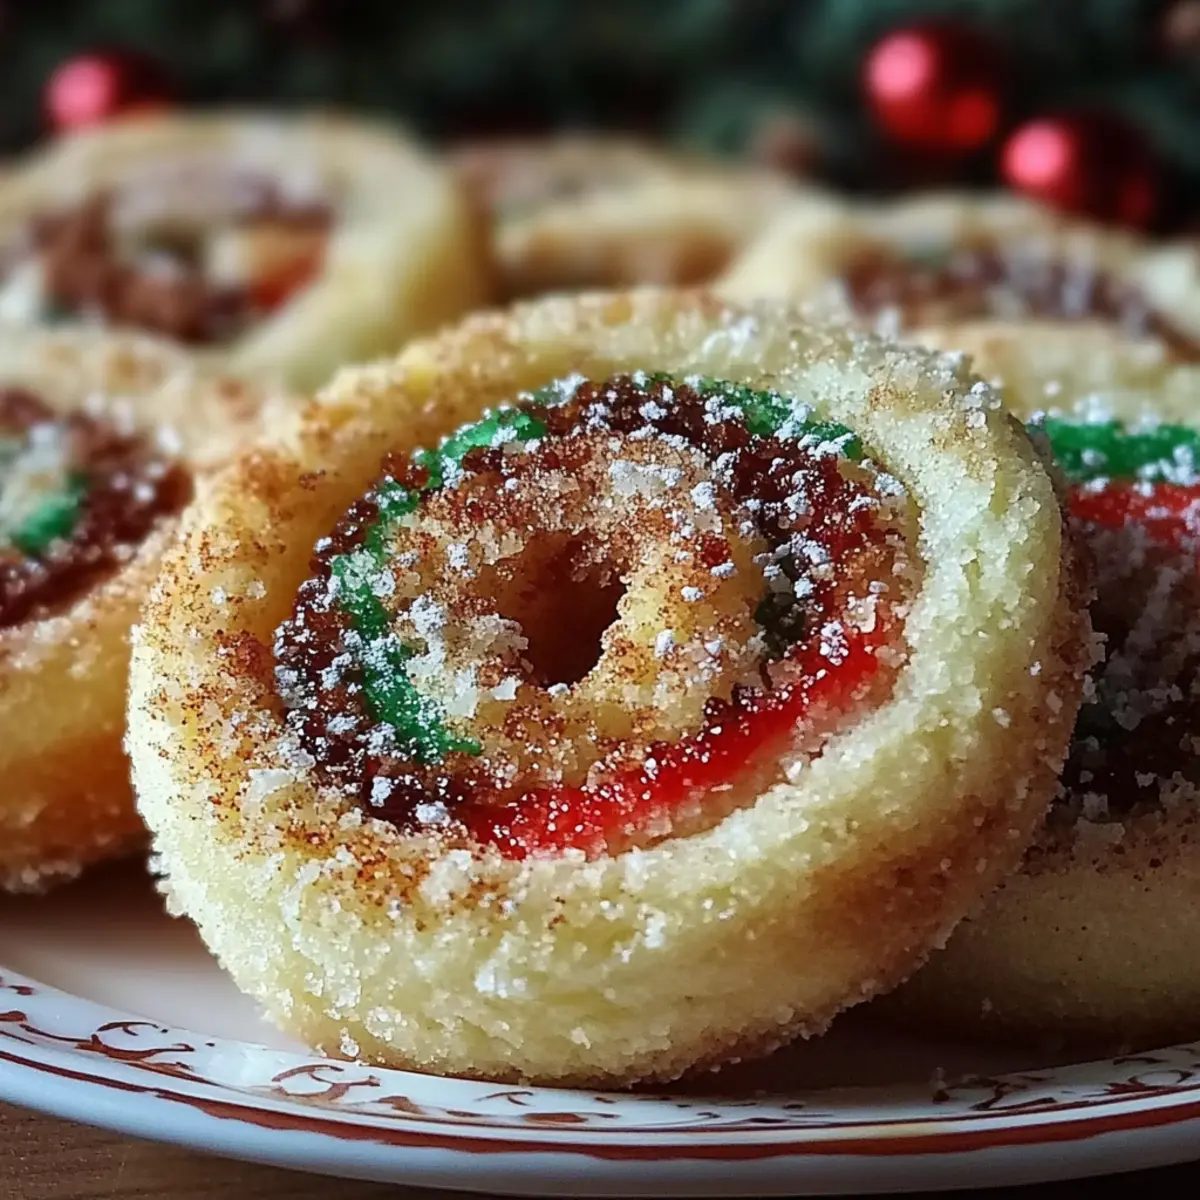
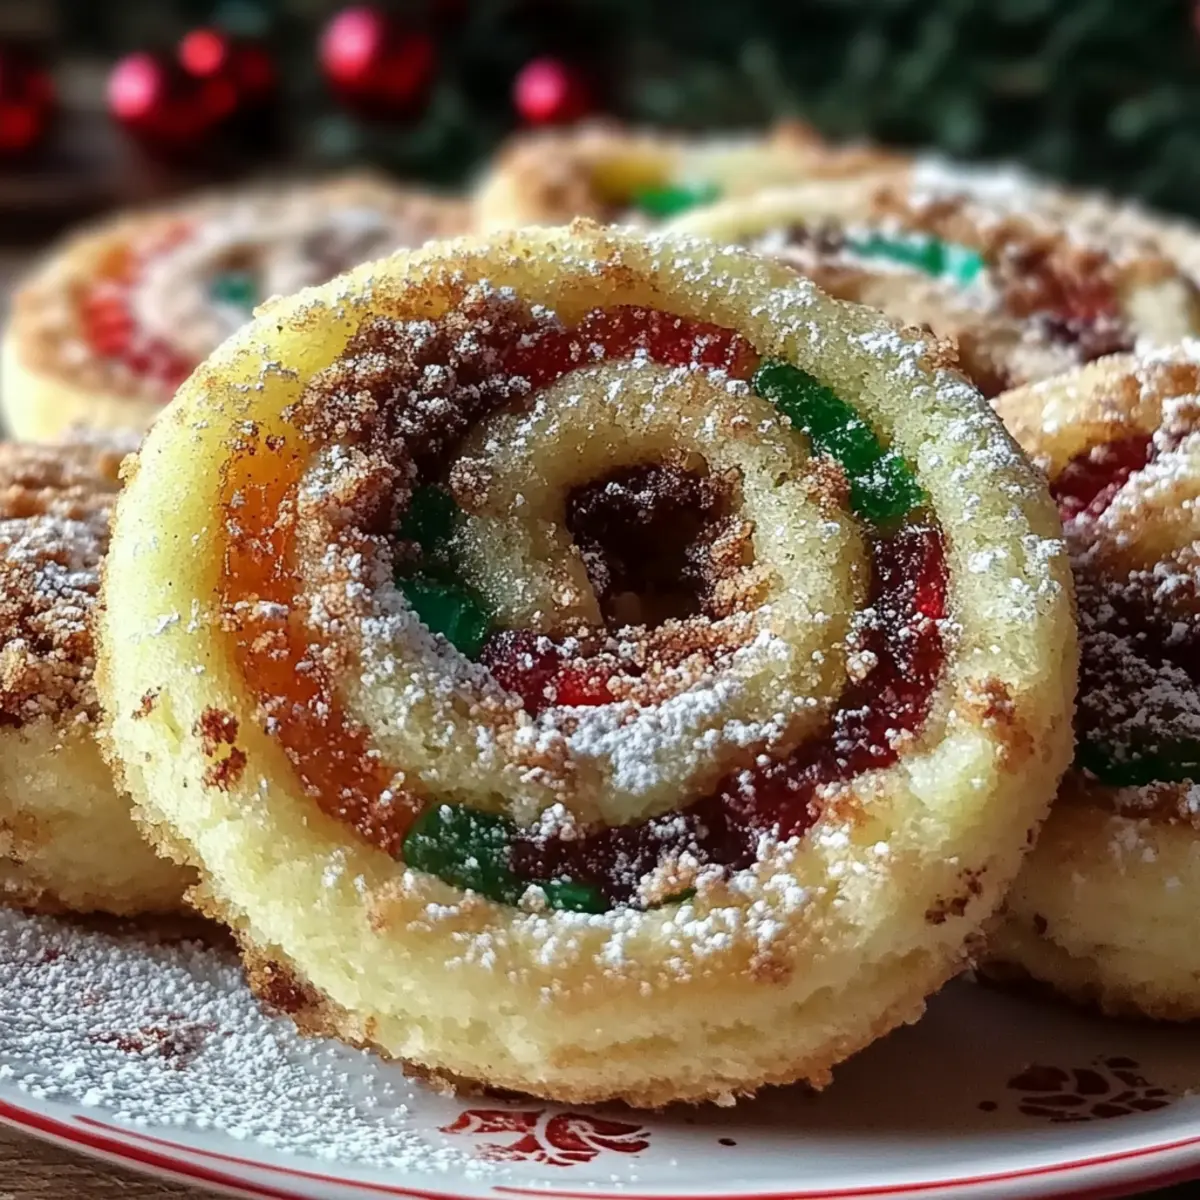
Once chilled, take the log out of the refrigerator and carefully unwrap it. Using a sharp knife, slice the log into ¼ inch thick rounds. Each slice should reveal the beautiful pinwheel pattern of vanilla and chocolate, showcasing your efforts and inviting smiles from everyone who sees them.
Step 11: Prepare for Baking
Place the cookie rounds onto the prepared baking sheets, spacing them a couple of inches apart to allow for spreading while baking. If you’d like, sprinkle the top of each cookie with colorful red and green sprinkles or crushed peppermint candies, adding a festive touch before they hit the oven.
Step 12: Bake the Cookies
Slide the baking sheets into the preheated oven and bake for 10-12 minutes. You’ll know they’re ready when the edges turn a light golden color. The aroma of sweet cookies will waft through your kitchen, bringing holiday cheer as you prepare to enjoy your creations.
Step 13: Cool the Cookies
After baking, remove the cookie sheets from the oven and let the cookies cool on the sheet for a few minutes. Once slightly firm, transfer them to a wire rack to cool completely. This step helps them maintain their texture, ensuring your Christmas Pinwheel Cookies are delightful to taste and to look at.
What to Serve with Christmas Pinwheel Cookies
The sweet aroma of freshly baked cookies is just the beginning of your festive feast!
- Rich Hot Cocoa: A warm, velvety cup of cocoa complements these cookies, enhancing their sweet flavors with every sip. Perfect for cozy evenings!
- Peppermint Tea: Infused with soothing notes of mint, this tea offers a refreshing contrast that balances the sweetness of the cookies beautifully.
- Creamy Vanilla Ice Cream: Serve alongside a scoop of vanilla ice cream for a delightful texture combination; the cold creaminess pairs perfectly with the cookies' warmth.
- Cheesy Fruit Platter: Fresh fruits like apples and pears bring a crisp freshness that cuts through the richness of the cookies, adding a delightful element to your spread.
- Christmas Punch: Bursting with festive flavors, a fruity punch will echo the holiday spirit and keep guests refreshed as they indulge in cookies.
- Chocolate Drizzle: A simple chocolate drizzle over the cookies elevates their elegance and offers an extra touch of sweetness that chocolate lovers will adore.
- Mixed Nuts: Crunchy, salty nuts provide a nice contrast to the soft texture of the cookies, making for a well-rounded snack experience.
- Cinnamon Sugar Popcorn: Lightly spiced popcorn adds a fun crunch that makes your dessert spread even more festive, perfect for munching while mingling!
- Gingerbread Men: Add a classic holiday cookie to your platter for a nostalgic touch; their spices blend beautifully with the pinwheel cookies.
Embrace these pairings for a delightful holiday gathering filled with warmth and cheer, where every bite and sip will be cherished!
How to Store and Freeze Christmas Pinwheel Cookies
Room Temperature: Store your Christmas Pinwheel Cookies in an airtight container at room temperature for up to 3 days. This keeps them fresh and soft, ready for snacking at any time.
Fridge: If you prefer a slightly firmer texture, refrigerate the cookies in an airtight container for up to a week. Let them come to room temperature before enjoying for the best flavor.
Freezer: For longer storage, freeze the cookies in a single layer on a baking sheet until firm, then transfer to a freezer-safe container. They can be frozen for up to 2 months without losing their delightful taste.
Reheating: To enjoy your frozen Christmas Pinwheel Cookies, thaw them in the fridge overnight, then warm them in a 350°F (175°C) oven for about 5-7 minutes.
Tips for the Best Christmas Pinwheel Cookies
-
Chill the Dough: Always chill the dough before slicing. This helps maintain the pinwheel shape and prevents the cookies from spreading too much while baking.
-
Use Fresh Ingredients: Ensure your baking powder and cocoa powder are fresh for the best rise and flavor. Stale ingredients can lead to flat, unsatisfactory cookies.
-
Don’t Overmix: When combining dry ingredients with wet ones, mix only until just combined. Overmixing can lead to tough cookies rather than the desired tender texture for your Christmas Pinwheel Cookies.
-
Uniform Thickness: Roll both doughs to an even thickness of about ¼ inch. This ensures even baking and a beautiful pinwheel design when sliced.
-
Experiment with Toppings: Feel free to switch the festive toppings! Instead of sprinkles, try crushed nuts or coconut for an alternative twist that complements the flavors beautifully.
Make Ahead Options
These Christmas Pinwheel Cookies are a fantastic choice for busy home cooks who want to enjoy homemade treats without the last-minute stress! You can prepare the cookie dough up to 3 days in advance by following the initial steps and rolling the dough into a log. After wrapping it tightly in plastic wrap, refrigerate the log until you’re ready to slice and bake. When you’re ready to bake, simply slice the chilled dough and follow the remaining steps as usual. This method ensures your cookies will remain just as delicious and vibrant, saving you precious time during the holiday rush. Plus, you can also freeze the unbaked cookie rounds for up to 3 months—just bake straight from the freezer, adding a minute or two to the baking time!
Christmas Pinwheel Cookies Variations
Feel free to let your imagination run wild as you customize these festive treats with delightful twists and delicious swaps!
-
Gluten-Free: Substitute all-purpose flour with a gluten-free blend for the same delightful texture without gluten.
-
Dairy-Free: Use vegan butter and a flax egg (1 tablespoon ground flaxseed mixed with 3 tablespoon water) for a creamy, plant-based version.
-
Mint Chocolate: Add 1 teaspoon of peppermint extract to the chocolate dough to amplify the minty bliss in every bite.
-
Nutty Delight: Fold in ½ cup of chopped nuts, such as walnuts or pecans, into the plain dough for an irresistible crunch.
-
Spiced Up: Mix in 1 teaspoon of cinnamon or ginger to the flour blend for a warm, spiced flavor profile that’s perfect for the holidays.
-
Chocolate Chip: Sprinkle a handful of mini chocolate chips onto the chocolate layer before rolling for extra sweetness and texture.
-
Fruit Fusion: Incorporate dried cranberries or cherries into the plain dough for a bright, fruity twist that compliments the chocolate beautifully.
-
Coconut-Lover’s Dream: Swap half the all-purpose flour with desiccated coconut to add a tropical flair to your Christmas Pinwheel Cookies.
Don’t forget to explore more creative avenues with the tips for the best Christmas Pinwheel Cookies, ensuring your cookie-making adventure is both enjoyable and delicious! Happy baking!
Christmas Pinwheel Cookies Recipe FAQs
How do I choose ripe ingredients for my Christmas Pinwheel Cookies?
Absolutely! Using the right ingredients makes a big difference. For the best flavor, make sure your unsalted butter is slightly softened, not melted, which allows for easier creaming with sugar. Fresh, large eggs are essential; check for a clean shell without cracks and a recent expiration date. This will ensure your cookies have the best structure and taste!
How should I store my Christmas Pinwheel Cookies?
Store your Christmas Pinwheel Cookies in an airtight container at room temperature for up to 3 days. This helps them maintain their soft texture and delightful flavors. For freshness, you can also refrigerate them for up to a week, but be sure to let them sit at room temperature for a bit before enjoying.
Can I freeze my Christmas Pinwheel Cookies? If so, how?
Certainly! You can freeze these delightful cookies! First, let the baked cookies cool completely. Next, place them in a single layer on a baking sheet and freeze until firm. Then, transfer them to a freezer-safe container, layering parchment paper between them to prevent sticking. They can be stored in the freezer for up to 2 months. When you're ready to enjoy them, simply thaw in the fridge overnight and warm them in a 350°F (175°C) oven for about 5-7 minutes for that freshly baked taste.
What if my cookie dough is too sticky or crumbly?
Very! If your dough is too sticky, this is usually due to the temperature of the butter. Ensure butter is softened but not greasy—if it’s too soft, try chilling the dough briefly before rolling. For crumbly dough, it may need a little more moisture; add a teaspoon of milk or water. Mix gently until fully incorporated to avoid overworking the dough.
Are there any dietary considerations I should be aware of?
Absolutely! If you’re sharing these Christmas Pinwheel Cookies with others, be mindful of allergies. They contain butter, eggs, and flour, which are common allergens. For a gluten-free alternative, consider using a gluten-free all-purpose flour blend. If you're making them for someone with lactose intolerance, you can substitute the butter for a dairy-free alternative, like coconut or vegan butter.

Christmas Pinwheel Cookies: Sweet Joy for Your Holiday Table
Equipment
- Mixing bowl
- Baking sheets
- Parchment Paper
- hand mixer
- Knife
- plastic wrap
Ingredients
For the Dough
- 1 cup Unsalted butter softened
- 1.5 cups Granulated sugar
- 1 large Egg
- 1 teaspoon Vanilla extract
- 2.5 cups All-purpose flour
- 1 teaspoon Baking powder
- 0.25 teaspoon Salt
For the Chocolate Variation
- 0.33 cup Unsweetened cocoa powder
For the Topping
- Red and green sprinkles or colored sugar
- Crushed peppermint candies
Instructions
Step-by-Step Instructions
- Preheat your oven to 350°F (175°C) and line two baking sheets with parchment paper.
- In a mixing bowl, cream together butter and sugar until light and fluffy, about 2-3 minutes.
- Beat in the egg and vanilla extract until well combined and smooth.
- Whisk together flour, baking powder, and salt in a separate bowl, then gradually add to the wet mixture until just incorporated.
- Divide dough into two portions, mixing cocoa powder into one for the chocolate layer.
- Roll out both doughs into rectangles of about ¼ inch thick between parchment paper.
- Layer the chocolate dough on top of the plain dough, aligning edges.
- Roll the dough into a tight log and wrap in plastic wrap. Chill in the refrigerator for at least 30 minutes.
- Slice the chilled log into ¼ inch thick rounds.
- Arrange the cookie rounds on the prepared baking sheets and add toppings if desired.
- Bake for 10-12 minutes or until the edges are lightly golden. Cool on the sheets for a few minutes before transferring to a wire rack.