There's a certain thrill that comes with unearthing a hidden gem in the kitchen, and these Cauldron Cookie Cups are just that! With Halloween around the corner, I wanted to create a treat that’s as fun to make as it is to eat. These delightful cookie cups are not only an easy way to showcase your creativity but also perfect for a spooky gathering or a cozy night in. The focus keyword here is "cookie cups," and trust me, you’ll love their chewy texture filled with a smooth, vibrant buttercream that looks like a bubbling potion. Plus, they are a fantastic crowd-pleaser and ideal for making ahead of time. So, who’s ready to whip up some Halloween magic in the kitchen? Let’s dive in!
Why Are These Cookie Cups So Special?
Fun to Make: These cookie cups are a delightful craft for all ages, making them perfect for family baking days or to impress friends at Halloween parties.
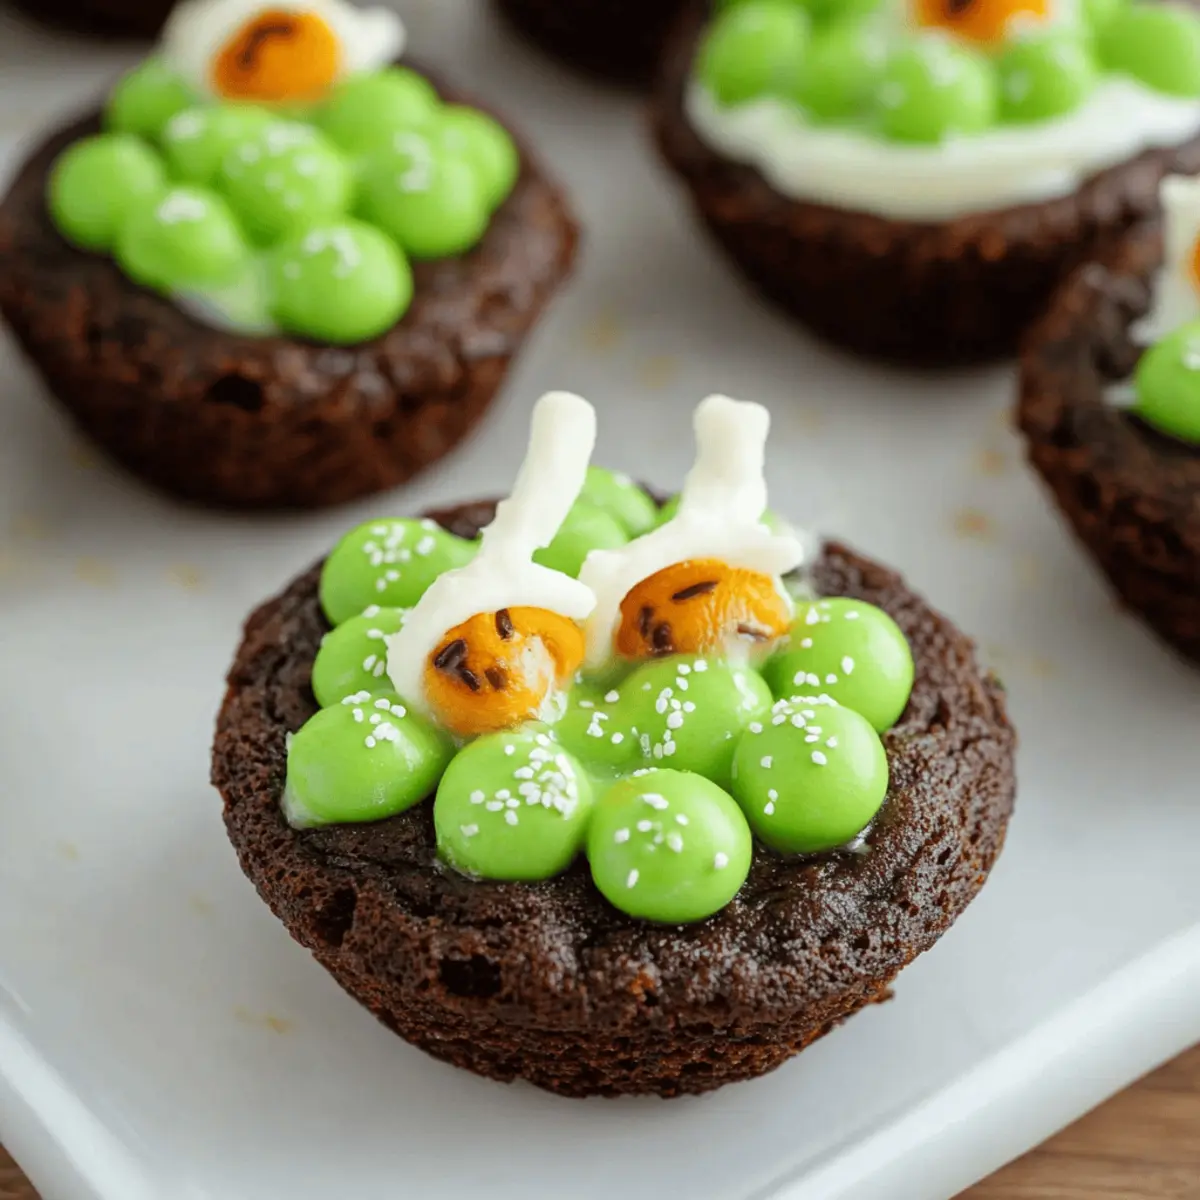
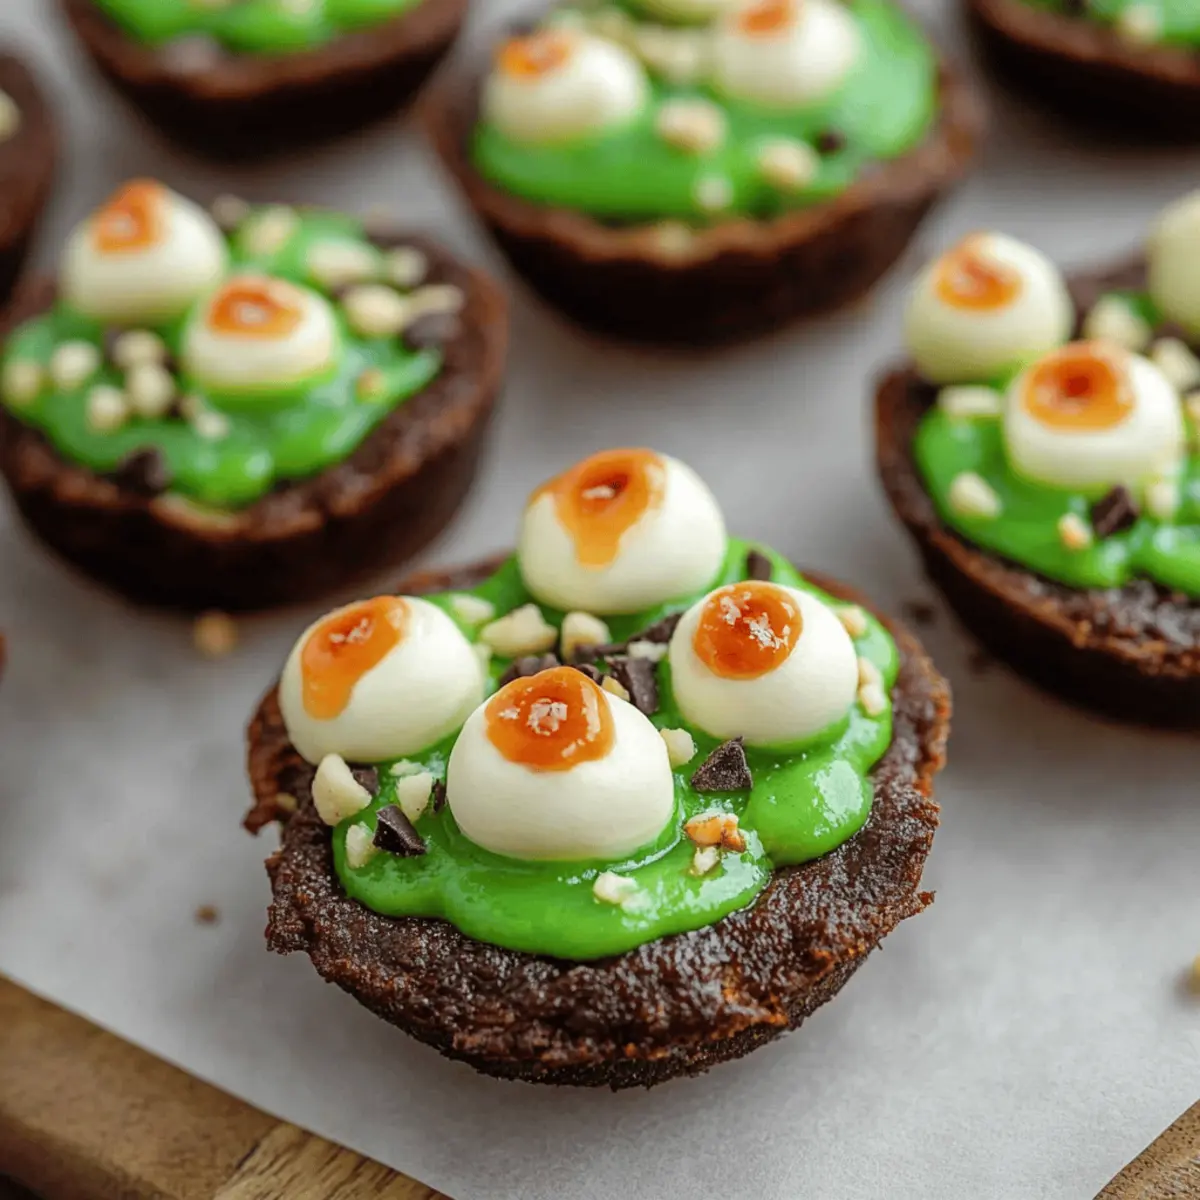
Visually Stunning: With their vibrant green buttercream and spooky decorations, they are sure to be the highlight of any festive gathering.
Texture Perfection: The combination of a chewy cookie base topped with smooth buttercream creates a mouthwatering contrast you’ll crave.
Versatile: Customize them with your favorite colors or toppings, making them suitable for any occasion beyond Halloween!
Quick to Prepare: In just 28 minutes, you can whip up a batch that's ready to impress, plus they can be made ahead for convenience.
Once you try these adorable treats, you’ll want to explore more festive ideas like our easy Halloween recipes to keep the fun going all season long!
Cookie Cups Ingredients
For the Cookie Base
• Devil's Food cake mix – This forms the chewy and chocolatey foundation of your cookie cups.
• Large eggs – Essential for binding the ingredients together and adding moisture.
• Canola or vegetable oil – Keeps the cookie cups soft and moist; you can use melted butter for a richer flavor.
• Black food coloring (optional) – Adds a spooky touch to your cookie base, perfect for the Halloween theme.
For the Buttercream
• Unsalted butter – The creamy base for your buttercream; always soften it for fluffiness.
• Powdered sugar – Gives sweetness and the right consistency to the buttercream; sift if clumpy.
• Vanilla extract – Enhances flavor, making the buttercream irresistible.
• Salt – Just a pinch balances the sweetness of the sugar.
• Milk – Adjusts the consistency of the buttercream; add gradually for the perfect spreadability.
• Green food coloring – To achieve that vibrant, potion-like color for your buttercream.
For Decoration
• Round green sprinkles – Adds a fun, festive crunch and a pop of color on top.
• Halloween sprinkles – For a spooky finish that captures the essence of the season.
• Candy eyeballs – Fun and quirky accents that make your cookie cups come alive!
• Pretzel sticks – Serve as cute stir sticks for stirring up the frightfully delicious potion.
Get ready to create not just treats, but edible Halloween magic with these cookie cups!
Step‑by‑Step Instructions for Cookie Cups
Step 1: Preheat the Oven
Begin by preheating your oven to 350°F (175°C). While it's warming up, grab three 12-count mini muffin pans and lightly grease them with a cooking spray or butter. This will ensure your cookie cups come out easily once baked. Set the greased pans aside as you prepare the cookie dough.
Step 2: Mix the Cookie Dough
In a large mixing bowl, combine the Devil's Food cake mix, two large eggs, and ½ cup of canola or vegetable oil. If you’d like to add a spooky touch, mix in black food coloring until you achieve your desired hue. Stir the ingredients together until they are well combined, creating a rich and thick cookie dough that smells divine.
Step 3: Fill the Muffin Pans
Scoop about ½ tablespoon of the cookie dough into each pocket of your mini muffin pans. Use your fingers to flatten each scoop into the pan, ensuring a smooth base for your cookie cups. Visualize them as little chocolate cauldrons ready to hold a magical filling. Make sure the dough is evenly distributed across all the cups.
Step 4: Bake the Cookie Cups
Place your filled mini muffin pans into the preheated oven and bake for 8-10 minutes. Keep an eye on them—you're looking for the edges to set while the centers remain slightly soft. Once done, remove the pans from the oven and immediately press the back of a 1-tablespoon measuring spoon into each warm cookie to form a cup shape. Allow them to cool completely.
Step 5: Prepare the Buttercream
While the cookie cups cool, let’s whip up some buttery goodness! In a medium bowl, beat 1 cup of softened unsalted butter until creamy and smooth. Gradually add in 3 cups of powdered sugar, along with 1 teaspoon of vanilla extract and ½ teaspoon of salt. Mix until combined, and then add 1-3 tablespoons of milk until the buttercream reaches a smooth, pipeable consistency.
Step 6: Add the Green Color
Once your buttercream is fluffy, it’s time to bring in some color! Mix in green food coloring to achieve the desired shade of vibrant green, reminiscent of a bubbling potion. Make sure to blend well so that the color is consistent throughout the buttercream, allowing for a fun and festive look for your cookie cups.
Step 7: Pipe the Buttercream
Now that your cookie cups are cool and your buttercream is ready, it’s time for the fun part! Use a piping bag or a simple ziplock bag with the corner snipped off to pipe the green buttercream into each cooled cookie cup. Fill each one generously, allowing the frosting to overflow slightly to resemble a potion that’s bubbling over.
Step 8: Decorate with Festive Toppings
To make your cookie cups come alive, decorate them with round green sprinkles and Halloween sprinkles, adding a delightful crunch and color contrast. For a whimsical touch, place candy eyeballs on top like they’re peeking out at you! Finally, break pretzel sticks in half and insert one into each cookie cup as a stir stick, ready for some spooky fun.

Make Ahead Options
These delightful cookie cups are perfect for meal prep enthusiasts and can help save you valuable time during the busy Halloween season! You can prepare the cookie base up to 24 hours in advance. Simply bake the cookie cups, let them cool completely, and store them in an airtight container at room temperature. The buttercream can also be made ahead—just keep it refrigerated for up to 3 days. When you're ready to serve, simply take the buttercream out and let it come to room temperature before piping it into the cooled cookie cups. With these make-ahead options, you can enjoy your festive treats while spending more time with loved ones!
What to Serve with Cauldron Cookies
Get ready to elevate your spooky gathering with delightful accompaniments that perfectly complement these charming cookie cups.
- Chilled Milk: Nothing beats a classic pairing; cold milk enhances the rich chocolate flavor and balances sweetness beautifully.
- Spooky Fruit Salad: A mix of oranges, grapes, and green apples cut into fun shapes adds a fresh, vibrant touch that contrasts nicely with the sweet cookie treats.
- Pumpkin Spice Hot Chocolate: This warm, spiced drink not only keeps the Halloween spirit alive but also harmonizes with the decadence of the cookie cups.
- Candy Corn Mix: A delightful mix of candy corn, nuts, and chocolate offers a crunchy, colorful side that perfectly embodies Halloween vibes.
- Ghoulish Cupcakes: Serve up some cupcakes decorated like monsters or mummies to match the festive theme; the fluffy textures will delight every sweet tooth.
- Witch’s Brew Punch: A refreshing and spooky beverage made with lime sherbet and soda can add fun fizz and a vibrant color splash for your guests.
- Caramel Apple Slices: Crisp apple slices drizzled with caramel create a deliciously chewy texture that complements the cookie cups beautifully, adding a fall-inspired twist.
- Haunted Cheese Platter: A selection of cheese and crackers, perhaps with spooky-themed shapes, offers a savory contrast to the sweetness of your dessert.
- Mini Pumpkin Pies: Bite-sized pumpkin pies are the icing on the Halloween cake, bringing warmth and nostalgia to your spread while keeping guests satisfied.
- Ghostly Meringues: Light, airy, and enchanting, these delightful treats can mimic ghosts and add a whimsical touch to your dessert table.
Cookie Cups Variations & Substitutions
Feel free to add your own twist to these delightful cookie cups and make them uniquely yours!
-
Gluten-Free: Use a gluten-free chocolate cake mix as a base for a delicious alternative without sacrificing flavor.
-
Nut Butter Twist: Substitute the canola oil with almond or peanut butter for a nutty flavor that complements the chocolate beautifully.
-
Filling Surprise: Add a spoonful of caramel or raspberry jam in the center before the buttercream for a fruity or decadent surprise.
-
Spice it Up: Include a teaspoon of cinnamon or pumpkin spice in the cookie dough for a warm, autumn-inspired flavor that'll delight your senses.
-
Dairy-Free Options: Replace the butter in the frosting with a dairy-free alternative like coconut cream, and use plant-based milk for a creamy texture.
-
Colorful Fun: Experiment with different food colorings for the buttercream—try orange for a classic Halloween look or purple for a mysterious flair!
-
Extra Crunch: Fold in crushed pretzels or nuts into the cookie dough for a deliciously crunchy texture that adds another layer of enjoyment.
-
Heat Level: For a spooky kick, mix in a pinch of cayenne pepper or chili powder into the cookie dough; it pairs surprisingly well with the sweet chocolate base.
These variations not only enhance flavor but also let your creativity shine. For more delicious and festive ideas, don’t miss our easy Halloween recipes!
Expert Tips for Cookie Cups
• Preparation is Key: Ensure all ingredients are at room temperature for better mixing, particularly the butter for the buttercream—this achieves a smoother texture.
• Avoid Overbaking: Keep a close watch on the cookie cups while baking. Remove them as soon as the edges are set to maintain that chewy texture essential for delicious cookie cups.
• Cooling Time: Allow your cookie cups to cool completely before piping the buttercream. This prevents the frosting from melting and ensures a beautiful finish.
• Piping Tips: If you're new to piping, practice on parchment paper first. A ziplock bag with the corner cut can work just as well if you don’t have a piping bag.
• Custom Decorations: Feel free to swap the toppings based on your theme or preferences. Sprinkles, chocolate chips, or even crushed candies can elevate your cookie cups further.
• Make Ahead: These cookie cups can be made ahead and stored in an airtight container, allowing you to enjoy the spooky festivities without last-minute baking stress.
How to Store and Freeze Cookie Cups
Room Temperature: Store uneaten cookie cups in an airtight container at room temperature for up to 3 days; this keeps them soft and fresh.
Fridge: If you’re in a warm climate, you can refrigerate the cookie cups for up to a week; just ensure they’re covered to prevent drying out.
Freezer: For longer storage, freeze the cookie cups in a single layer on a baking sheet, then transfer to an airtight container for up to 2 months. Thaw before serving.
Reheating: To enjoy a warm treat, microwave a frozen cookie cup for 10-15 seconds or until just warm; this revives the delightful chewy texture of your cookie cups.
Cauldron Cookies Recipe FAQs
What’s the best way to select ripe ingredients for the cookie cups?
Absolutely! For the best results, choose fresh, high-quality ingredients. Make sure the eggs are fresh—check the expiration date on the carton. For your butter, it should be softened to room temperature, not melted, for a creamy buttercream. The Devil's Food cake mix should be within its expiration date to ensure a fluffy texture.
How should I store the cookie cups after baking?
Very! Store your uneaten cookie cups in an airtight container at room temperature for up to 3 days. This will keep them soft and delicious. If you live in a warm area, you can also refrigerate them for up to a week, but make sure they’re covered to prevent drying out.
Can I freeze cookie cups for later enjoyment?
Absolutely! To freeze your cookie cups, first arrange them in a single layer on a baking sheet and freeze for about an hour until firm. Then, transfer them into an airtight container and store for up to 2 months. When you’re ready to enjoy, simply thaw them in the fridge overnight or microwave them for 10-15 seconds to restore their delightful chewy texture.
What should I do if my cookie cups sink in the middle?
Don’t worry! If your cookie cups are sinking, it could be due to overmixing or improper baking. Make sure to mix your batter just until combined. Also, ensure you bake them long enough for the edges to set; when done, the centers should remain slightly soft. If they sink after baking, press down the centers gently while they are still warm to shape them, but be cautious not to overbake!
Are there any dietary considerations for the cookie cups?
Indeed! If you’re making these cookie cups for friends or family with dietary restrictions, consider the following: use gluten-free cake mix to cater to those with gluten sensitivities. For a dairy-free version, substitute the butter with a plant-based alternative and check the powdered sugar for any added ingredients. Always be cautious with allergy-friendly toppings—make sure your candy eyeballs and sprinkles are free from allergens.
Can I make the cookie cups ahead of time for a party?
Of course! You can prepare the cookie cups in advance—just store them in an airtight container after baking. You can also make the buttercream ahead and store it in the fridge for up to a week. When you’re ready to serve, pipe the buttercream and decorate them. This way, you can enjoy the party without the last-minute baking stress!

Deliciously Fun Cookie Cups for Halloween Treats
Equipment
- mini muffin pans
- Mixing bowls
- Piping bag
- measuring spoons
- spatula
Ingredients
For the Cookie Base
- 1 box Devil's Food cake mix Forms the chewy foundation.
- 2 large eggs Essential for binding.
- ½ cup canola or vegetable oil Keeps cookie cups moist.
- 1 teaspoon black food coloring Optional for spooky color.
For the Buttercream
- 1 cup unsalted butter Softened for fluffiness.
- 3 cups powdered sugar Sift if clumpy.
- 1 teaspoon vanilla extract Enhances flavor.
- ½ teaspoon salt Balances sweetness.
- 1-3 tablespoon milk Adjusts consistency.
- 1 teaspoon green food coloring For vibrant color.
For Decoration
- 1 cup round green sprinkles For a festive crunch.
- 1 cup Halloween sprinkles For a spooky finish.
- 1 cup candy eyeballs Fun accents.
- 12 pieces pretzel sticks Stir sticks for cookie cups.
Instructions
Baking Instructions
- Preheat your oven to 350°F (175°C) and grease mini muffin pans.
- Combine the cake mix, eggs, and oil in a mixing bowl. Mix in black food coloring until desired.
- Scoop dough into muffin pans and flatten with fingers.
- Bake for 8-10 minutes, press a spoon into the center to form cups, then cool completely.
- Beat softened butter until creamy, add powdered sugar, vanilla, salt, and milk until smooth.
- Mix in green food coloring to achieve desired vibrancy.
- Pipe buttercream into cooled cookie cups, allowing overflow for a bubbling effect.
- Decorate with sprinkles, candy eyeballs, and pretzel sticks.