Indulgent Ravenclaw Blueberry Lemon Cheesecake Bars Delight
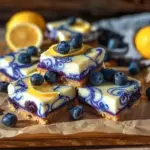
Discover the magical taste of Ravenclaw Blueberry Lemon Cheesecake Bars with creamy cheesecake, zesty lemon, and delightful blueberry swirls.
- Prep Time: 20 minutes
- Cook Time: 45 minutes
- Total Time: 1 hour 5 minutes
- Yield: 16 bars 1x
- Category: Dessert
- Method: Bake
- Cuisine: American
- Diet: Vegetarian
Ingredients
Scale
- 1 1/2 cups graham cracker crumbs
- 1/4 cup granulated sugar
- 1/2 cup unsalted butter (melted)
- 16 ounces cream cheese (softened)
- 3/4 cup granulated sugar
- 1 cup sour cream
- 1 teaspoon vanilla extract
- 1 tablespoon lemon zest
- 1/4 cup lemon juice
- 3 eggs (large)
- 2 cups blueberries (fresh or frozen)
- 1/4 cup granulated sugar
- 1 tablespoon lemon juice
- 1 tablespoon cornstarch
- edible silver or gold dust – optional for decoration
Instructions
- Preheat your oven to 325°F (163°C) and prepare an 8x8 or 9x13 inch baking pan by lining it with parchment paper. In a large bowl, combine the graham cracker crumbs, granulated sugar, and melted butter, mixing until well combined. The mixture should resemble wet sand. Press the crumb mixture firmly into the bottom of the prepared pan to form a crust, ensuring it’s evenly distributed. Bake the crust for about 10 minutes until it’s lightly golden. Once finished, remove it from the oven and allow it to cool completely.
- While the crust cools, prepare the cheesecake filling for your Ravenclaw Blueberry Lemon Cheesecake Bars. In a large mixing bowl, beat softened cream cheese and granulated sugar together using an electric mixer until smooth and creamy, about 3-4 minutes. Add in the sour cream, vanilla extract, lemon zest, and lemon juice, and continue to mix until fully incorporated. Lastly, add the eggs one at a time, mixing gently after each addition until just blended. Be careful not to overmix, as this can cause cracks.
- For the vibrant blueberry swirl, combine fresh or frozen blueberries, granulated sugar, and lemon juice in a medium saucepan. Cook the mixture over medium heat for about 5 minutes, stirring occasionally, until the blueberries start to soften and release their juices. In a separate small bowl, mix cornstarch with a splash of water to create a slurry, then stir this into the blueberry mixture. Cook for an additional 2-3 minutes until the sauce thickens slightly. Once thickened, you can strain it for a smoother sauce or blend it for a richer texture. Allow the blueberry sauce to cool.
- Now it’s time to assemble your Ravenclaw Blueberry Lemon Cheesecake Bars. Pour the cheesecake batter over the cooled crust, spreading it evenly. Spoon dollops of the cooled blueberry sauce on top of the cheesecake layer, and using a toothpick or knife, gently swirl the sauce into the batter for that beautiful marbled effect. Bake in the preheated oven for 40-45 minutes. The center should be set but still slightly jiggly. Once done, turn off the oven and leave the bars to cool inside with the door propped open to prevent cracking.
- After cooling, transfer the Ravenclaw Blueberry Lemon Cheesecake Bars to the refrigerator. Let them chill for at least 4 hours, or preferably overnight, to set completely. When you're ready to serve, sprinkle with edible silver or gold dust for an enchanting touch. Using a warm knife, slice the chilled dessert into bars for clean edges. Enjoy this magical treat, perfect for any Harry Potter-themed gathering!
Notes
- Avoid Overmixing: Overmixing the batter can lead to cracks in your cheesecake bars. Beat just until combined after adding the eggs.
- Cool Gradually: Allow the cheesecake to cool gradually in the oven with the door slightly ajar. This helps prevent unsightly cracks on the surface.
- Swirl It Right: For the best blueberry swirl effect, drop spoonfuls of sauce onto the batter and gently swirl with a toothpick; don’t overdo it!
- Clean Cuts: Use a warm knife for slicing your bars after chilling. It helps achieve clean edges for a more elegant presentation.
- Storage Wise: These Ravenclaw Blueberry Lemon Cheesecake Bars can stay fresh in the fridge for up to 5 days, perfect for making ahead!
Nutrition
- Serving Size: 1 bar
- Calories: 250
- Sugar: 18g
- Sodium: 200mg
- Fat: 15g
- Saturated Fat: 9g
- Unsaturated Fat: 4g
- Trans Fat: 0g
- Carbohydrates: 25g
- Fiber: 1g
- Protein: 3g
- Cholesterol: 80mg