A delightful aroma of melted marshmallows wafted through my kitchen, instantly transporting me back to carefree school days filled with lunchtime treats. That’s when the inspiration hit for these fun Ruler Rice Krispies! Not only are these colorful bars a fantastic way to bring a smile to kids’ faces, but they also serve as an engaging activity for passionate home-chefs who love getting creative. With just a few simple ingredients and a quick 25-minute prep, you’ll have a homemade snack that's both easy to make and irresistibly visually appealing. Plus, they’re perfect for school lunches or as a playful addition to birthday parties. Curious about how to craft these whimsical treats and impress your family and friends? Let’s dive in!
Why Are Ruler Rice Krispies So Fun?
Playful Appearance: These Rice Krispies treats don't just taste incredible; they look like actual rulers! Vibrant Colors from the gel food coloring add a playful twist that catches the eye and sparks joy.
Quick and Easy: With just 25 minutes from start to finish, you can whip up these delights in no time, making them a breeze for last-minute gatherings.
Versatile Snack: They’re perfect for parties, school lunches, or just as a fun snack at home. Add them to your collection of creative snacks like colorful cake pops or homemade granola bars for more fun ideas!
Kid-Friendly Activity: Involve your kids in the process for a delightful family baking session that will create lasting memories.
Crowd-Pleaser: Whether at a birthday party or a picnic, these unique treats will be a hit with both kids and adults alike.
Ruler Rice Krispies Ingredients
For the Treats
• 6 cups Rice Krispies cereal – the star ingredient that gives these treats their signature crunch.
• 1 (10 oz) bag mini marshmallows – essential for achieving that gooey texture everyone loves.
• 3 tablespoons butter – adds rich flavor and helps bind the treats together.
For the Colors
• Red gel food coloring – brings a vibrant hue to one of the layers, mimicking a classic ruler.
• Yellow gel food coloring – perfect for the eye-catching middle layer.
• Black gel food coloring – optional for adding accents or more creative flair.
For the Decoration
• ½ cup white candy melts – used to create the metallic edge of the ruler look.
• ½ cup chocolate chips (or brown candy melts) – perfect for adding realistic ruler markings.
• Black decorating gel or black edible marker – adds precise measurements and details that enhance the ruler design.
For Preparation
• Non-stick cooking spray – ensures easy removal of treats from the baking dish.
• Parchment paper – makes cleanup a breeze and prevents sticking.
Get your sweet tooth ready for these delightful Ruler Rice Krispies that promise not just fun but a tasty adventure!
Step‑by‑Step Instructions for Ruler Rice Krispies
Step 1: Prepare the Pan
Begin by prepping a 9×13 inch baking dish for your Ruler Rice Krispies. Line it with parchment paper, ensuring it covers the bottom and sides, and spray with non-stick cooking spray. This will help your treats release easily once set. Set the dish aside while you prepare the gooey marshmallow mixture.
Step 2: Melt the Butter and Marshmallows
In a large saucepan, melt 3 tablespoons of butter over low heat, stirring gently to prevent it from burning. Once melted, add a 10 oz bag of mini marshmallows and continue stirring until the mixture becomes completely smooth and glossy, about 5–7 minutes. Be patient; a well-melted marshmallow base is key to delicious treats!
Step 3: Combine with Rice Krispies
Remove the saucepan from heat and immediately stir in 6 cups of Rice Krispies cereal. Use a spatula to fold the cereal gently until fully coated in the melted marshmallow mixture. The texture should be sticky yet manageable. This step is crucial to ensure every bite of your Ruler Rice Krispies is packed with flavor.
Step 4: Divide the Mixture
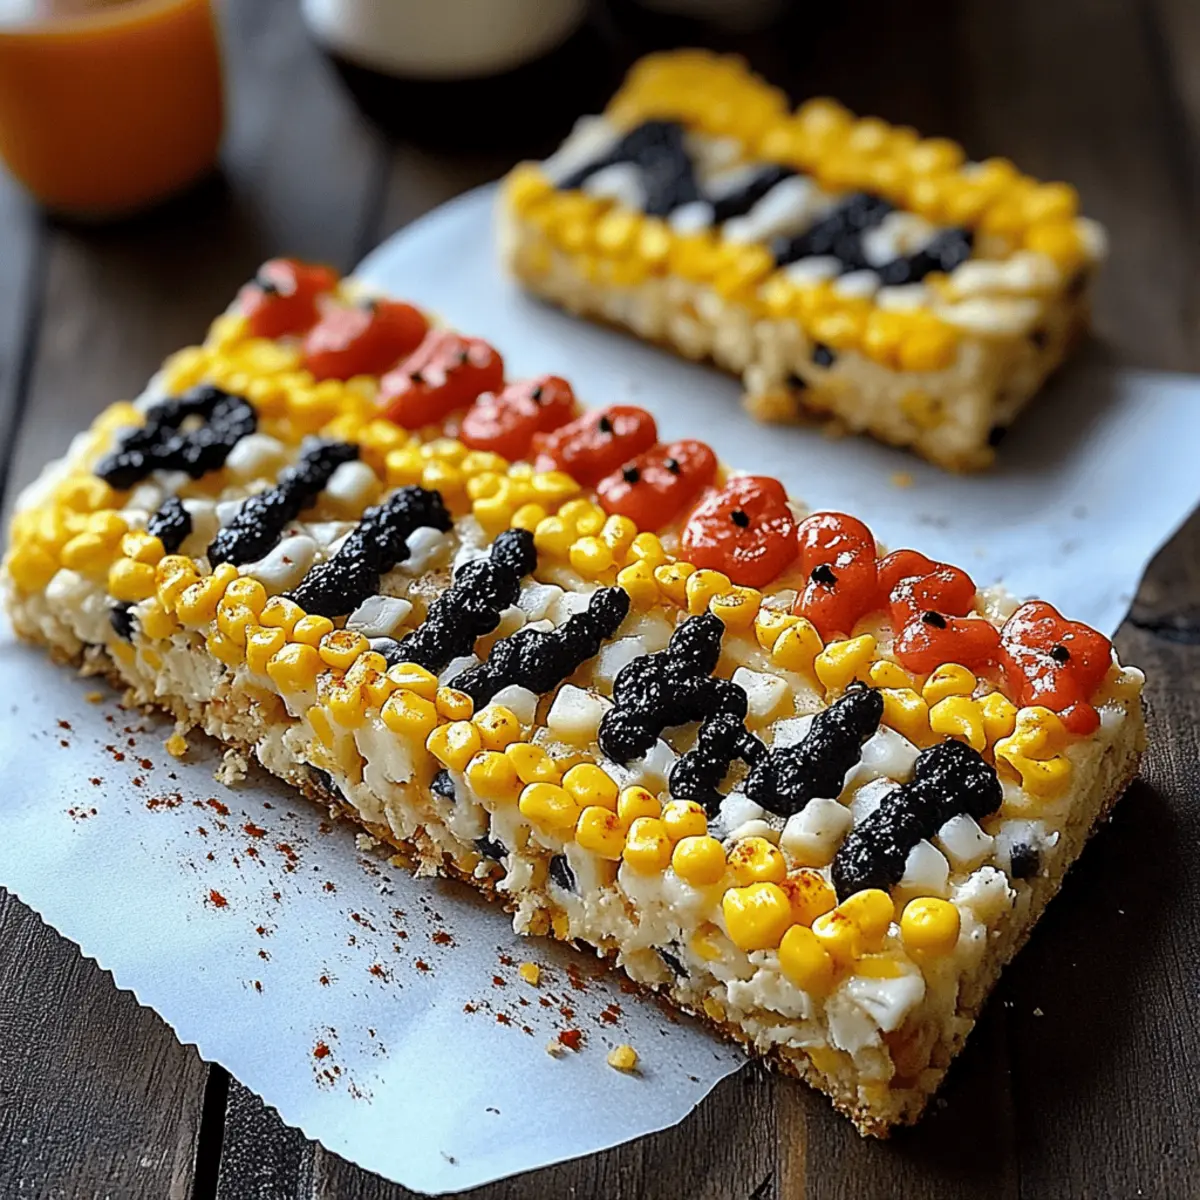
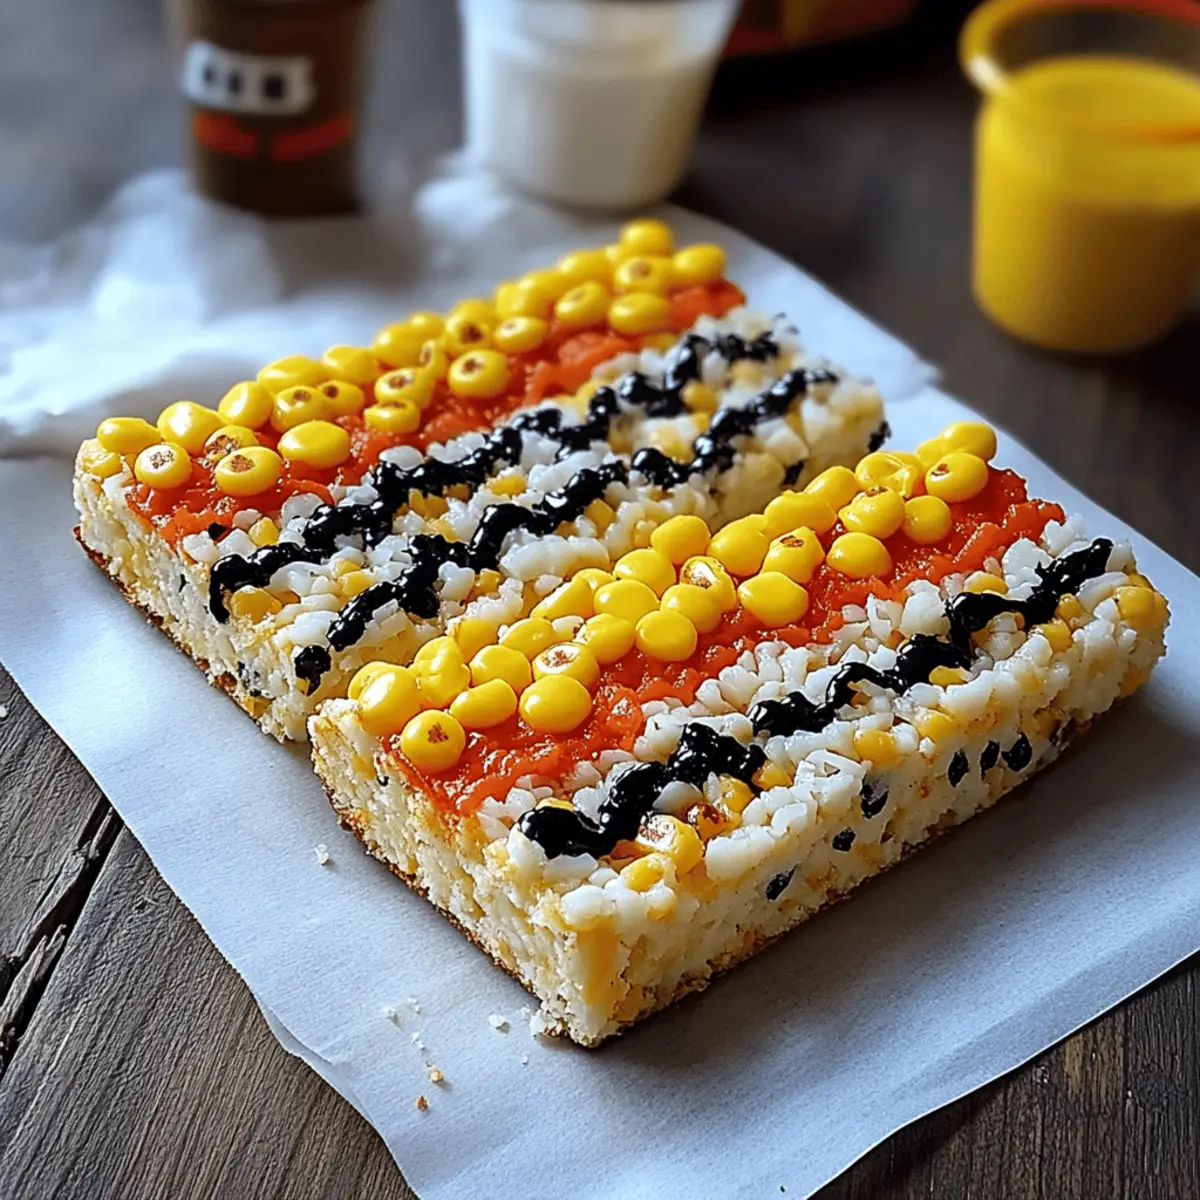
Once well combined, divide the mixture into three equal portions. Transfer one portion to a separate bowl and leave it plain. In two other bowls, add yellow gel food coloring to one portion and red gel food coloring to the other, mixing until the colors are vibrant. This will make your Ruler Rice Krispies visually appealing!
Step 5: Layer the Colors
With your colored mixtures ready, it's time to layer them in the prepared baking dish. Start by pressing the red mixture into the bottom third of the dish using your spatula. Next, add the yellow mixture in the center and finally the plain Rice Krispies mixture on top. Press down firmly to create even layers and a compact treat.
Step 6: Allow to Cool
Let the layered Rice Krispies cool completely at room temperature; this typically takes about 30 minutes. This cooling period is essential as it allows the treats to set firmly, making them easier to cut into the desired ruler shapes. Once set, you’ll be ready to slice them up!
Step 7: Cut into Bars
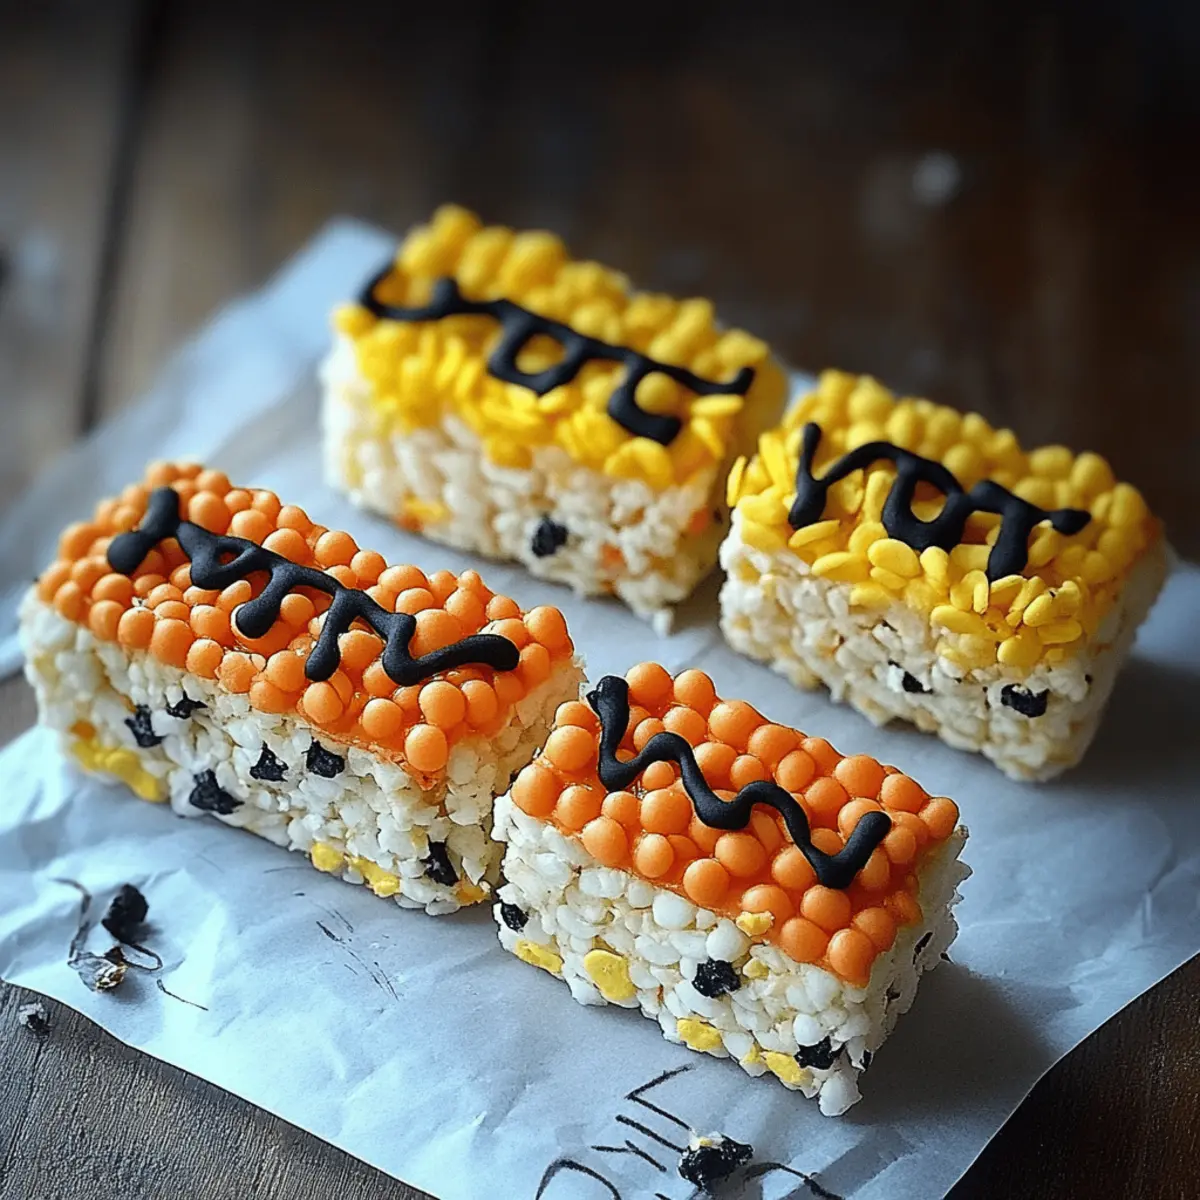
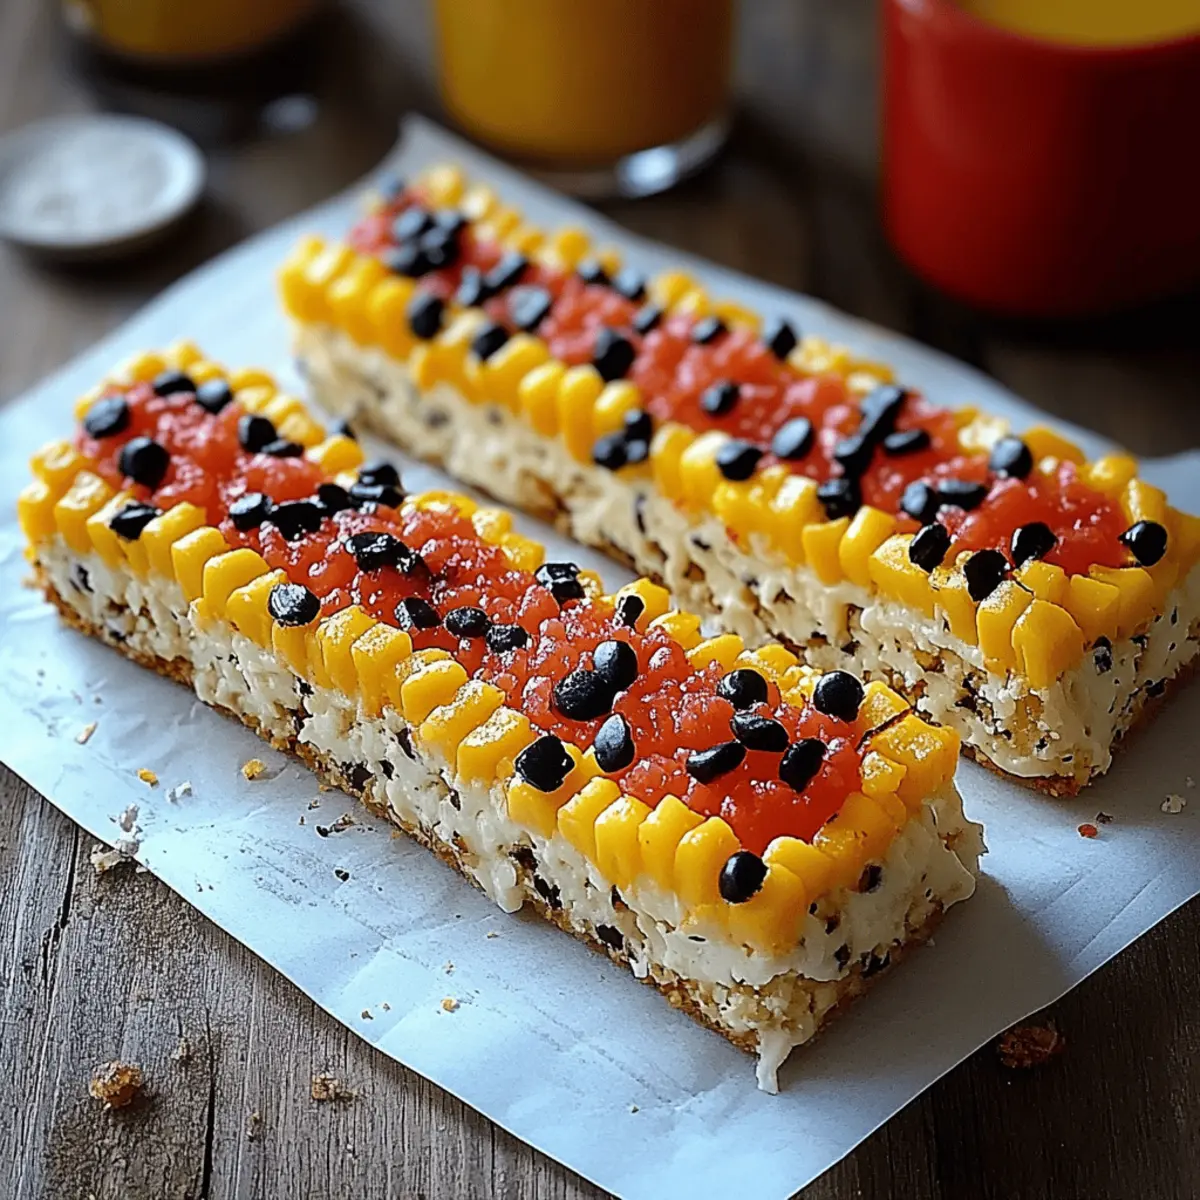
Once the Ruler Rice Krispies have cooled and set, use a sharp knife to cut them into long rectangle bars. Aim for pieces that closely resemble a ruler in shape. Highlight the neatness of your cuts, as this creates a more authentic ruler appearance, adding to the fun of these treats!
Step 8: Melt the Chocolate and Candy Melts
In microwave-safe bowls, melt ½ cup of white candy melts and ½ cup of chocolate chips (or brown candy melts) separately. Heat them in 30-second intervals, stirring in between, until completely smooth. Be careful not to overheat; you want a drizzling consistency for decorating your Ruler Rice Krispies.
Step 9: Decorate the Rulers
Using a piping bag or a spoon, carefully add ruler markings with the melted chocolate onto each of the cut Ruler Rice Krispies. Create a “metal edge” on one side with the melted white candy melts for that authentic ruler look. Let your creativity shine in this step!
Step 10: Final Touches
Finally, use black decorating gel or a black edible marker to add numbers and small lines that enhance the ruler design. This will make your Ruler Rice Krispies not only look fun but also realistic. Ensure the decorations are precise as this adds to the charm of your creative snacks.
Step 11: Set Before Serving
Allow the decorated Ruler Rice Krispies to set until the chocolate hardens completely, which may take about 15–20 minutes at room temperature. Once set, they are ready to be served or wrapped up for later. Get ready to impress your family and friends with this delightful treat!
Ruler Rice Krispies Variations & Substitutions
Feel free to get creative with this recipe and make it your own!
- Chocolate Lover: Add ½ cup cocoa powder to the marshmallow mixture for a rich chocolate flavor. This twist makes for a delightful contrast with the colorful layers.
- Nutty Addition: Mix in 1 cup of chopped nuts, like pecans or almonds, into the Rice Krispies for satisfying crunch and a bit of healthy fats. It truly elevates the treat, adding a wonderful texture.
- Vegan Option: Use dairy-free butter and swap marshmallows for vegan alternatives for a cruelty-free version. Enjoy great taste with a kind twist!
- Candy Burst: Incorporate 1 cup of mini chocolate candies or gummy treats into your Rice Krispies mixture for added flavor and surprise in every bite. Children will love this extra pop of fun!
- Gluten-Free Swap: Use gluten-free Rice Krispies to keep these treats safe for gluten-sensitive friends or family. They’ll be just as delicious without the gluten!
- Spicy Kick: Add a pinch of cayenne pepper or cinnamon to the melted marshmallow mixture for a unique spicy dimension. This twist adds warmth and makes them unforgettable!
- Fruity Flavor: Swap out some of the candy melts for freeze-dried fruit powder, like strawberry or raspberry, to create a fruity twist that complements the sweetness. This variation offers a refreshing taste!
- Custom Shapes: Instead of bars, use cookie cutters to create fun shapes like stars or hearts for themed parties. This adds a playful touch that kids adore and makes every occasion special!
Explore these variations to find your favorite spin on these delightful Ruler Rice Krispies! You might also enjoy more playful desserts like colorful cake pops and homemade granola bars that continue the fun!
Expert Tips for Ruler Rice Krispies
• Avoid Sticking: Make sure to line your baking dish with parchment paper and spray it with non-stick cooking spray to prevent sticking.
• Color Mix: Start with a little gel food coloring and gradually add more until you've achieved vibrant colors for your Ruler Rice Krispies. Too much can alter the texture!
• Proper Melting: Melt the butter and marshmallows on low heat and stir continuously. This ensures a smooth and gooey mixture, avoiding burnt marshmallows.
• Layering Technique: When pressing the colored mixtures into the baking dish, ensure they are packed tightly but not overly compressed. This will help maintain their shape without being too hard.
• Sharp Cuts: Use a sharp knife to cut the cooled treats into neat rectangles. Cleaner cuts enhance the ruler appearance and make for more appealing presentations.
• Patient Cooling: Let the decorated Ruler Rice Krispies set until fully hardened, as this will make them easier to handle and serve without losing their shape.
How to Store and Freeze Ruler Rice Krispies
Room Temperature: Keep your Ruler Rice Krispies in an airtight container at room temperature for up to 3 days. This will keep them fresh and chewy!
Fridge: If you want to extend their life, store them in the fridge for up to a week. Just be sure to keep them covered to prevent them from drying out.
Freezer: For longer storage, freeze the Ruler Rice Krispies in an airtight container for up to 3 months. Separate layers with parchment paper to avoid sticking.
Reheating: When ready to enjoy, simply take them out of the freezer, allow them to thaw at room temperature for about 30 minutes, and they should be ready to eat!
Make Ahead Options
These Ruler Rice Krispies are a fantastic treat to prepare ahead of time, making them perfect for busy weeknights or school events! You can make the base of the Rice Krispies up to 3 days in advance; simply allow the layered mixture to cool completely, cut into bars, and store them in an airtight container to maintain freshness. Alternatively, you can prepare the decorated bars up to 24 hours before serving—just make sure the chocolate and decorations set properly to prevent smudging. When you're ready to enjoy, simply pull them out of the fridge and present them for a delightful treat that's just as delicious and fun as if they were made fresh!
What to Serve with Ruler Rice Krispies
Imagine a table filled with delightful flavors and textures that perfectly complement your whimsical Ruler Rice Krispies!
-
Chocolate Milk: Rich and creamy, it enhances the sweetness of the treats, making snack time even more enjoyable.
-
Fruit Skewers: Bright, fresh fruits provide a refreshing contrast, adding vibrant colors and a dose of natural sweetness to every bite.
-
Ice Cream: A scoop of vanilla or chocolate ice cream creates a delightful pairing, turning your treats into an indulgent dessert experience.
-
Nut Butter Dips: Smooth or crunchy peanut butter or almond butter brings a savory richness that balances the sugary treats splendidly.
-
Marshmallow Dip: For the ultimate indulgence, a warm marshmallow dip takes the Ruler Rice Krispies from fun to fabulous!
Looking for a special drink? Pair these treats with an iced tea or lemonade for a refreshing burst of flavor. Each sip complements the playful sweetness, making them perfect for a sun-filled gathering or a cozy snack at home.
Ruler Rice Krispies Recipe FAQs
How do I choose the best marshmallows for Ruler Rice Krispies?
Absolutely! Look for fresh, soft mini marshmallows without any hard or stale pieces. Ideally, they should be within their expiration date to ensure maximum gooeyness!
What is the best way to store Ruler Rice Krispies?
For optimal freshness, keep your Ruler Rice Krispies in an airtight container at room temperature for up to 3 days. If you’re planning to keep them longer, storing them in the fridge can extend their shelf life to about 1 week. Just remember to keep them covered to prevent drying out!
Can I freeze Ruler Rice Krispies? How do I do it?
Yes, you can! To freeze your Ruler Rice Krispies, place them in an airtight container lined with parchment paper, making sure to separate layers with more parchment to prevent sticking. They’ll stay tasty for up to 3 months! When you’re ready to enjoy, simply thaw them at room temperature for about 30 minutes, and they’ll be as good as new.
What should I do if my Ruler Rice Krispies are too hard?
Very! If your Rice Krispies treats are hard, it might be due to overly compacting the mixture or letting them cool too long before cutting. You can try microwaving them for 5–10 seconds to soften them slightly. Next time, be sure to pack the mixture gently and allow for a bit of fluffiness!
Are there any dietary considerations for making Ruler Rice Krispies?
Absolutely! If you or someone you are serving has allergies, be mindful of the ingredients used—especially the marshmallows and chocolate, which can contain allergens like gluten or dairy. Additionally, if you have pets, be cautious with chocolate and candy melts, as they can be toxic to animals. Always read packaging labels for allergy information.
Can I use other cereals instead of Rice Krispies?
Very much! While Rice Krispies give that classic crunch, you can experiment with other cereals such as Cocoa Krispies for a chocolatey twist or even blended granola for added texture. Just remember that altering the cereal may change the flavor and overall fun look of your Ruler Rice Krispies!
Ruler Rice Krispies: Fun Treats Perfect for Creative Snacking
Equipment
- 9x13 inch baking dish
- Large saucepan
- spatula
- microwave-safe bowls
- Piping bag
Ingredients
For the Treats
- 6 cups Rice Krispies cereal the star ingredient that gives these treats their signature crunch.
- 1 10 oz bag mini marshmallows essential for achieving that gooey texture everyone loves.
- 3 tablespoons butter adds rich flavor and helps bind the treats together.
For the Colors
- 1 bottle red gel food coloring brings a vibrant hue to one of the layers.
- 1 bottle yellow gel food coloring perfect for the eye-catching middle layer.
- 1 bottle black gel food coloring optional for adding accents.
For the Decoration
- ½ cup white candy melts used to create the metallic edge of the ruler look.
- ½ cup chocolate chips perfect for adding realistic ruler markings.
- 1 tube black decorating gel or black edible marker adds precise measurements and details.
For Preparation
- 1 can non-stick cooking spray ensures easy removal of treats.
- 1 sheet parchment paper makes cleanup a breeze and prevents sticking.
Instructions
Step-by-Step Instructions for Ruler Rice Krispies
- Prepare the baking dish by lining it with parchment paper and spraying with non-stick cooking spray.
- Melt 3 tablespoons of butter in a large saucepan over low heat, then add a 10 oz bag of mini marshmallows and stir until smooth, about 5–7 minutes.
- Remove from heat and stir in 6 cups of Rice Krispies cereal until fully coated.
- Divide the mixture into three equal portions; leave one plain, add yellow gel to one portion and red gel to the other.
- Layer the colored mixtures in the prepared dish, starting with red at the bottom, yellow in the middle, and plain on top.
- Allow the layered Rice Krispies to cool completely at room temperature for about 30 minutes.
- Cut the cooled and set Ruler Rice Krispies into long rectangle bars.
- Melt ½ cup of white candy melts and ½ cup of chocolate chips separately, stirring until smooth.
- Use melted chocolate to add ruler markings and white candy melts to create a metallic edge.
- Add numbers and markings with black decorating gel or marker for a realistic ruler look.
- Allow decorated Ruler Rice Krispies to set until chocolate hardens completely, about 15–20 minutes.