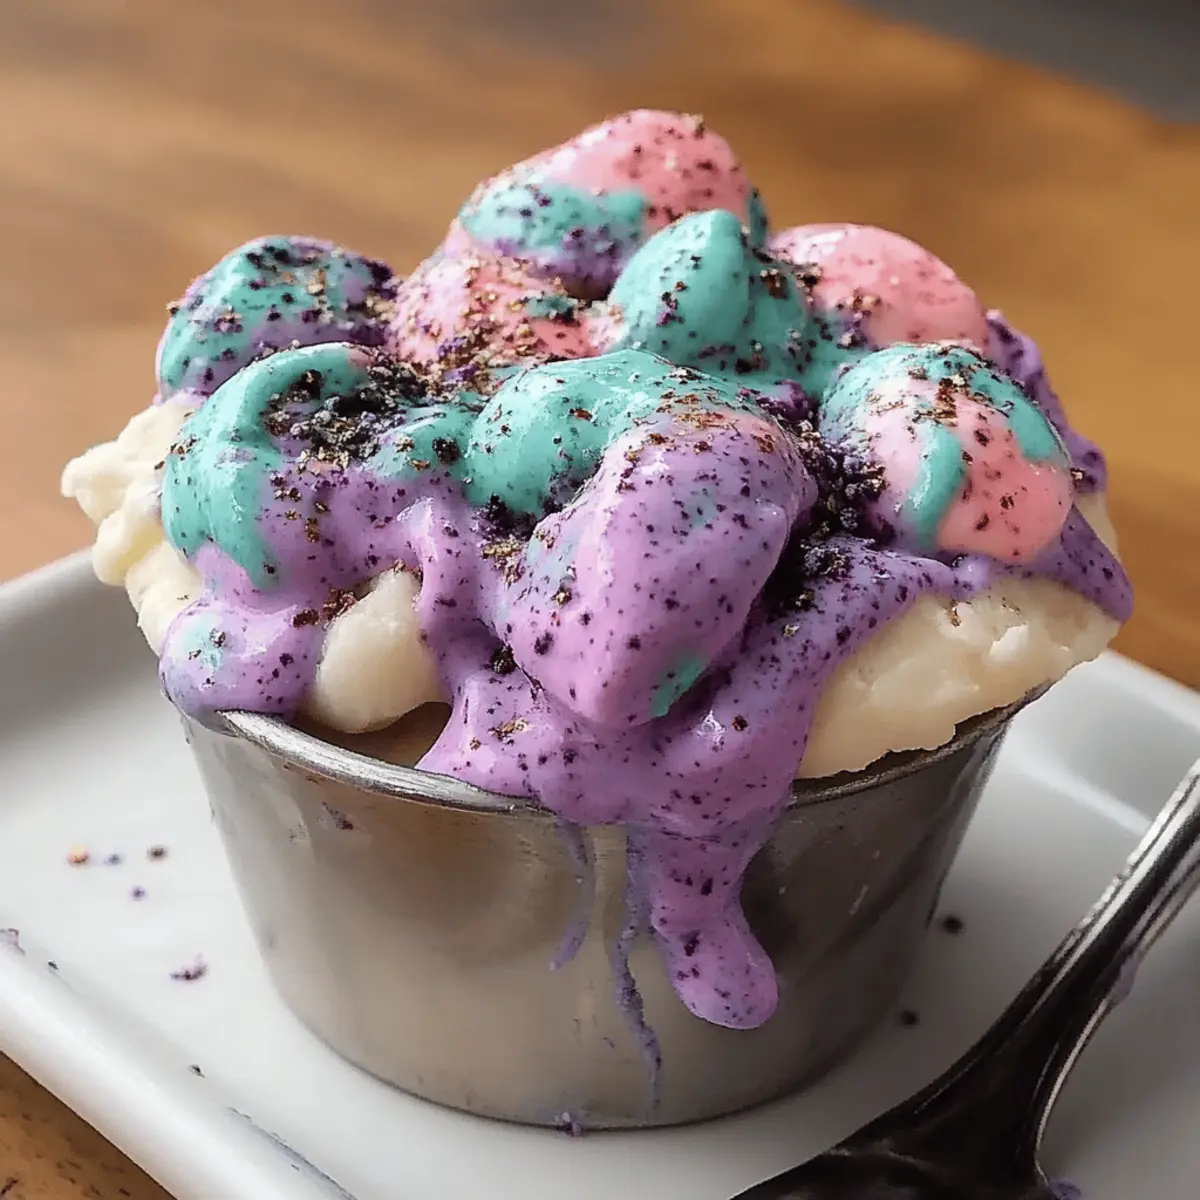
As I scoured my kitchen for a quick way to cool down on a sweltering summer day, the idea of crafting my own Mermaid Ice Cream swirled into my thoughts. This no-churn delight is not just about the dazzling colors—it’s a fun, kid-friendly treat that’s both customizable and easy to whip up. With zero raw eggs and just a handful of ingredients, you’ll feel like a magician enchanting your family and friends. In only 10 minutes of prep, you can create a vibrant ice cream wonder that will banish any memories of fast food desserts. Ready to dive into a world of color and sweetness that'll spark joy for kids and adults alike? Let's get mixing!
Why is Mermaid Ice Cream a Hit?
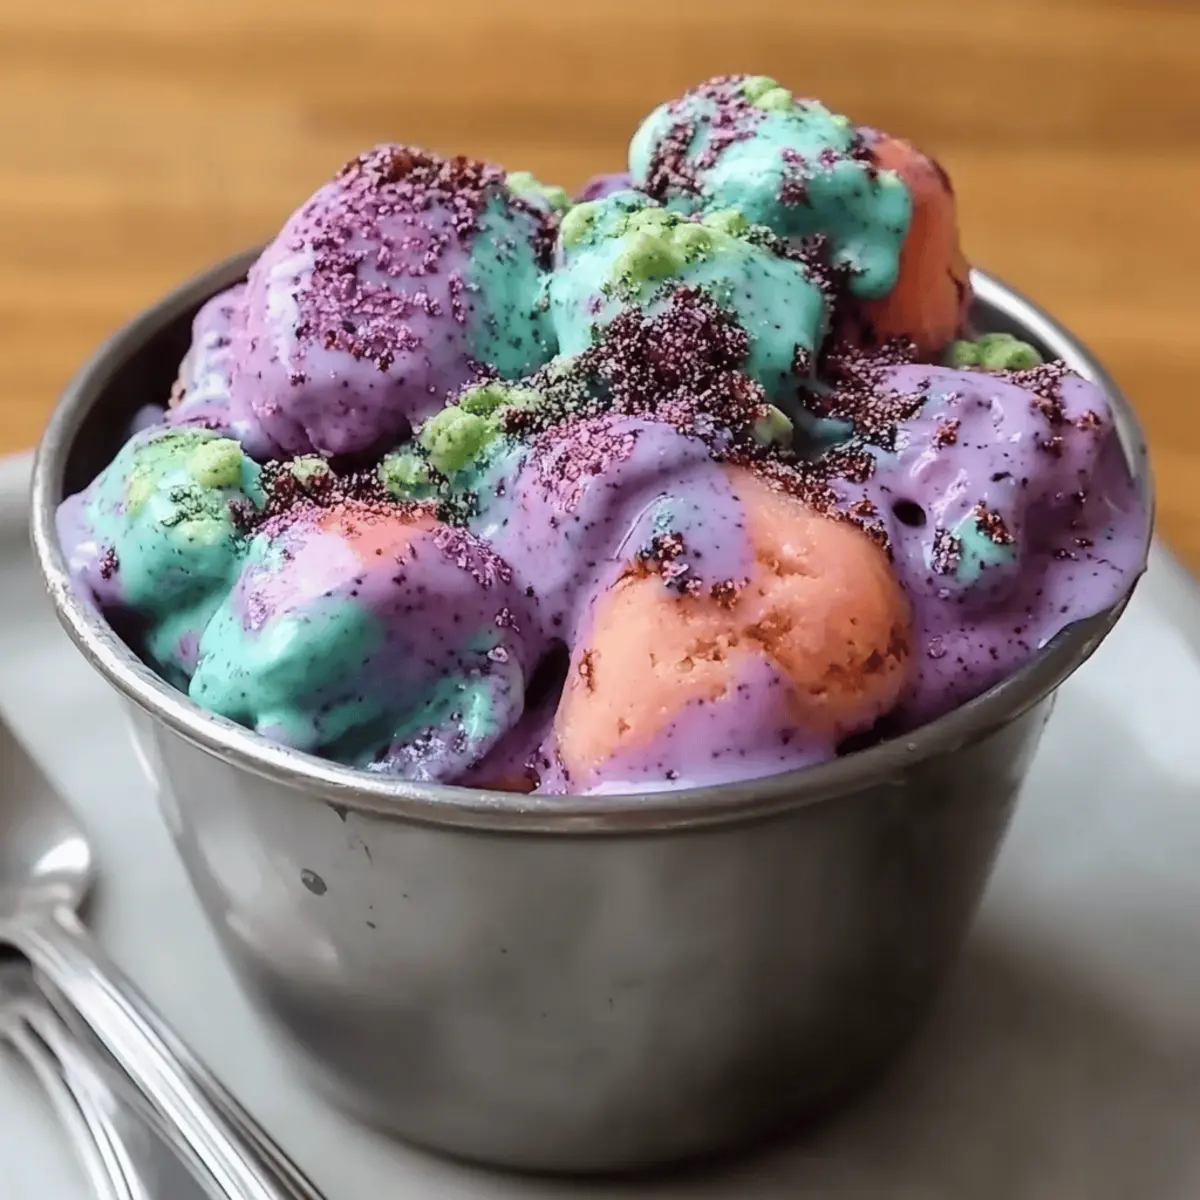
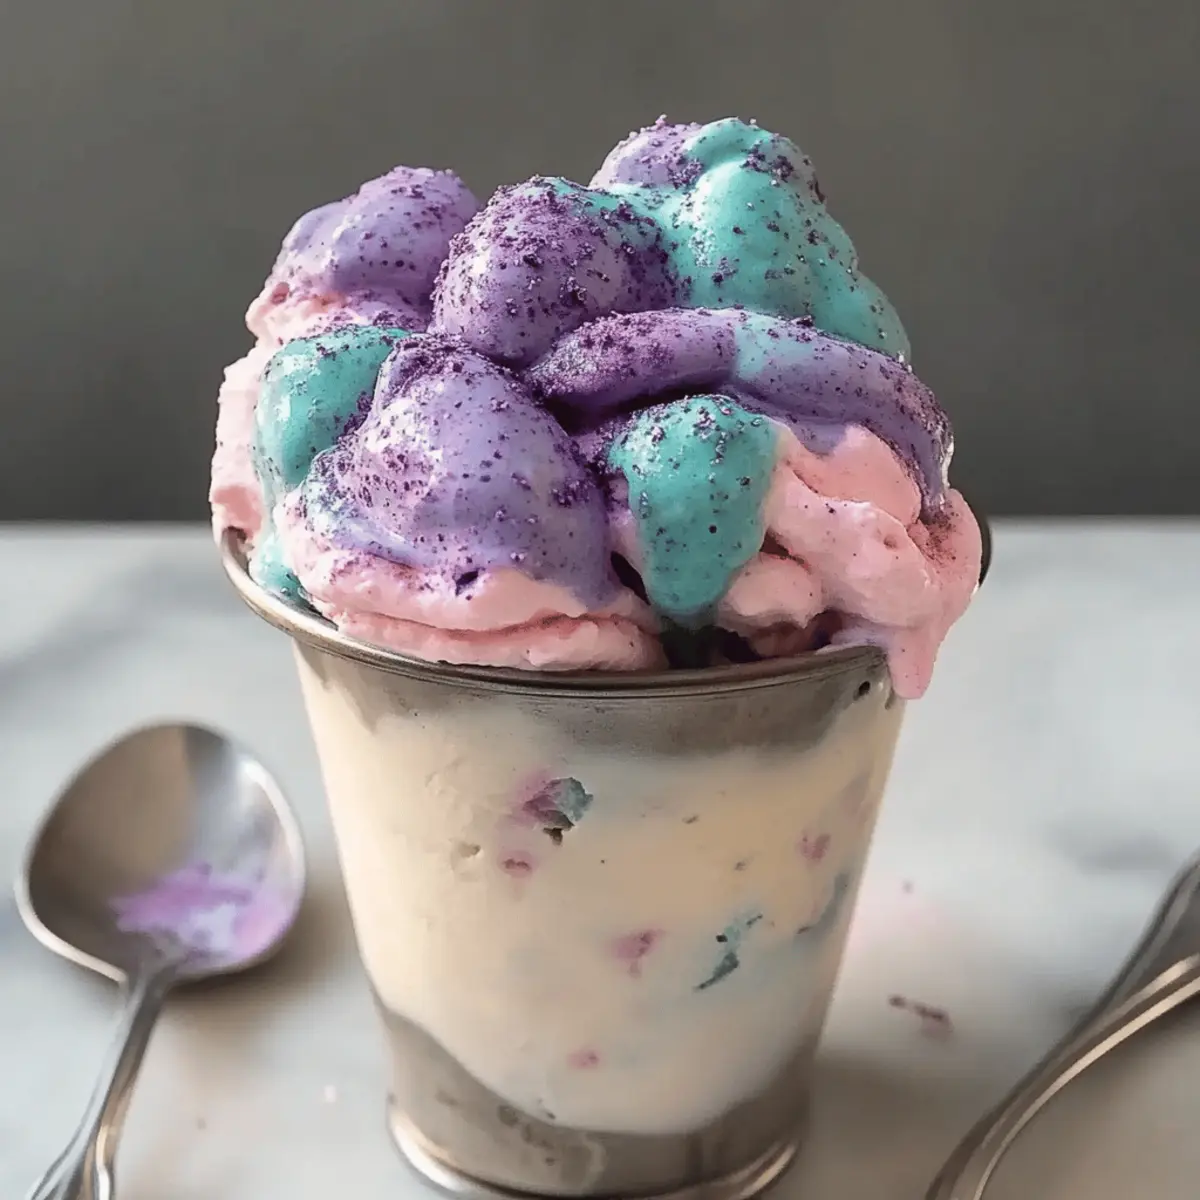
Delightful Visuals: The vibrant pink, purple, and teal colors create a whimsical treat that’s almost too pretty to eat.
Kid-Friendly Fun: No raw eggs and a simple no-churn method make this a safe and enjoyable cooking experience for young ones.
Quick and Easy: With just 10 minutes of prep time, you can whip up this magical dessert without the fuss of traditional ice cream.
Customizable Creations: Feel free to mix and match colors or add your favorite toppings—edible glitter or sprinkles bring even more excitement!
Crowd-Pleasing Dessert: This impressive dessert is perfect for gatherings, ensuring everyone will be enchanted by its beauty and flavor. Dive into this recipe and experience a delightful escape from ordinary desserts!
Ingredients
-
For the Ice Cream Base
• Heavy cream – this rich ingredient is crucial for achieving a creamy, smooth texture in your Mermaid Ice Cream.
• Sweetened condensed milk – adds sweetness and keeps the ice cream soft and scoopable once frozen.
• Vanilla extract – enhances the flavor profile, making each bite even more delightful. -
For the Colors
• Pink gel food coloring – use this to create sweet shades reminiscent of cotton candy for a magical touch.
• Purple gel food coloring – adds a whimsical hue, making your ice cream look truly enchanting.
• Teal gel food coloring – infuses a vibrant ocean-like color, perfect for this mermaid-themed treat. -
For the Decoration
• Edible glitter or sprinkles – sprinkle on top to give your Mermaid Ice Cream an extra magical flair, making it irresistible.
Step‑by‑Step Instructions for Mermaid Ice Cream
Step 1: Whip the Cream
In a large mixing bowl, use an electric mixer to whip 2 cups of heavy cream on medium speed until stiff peaks form, which should take about 3-5 minutes. You'll know the cream is ready when it's thickened and can hold its shape; this creates a luscious base for your Mermaid Ice Cream.
Step 2: Combine Ingredients
In a separate bowl, mix together one 14-ounce can of sweetened condensed milk and 1 teaspoon of vanilla extract until well blended. This sweet and creamy combination should be smooth and uniform, ensuring the flavors meld beautifully before folding into the whipped cream.
Step 3: Fold in the Cream
Gently fold the whipped cream into the combined milk mixture using a spatula, being careful not to deflate the cream. This process should take about 2-3 minutes, resulting in a light and airy ice cream base that will retain its delightful texture when frozen—essential for creating your Mermaid Ice Cream.
Step 4: Color the Mixture
Evenly divide the ice cream base into three separate bowls. Add pink gel food coloring to one bowl, purple gel food coloring to another, and teal gel food coloring to the last, mixing thoroughly until the colors are vibrant and well incorporated, which should take about 1-2 minutes per bowl.
Step 5: Swirl the Colors
In a loaf pan, alternate spoonfuls of your colored mixtures, creating dollops of each color. Using a butter knife, gently swirl the colors together to form a marbled effect, being cautious not to overmix. This step will take roughly 2-3 minutes and will make your Mermaid Ice Cream visually stunning.
Step 6: Add Finishing Touches
Sprinkle edible glitter or your favorite sprinkles generously over the top of the ice cream mixture in the loaf pan, ensuring an enchanting finish. This decorative touch adds a magical flair and will make your creation truly irresistible, so take a moment to be creative!
Step 7: Freeze to Perfection
Cover the loaf pan with plastic wrap or a lid and place it in the freezer for at least 6 hours, or until the ice cream is firm and scoopable. The freezing process is crucial, as it solidifies your Mermaid Ice Cream, locking in the flavors while creating that ideal creamy texture.

Expert Tips for Mermaid Ice Cream
• Whipping Perfection: Ensure your heavy cream is cold before whipping; this helps achieve those lovely stiff peaks for a creamy texture.
• Color Intensity: Start with a small amount of gel food coloring and gradually add more until you achieve your desired shade; avoid overpowering the base.
• Swirling Technique: Don’t overmix when swirling the colors; aim for a marbled look rather than completely blending the colors to maintain visual appeal.
• Freezing Time: Allow enough freezing time; for best results, chill it overnight to ensure it's fully firm for serving.
• Storage Tips: If you have leftovers, store your Mermaid Ice Cream in an airtight container to prevent freezer burn and preserve its magical flavors.
Mermaid Ice Cream Variations
Feel free to let your creativity shine with these delightful twists on Mermaid Ice Cream!
-
Dairy-Free: Substitute heavy cream with coconut cream for a rich and tropical flavor that still feels indulgent.
The coconut enhances the sweetness, making this version an exciting option for those avoiding dairy. -
Flavor Infusion: Add a teaspoon of almond or coconut extract to deepen the flavor profile, making each scoop more aromatic and unforgettable.
A hint of almond can make the sweetness sing, transforming your treat into an enchanting dessert experience. -
Nutty Crunch: Incorporate finely chopped nuts, like almonds or pecans, for a fun textural twist that contrasts with the creamy base.
The crunch adds a delightful surprise, elevating your Mermaid Ice Cream to a new level of yum! -
Fruity Swirl: Blend in some pureed strawberries, raspberries, or mango to create a fruity ribbon throughout the ice cream.
The fruity addition not only boosts the flavor but also adds a delightful tartness that balances the sweetness beautifully. -
Spicy Kick: For the daring souls, add a dash of cayenne or chili powder to one of the colored mixtures to create a kick of heat.
This twist will surprise your taste buds and transform dessert into a thrilling adventure! -
Sugar-Free Alternative: Use a sugar-free sweetened condensed milk for a guilt-free indulgence without sacrificing taste.
You and your health-conscious friends can enjoy every colorful scoop while staying true to your dietary preference. -
Chocolate Splash: Mix in chocolate chips or a swirl of fudge to one layer for a delightful chocolate contrast.
Chocolate and pastel colors create a fun and striking visual that will make your Mermaid Ice Cream even more enticing!
For more magical variations, consider pairing this delightful treat with our Delicious Waffle Cones for a whimsical dessert experience!
How to Store and Freeze Mermaid Ice Cream
Fridge: Store any leftover Mermaid Ice Cream in the fridge for up to 3 days, but keep in mind that it will lose its creamy texture and may become softer.
Freezer: For longer storage, place the ice cream in an airtight container and freeze for up to 2 months. This preserves the vibrant colors and flavors, ensuring you enjoy a magical treat anytime.
Reheating: Since this is a frozen dessert, there's no need to reheat. Simply take it out of the freezer and let it sit at room temperature for about 5-10 minutes for easier scooping.
Serving Suggestion: When ready to serve, scoop out your Mermaid Ice Cream into bowls and add extra edible glitter or sprinkles for an enchanting finish.
What to Serve with Mermaid Ice Cream?
Create a delightful pairing for this colorful dessert that will leave everyone smiling.
- Fresh Berries: The natural sweetness and tartness of strawberries, blueberries, or raspberries perfectly balance the rich creamy ice cream.
- Colorful Fruit Salad: A vibrant mix of fruits enhances the whimsical theme, adding a refreshing crunch to each delightful bite.
- Chocolate Sauce: Drizzling homemade or store-bought chocolate sauce adds a touch of indulgence that complements the playful ice cream flavors.
Indulging in Mermaid Ice Cream doesn't mean skipping on variety! A scoop paired with vibrant fruit can be a healthful balance, providing freshness against the soft, sweet textures of the dessert.
- Wafer Cones: Serve your ice cream in crunchy wafer cones for an extra layer of texture, turning every scoop into a fun-filled experience.
- Coconut Whipped Cream: Light and fluffy coconut whipped cream adds a tropical touch and enhances the creaminess of each bite.
- Sparkling Lemonade: Accompany this magical sweet treat with a glass of bubbly lemonade for a refreshing and zesty contrast.
- Marshmallow Fluff: For the ultimate treat, a dollop of marshmallow fluff provides sticky sweetness that harmonizes beautifully with the ice cream’s delicate texture.
Make Ahead Options
These Mermaid Ice Creams are perfect for busy weeknights or sunny weekend gatherings! You can prepare the ice cream base (heavy cream, sweetened condensed milk, vanilla) up to 24 hours in advance, storing it in an airtight container in the refrigerator to maintain freshness. Just mix the food coloring and swirl everything together in the loaf pan right before you’re ready to freeze—this keeps the vibrant colors looking their best! Once frozen, the ice cream can be kept in the freezer for up to 3 days without losing its creamy texture. When you’re ready to serve, simply scoop, top with edible glitter or sprinkles, and watch everyone delight in this whimsical homemade treat!
Mermaid Ice Cream Recipe FAQs
How do I choose ripe ingredients for Mermaid Ice Cream?
Absolutely! When selecting your ingredients, freshness is key. Use heavy cream that is well within its expiration date, and check for a thick consistency without any separation. Sweetened condensed milk should also be fresh—look for a can that is undamaged and has not been sitting on the shelf for too long.
How should I store Mermaid Ice Cream, and how long will it last?
For optimal storage, place any leftover Mermaid Ice Cream in an airtight container and keep it in the freezer for up to 2 months. Stored this way, it will maintain its vivid colors and delightful texture. If kept in the fridge, it will only last about 3 days before it begins to lose its creamy consistency.
Can I freeze Mermaid Ice Cream, and if so, how?
Absolutely! Freezing your Mermaid Ice Cream is essential for achieving the right texture. To freeze, simply pour the mixture into a loaf pan, cover it tightly with plastic wrap or a lid, and place it in the freezer for at least 6 hours, or preferably overnight. This will ensure it's perfectly set and ready to scoop. When taking it out, let it sit at room temperature for 5-10 minutes for easier serving.
What should I do if my ice cream doesn’t set properly?
If your Mermaid Ice Cream isn’t setting, fear not! There could be a couple of reasons: either the cream wasn't whipped to stiff peaks or the mixture wasn’t folded gently enough, causing air to escape. Next time, double-check the cream’s consistency while whipping—aim for those thick peaks! Also, ensure you are freezing it for a full 6 hours or longer; if it stays too soft, it may need extra time to fully solidify.
Are there any dietary considerations for Mermaid Ice Cream?
Yes, indeed! Since this recipe contains dairy, it may not be suitable for those who are lactose intolerant or have a dairy allergy. However, you can easily substitute heavy cream with a non-dairy alternative like coconut cream for an equally delicious and creamy result. Always check the labels on food coloring and sprinkles for any allergens, especially if serving kids.
Mermaid Ice Cream: A Magical No-Churn Treat for All Ages
Equipment
- Electric mixer
- Mixing bowls
- Loaf pan
- spatula
- Butter knife
Ingredients
For the Ice Cream Base
- 2 cups Heavy cream for a creamy texture
- 14 ounces Sweetened condensed milk adds sweetness
- 1 teaspoon Vanilla extract enhances flavor
For the Colors
- 1 drop Pink gel food coloring for cotton candy shade
- 1 drop Purple gel food coloring for whimsical hue
- 1 drop Teal gel food coloring for ocean-like color
For the Decoration
- to taste Edible glitter or sprinkles to sprinkle on top
Instructions
Step-by-Step Instructions
- Whip the cream in a bowl until stiff peaks form, about 3-5 minutes.
- Combine sweetened condensed milk and vanilla extract in a separate bowl until uniform.
- Gently fold the whipped cream into the condensed milk mixture.
- Divide the mixture into three bowls and add food coloring to each.
- Alternate spoonfuls of colored mixtures in a loaf pan and swirl gently with a knife.
- Sprinkle edible glitter or sprinkles on top.
- Cover and freeze for at least 6 hours until firm.