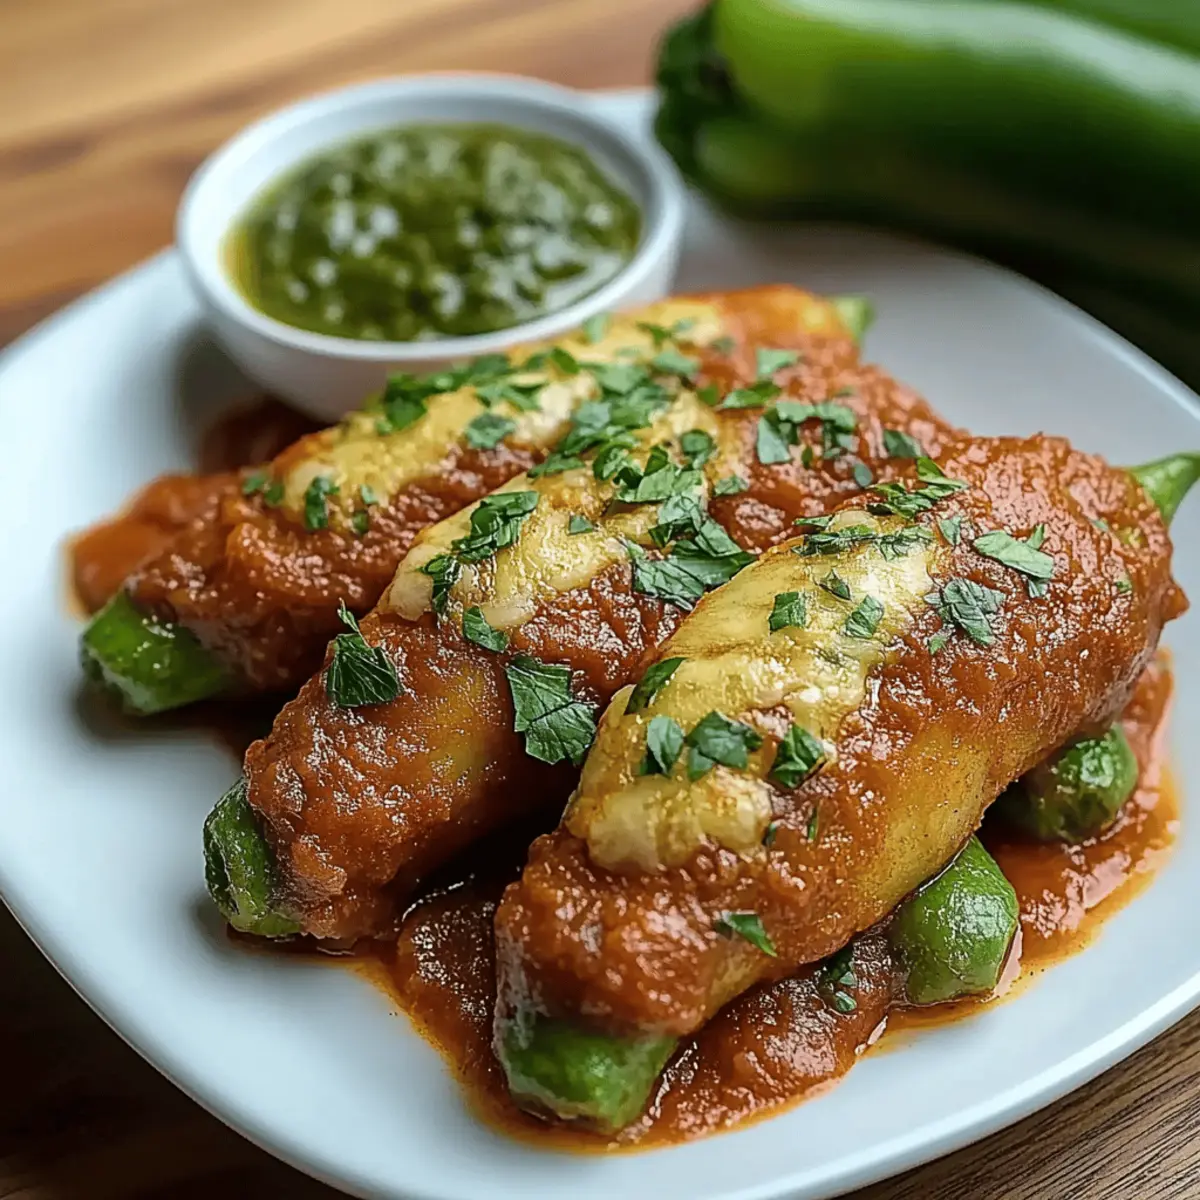
There’s a certain magic that comes when you transform humble ingredients into a flavor-packed dish, and that’s exactly what my Cheesy Hatch Chile Rellenos accomplishes. With the perfect balance of roasted hatch chiles and gooey Oaxaca cheese, this recipe redefines comfort food while delivering a delightful crunch that will make your taste buds dance. Plus, not only is this crowd-pleaser simple to prepare, but it also makes for an impressive centerpiece on any table. Imagine friends and family gathering around, eager to dig in as you proudly serve your homemade creation. Ready to dive into a culinary adventure that blends vibrant flavors and satisfying textures? Let’s get cooking and elevate your next meal!

Why are these Chiles Worth the Hype?
Bold, Flavorful Ingredients: Each bite bursts with the earthy sweetness of roasted hatch chiles, complemented by the melty goodness of Oaxaca cheese.
Simplicity Made Delicious: With just a handful of ingredients, including fresh tomatoes for the sauce, this recipe proves that homemade doesn’t have to be complicated.
Party-Ready Perfection: Whether you’re hosting a dinner party or just craving some comfort food, these cheesy hatch chile rellenos are sure to wow your guests.
Perfect for Meal Prep: Make a batch and enjoy leftovers throughout the week, delivering a delicious and satisfying dish that’s ready in minutes.
A Satisfying Crunch: The crispy exterior paired with the gooey, cheesy center creates a delightful texture that keeps everyone coming back for more!
For more savory ideas, check out my Crispy Chicken Tacos or elevate your brunch with these Sweet Potato Hash Browns.
Cheesy Hatch Chile Rellenos Ingredients
• Get ready to elevate your cooking with this flavorful dish!
For the Chiles
• Hatch green chiles – these are the star of the show with their unique flavor and mild heat.
• Oaxaca cheese – this melting cheese provides a creamy, gooey texture that’s essential for authentic rellenos.
For the Batter
• Large eggs – separating the yolks from the whites helps create a light, airy batter.
• All-purpose flour – provides the perfect base for a crunchy coating.
• Salt – enhances all the flavors throughout your dish.
• Garlic powder – adds a savory depth to the batter that complements the chiles.
For the Sauce
• Fresh tomatoes – use Roma or any fresh variety for a vibrant, flavorful base.
• White onion – contributes a sharp sweetness to the sauce's profile.
• Garlic cloves – minced garlic brings an aromatic kick that elevates your sauce.
• Chopped cilantro – this herb adds freshness and balances the flavors perfectly.
• Salt – once again, crucial for bringing out the best in your sauce!
• Sliced jalapeños (optional) – for those who enjoy a little extra heat in their sauce.
Dive into making these Cheesy Hatch Chile Rellenos, and let the flavors create a memorable gathering!
Step‑by‑Step Instructions for Cheesy Hatch Chile Rellenos
Step 1: Roasting the Chiles
Preheat your broiler and arrange the hatch green chiles on a foil-lined baking sheet. Broil for about 5–10 minutes, turning them halfway through, until the skins are blackened and blistered. Keep an eye out for an aromatic smell as they roast to ensure they’re cooking to perfection.
Step 2: Steaming the Chiles
Once roasted, immediately transfer the chiles to a gallon-sized ziplock bag to steam for 10–15 minutes. This step is crucial for loosening the skins, making them easier to peel. Be careful not to exceed the time as over-steaming can make them soggy and difficult to handle.
Step 3: Peeling and Preparing Chiles
After steaming, gently peel off the skins from the cooled chiles, taking care not to damage them. Cut a slit down one side of each chile and carefully remove the seeds with your fingers. This prep allows for maximum cheesy deliciousness in your Cheesy Hatch Chile Rellenos.
Step 4: Stuffing the Chiles
Fill each peeled chile generously with Oaxaca cheese or a similar melting cheese, ensuring they're well-stuffed for that gooey surprise. Use 1–2 toothpicks to seal the opening of each chile. This prevents the cheese from leaking during frying and gives your dish a beautiful, wholesome appearance.
Step 5: Whipping the Egg Whites
Separate the egg whites into a mixing bowl, and place the yolks in a separate cup. Beat the egg whites with an electric mixer at medium speed until stiff peaks form—about 3–5 minutes. Gently fold the yolks into the whipped whites on low speed until fully blended; this creates a light batter.
Step 6: Preparing the Batter
In a shallow dish, combine the all-purpose flour, 1 teaspoon of salt, and garlic powder. This mixture will help the batter adhere to the stuffed chiles, creating that crispy coating essential for perfect Cheesy Hatch Chile Rellenos. Mix well to ensure even distribution of the seasonings.
Step 7: Heating the Oil
In a deep pan, heat enough vegetable oil to submerge the chiles, reaching a temperature of 350°F (175°C). A candy thermometer can help you monitor the temperature accurately. The right heat is essential for achieving a perfectly golden and crunchy texture without overcooking the insides.
Step 8: Dredging and Coating
Carefully dredge each stuffed chile in the flour mixture, ensuring they are fully coated. Then dip them into the egg batter, allowing excess batter to drip off. This two-step coating process is key to creating that crispy texture that balances so beautifully with the melty cheese.
Step 9: Frying the Chiles
Gently place each coated chile into the hot oil, frying for 2–3 minutes on one side. Flip the chiles and continue frying for another 2–3 minutes, or until they turn a delightful golden brown. Monitor them closely to prevent burning and achieve that perfect crunch.
Step 10: Draining the Chiles
Once the chiles are beautifully golden, carefully remove them and let them drain on paper towels. This step allows excess oil to escape, ensuring your Cheesy Hatch Chile Rellenos have a delightful crisp without being greasy.
Step 11: Making the Sauce
For the sauce, blend together the tomatoes, white onion, garlic, chopped cilantro, and 1 teaspoon of salt until smooth. Transfer the mixture to a saucepan and heat over medium until it reaches a boil. Reduce the heat to a low simmer to let the flavors meld beautifully.
Step 12: Serving the Dish
Serve the fried chiles rellenos immediately, drizzling them generously with the vibrant red sauce over the top. As you present this colorful dish, the cheesy filling will beckon your guests, promising a taste experience they won't forget with each delicious bite!

Make Ahead Options
These Cheesy Hatch Chile Rellenos are a fantastic choice for meal prep enthusiasts! You can roast and steam the hatch chiles up to 24 hours in advance, making them easy to handle later. Just peel and stuff the chiles with Oaxaca cheese, and store them in an airtight container in the fridge. For the batter, whip the egg whites and yolks separately no more than 3 days ahead of time, keeping the components in separate, covered containers. On the day you plan to serve, simply dredge the stuffed chiles in the flour mixture again, fry, and enjoy a delicious dish that tastes just as fresh as if made that day!
Expert Tips for Cheesy Hatch Chile Rellenos
-
Choose Quality Chiles: Always select fresh hatch green chiles; their flavor is key in achieving the best Cheesy Hatch Chile Rellenos. Look for firm chiles with no blemishes.
-
Don’t Skip Steaming: Steaming the roasted chiles is crucial for easy peeling. Avoid over-steaming to keep them intact and perfect for stuffing!
-
Perfect the Batter: Ensure the egg whites are whipped to stiff peaks for a light batter. Fold in yolks gently to maintain that airy texture, creating a delightful crunch.
-
Monitor Oil Temperature: Maintaining oil at 350°F ensures your chiles fry evenly without absorbing too much oil. Use a thermometer for best results.
-
Serve Fresh: For the crispiest Cheesy Hatch Chile Rellenos, serve them hot right after frying. Letting them sit can make them lose their perfect crunch!
-
Customize Your Filling: Feel free to mix in other ingredients like spices or additional cheeses for a personalized twist on traditional rellenos.
How to Store and Freeze Cheesy Hatch Chile Rellenos
-
Room Temperature: It's best to enjoy Cheesy Hatch Chile Rellenos fresh. However, if you need to leave them out, keep them at room temperature for no more than 2 hours.
-
Fridge: Store leftover chiles in an airtight container in the fridge for up to 3 days. Reheat carefully in the oven to maintain their crispiness.
-
Freezer: To freeze, wrap each chile individually in plastic wrap and place them in a freezer bag. They can be frozen for up to 3 months.
-
Reheating: For reheating, place thawed chiles on a baking sheet and heat in a preheated oven at 350°F (175°C) for about 15-20 minutes until warmed through and crispy.
What to Serve with Cheesy Hatch Chile Rellenos
There’s nothing quite like an inviting spread that harmonizes with the cheesy goodness of your delicious creation.
-
Cilantro Lime Rice: This zesty side adds brightness and balances the richness of the chiles, bringing a refreshing touch to your meal.
-
Black Beans: A warm bowl of seasoned black beans offers a creamy texture and hearty flavor, complementing the cheese in the rellenos perfectly.
-
Avocado Salsa: This fresh and creamy salsa enhances each bite with buttery richness and a hint of acidity, making your meal even more vibrant.
-
Mexican Street Corn: The sweet and spicy flavors of elote topped with cotija cheese create a delightful contrast, adding crunch and excitement to the plate.
-
Chilled Cucumber Salad: Crisp cucumbers dressed with lime juice and cilantro provide a refreshing palate cleanser that pairs beautifully with rich chiles.
-
Margaritas: Sip on a classic margarita—its zesty lime and tangy notes will enhance the flavors of your cheesy hatch chile rellenos while adding a festive flair.
-
Churros: Finish your meal on a sweet note with warm, cinnamon-sugar churros. Their crispy exterior and soft interior balance out the spiciness of the dish beautifully.
Cheesy Hatch Chile Rellenos Variations
Feel free to get creative with these delicious options that let your personality shine through each bite.
-
Spicy Twist: Add diced jalapeños or serrano peppers to the cheese filling for an extra kick that dances on your palate.
-
Vegetarian Delight: Swap the Oaxaca cheese with a blend of sautéed mushrooms and spinach for a vibrant, hearty stuffing perfect for non-meat lovers.
-
Gluten-Free: Replace all-purpose flour with a gluten-free blend to make these chiles accessible without sacrificing that crunchy texture!
-
Rich Flavor: Stir in some crumbled chorizo or ground beef into your cheesy filling for an added savory depth that meat lovers will appreciate.
-
Herbaceous Boost: Incorporate fresh herbs like basil or thyme into the batter or sauce for a refreshing lift in flavor that's sure to impress.
-
Cheese Variety: Experiment with different cheeses such as Monterey Jack or Fontina for a twist on the traditional gooeyness you love.
-
Hearty Addition: For a filling twist, stuff the chiles with a mixture of quinoa and black beans along with the cheese, making it protein-packed and extra satisfying.
-
Zesty Sauce: Elevate your tomato sauce with a splash of lime juice or a pinch of smoked paprika to brighten up the flavors and add a zesty finish.
For more delightful recipes perfect for any meal, you might enjoy my Crispy Chicken Tacos or whip up a comforting batch of Sweet Potato Hash Browns.

Cheesy Hatch Chile Rellenos Recipe FAQs
How do I choose the best hatch green chiles?
Absolutely! Look for firm hatch green chiles that are free from blemishes or dark spots. The ideal chiles should feel heavy in your hand and have a vibrant green color. Their unique flavor and mild heat are what truly make the Cheesy Hatch Chile Rellenos shine!
How should I store leftover Cheesy Hatch Chile Rellenos?
For the best results, store leftover chiles in an airtight container in the fridge, where they will stay fresh for up to 3 days. When it’s time to reheat, simply pop them in the oven at 350°F (175°C) for about 15-20 minutes to recapture that delightful crispiness.
Can I freeze Cheesy Hatch Chile Rellenos?
Yes, you can! Wrap each chile individually in plastic wrap, then place them in a freezer bag. They will keep well for up to 3 months. When you're ready to enjoy them again, simply thaw them in the fridge overnight and reheat in the oven at 350°F (175°C) for 15-20 minutes until heated through.
What’s the best way to reheat the chiles?
To reheat, first thaw your frozen Cheesy Hatch Chile Rellenos in the fridge overnight. Preheat your oven to 350°F (175°C), then place the chiles on a baking sheet. Heat them for about 15-20 minutes or until they're warmed through and the exterior regains its lovely crunch.
Are Cheesy Hatch Chile Rellenos safe for pets?
Very! While the ingredients in Cheesy Hatch Chile Rellenos are not toxic to pets, be cautious of the spices and cheese, as they can upset your furry friend's stomach. If you're considering sharing a small piece, make sure it's plain without any sauce.
What should I do if my batter isn't sticking to the chiles?
No worries! If your batter isn't adhering properly, try lightly dredging the stuffed chiles in flour again before dipping them into the egg batter. This extra layer of flour helps create a firmer surface for the batter to cling onto, ensuring that each bite of Cheesy Hatch Chile Rellenos is perfectly crispy!
Irresistibly Cheesy Hatch Chile Rellenos You’ll Crave
Equipment
- Broiler
- Baking Sheet
- Mixing bowl
- Electric mixer
- Deep Pan
- Blender
- Saucepan
- Thermometer
Ingredients
For the Chiles
- 6 Hatch green chiles These are the star of the show with their unique flavor and mild heat.
- 2 cups Oaxaca cheese This melting cheese provides a creamy, gooey texture.
For the Batter
- 4 Large eggs Separate yolks from the whites.
- 1 cup All-purpose flour Provides the perfect base for a crunchy coating.
- 1 teaspoon Salt Enhances all the flavors.
- 1 teaspoon Garlic powder Adds savory depth to the batter.
For the Sauce
- 4 medium Fresh tomatoes Use Roma or any fresh variety for a vibrant, flavorful base.
- 1 medium White onion Contributes a sharp sweetness.
- 2 cloves Garlic cloves Minced for an aromatic kick.
- ¼ cup Chopped cilantro Adds freshness and balances flavors.
- 1 teaspoon Salt Crucial for flavor.
- 1 Sliced jalapeños (optional) For extra heat.
Instructions
Step-by-Step Instructions
- Preheat your broiler and arrange the hatch green chiles on a foil-lined baking sheet. Broil for 5–10 minutes, turning halfway, until skins are blackened.
- Transfer the chiles to a ziplock bag to steam for 10–15 minutes.
- Gently peel the skins from the cooled chiles, cut a slit, and remove seeds.
- Stuff each peeled chile with Oaxaca cheese and seal with toothpicks.
- Beat egg whites until stiff peaks form, then gently fold in yolks.
- Combine flour, 1 teaspoon salt, and garlic powder in a shallow dish.
- Heat vegetable oil to 350°F (175°C) in a deep pan.
- Dredge each stuffed chile in the flour mixture, then dip in egg batter.
- Fry each coated chile for 2–3 minutes on each side until golden brown.
- Drain fried chiles on paper towels.
- Blend tomatoes, onion, garlic, cilantro, and 1 teaspoon salt. Heat in a saucepan until smooth and boiling, then simmer.
- Serve fried chiles topped with the vibrant red sauce.