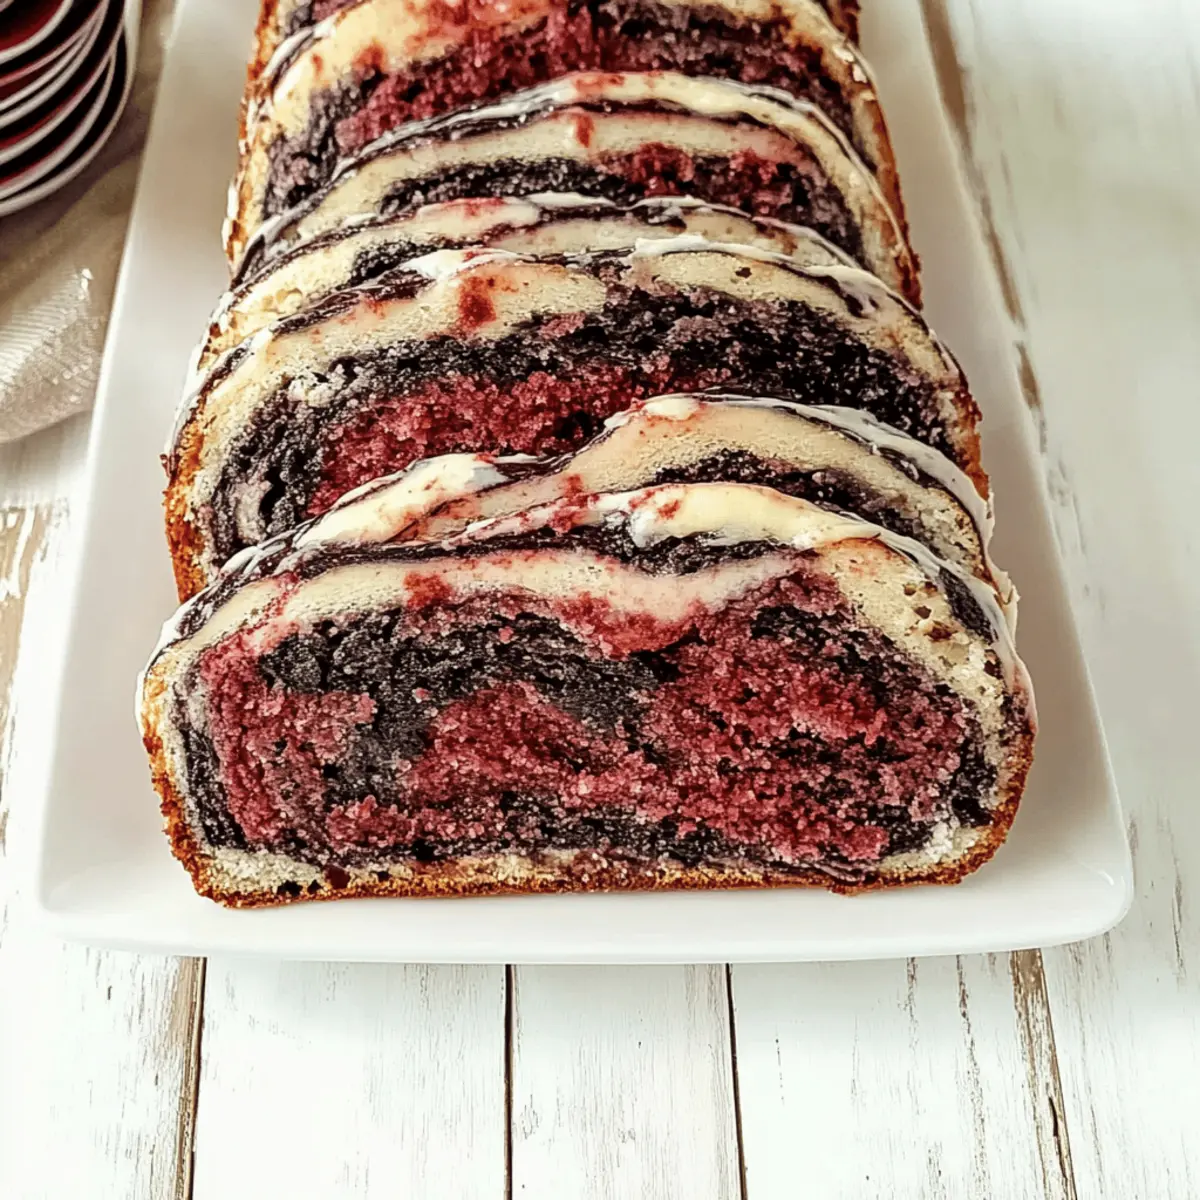
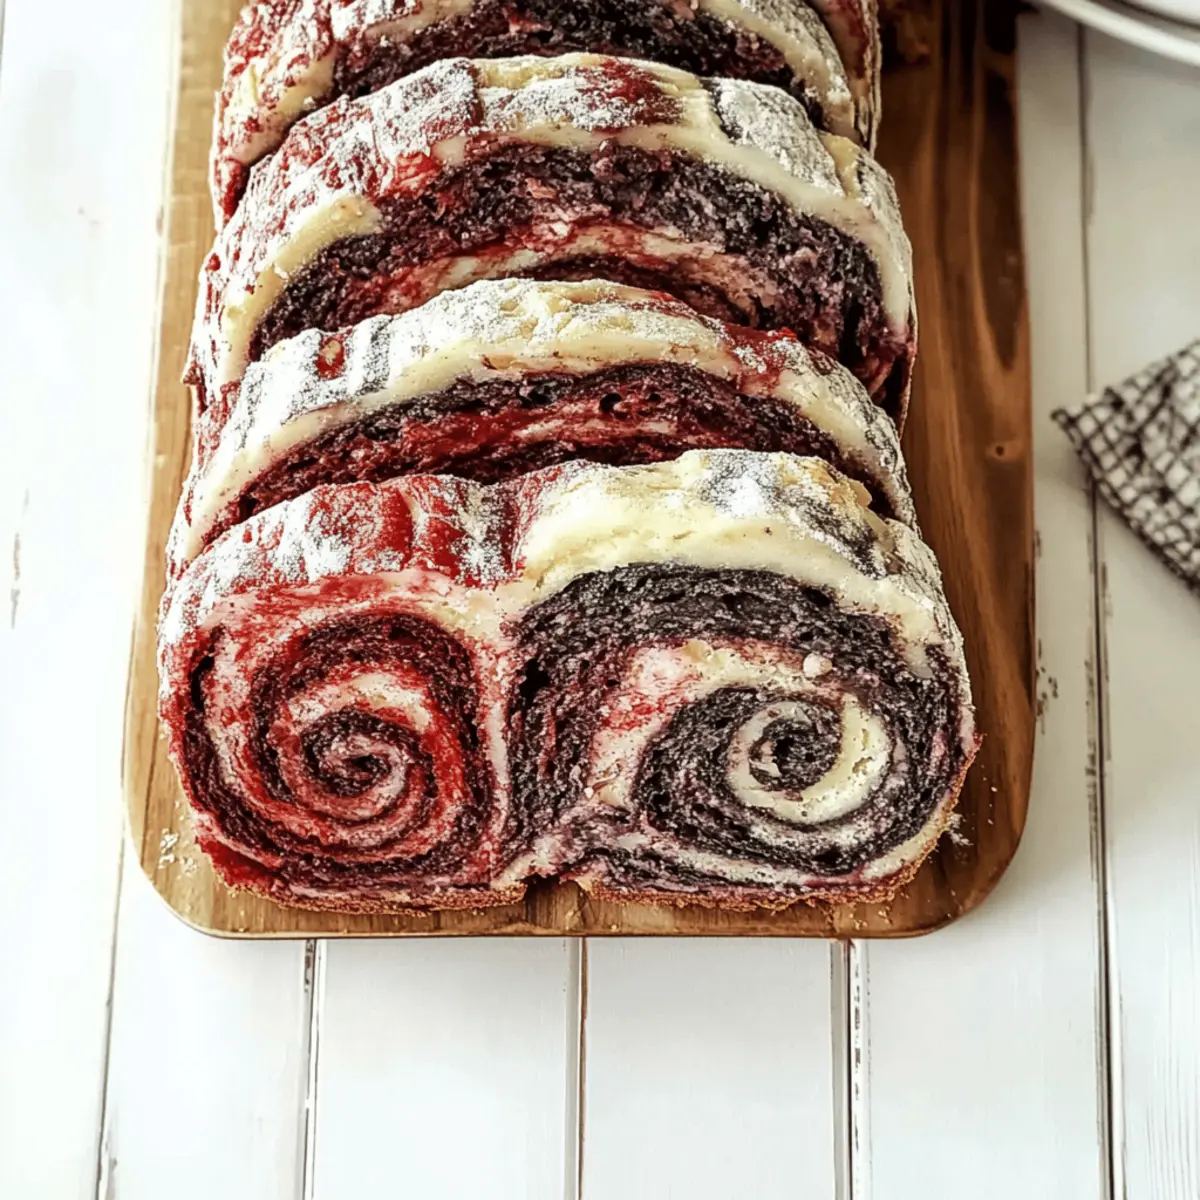
As the sun sets and shadows stretch across my kitchen, a delightful mix of whimsy and warmth fills the room. Today, I’m excited to share my enchanting recipe for Vampire Bread, a fun twist on homemade baking that’ll make your dinner table shine with a touch of Halloween magic. This recipe is perfect for bringing family and friends together, with its striking marbled colors and delightful aroma wafting from the oven. Not only is it a quick prep, taking just 5 minutes to get started, but it also doubles as a crowd-pleaser that’s guaranteed to spark laughter and conversation. Ready to summon some culinary creativity? Let’s dive into the mysterious world of baking with this spooky masterpiece!
Why Is This Vampire Bread a Must-Try?
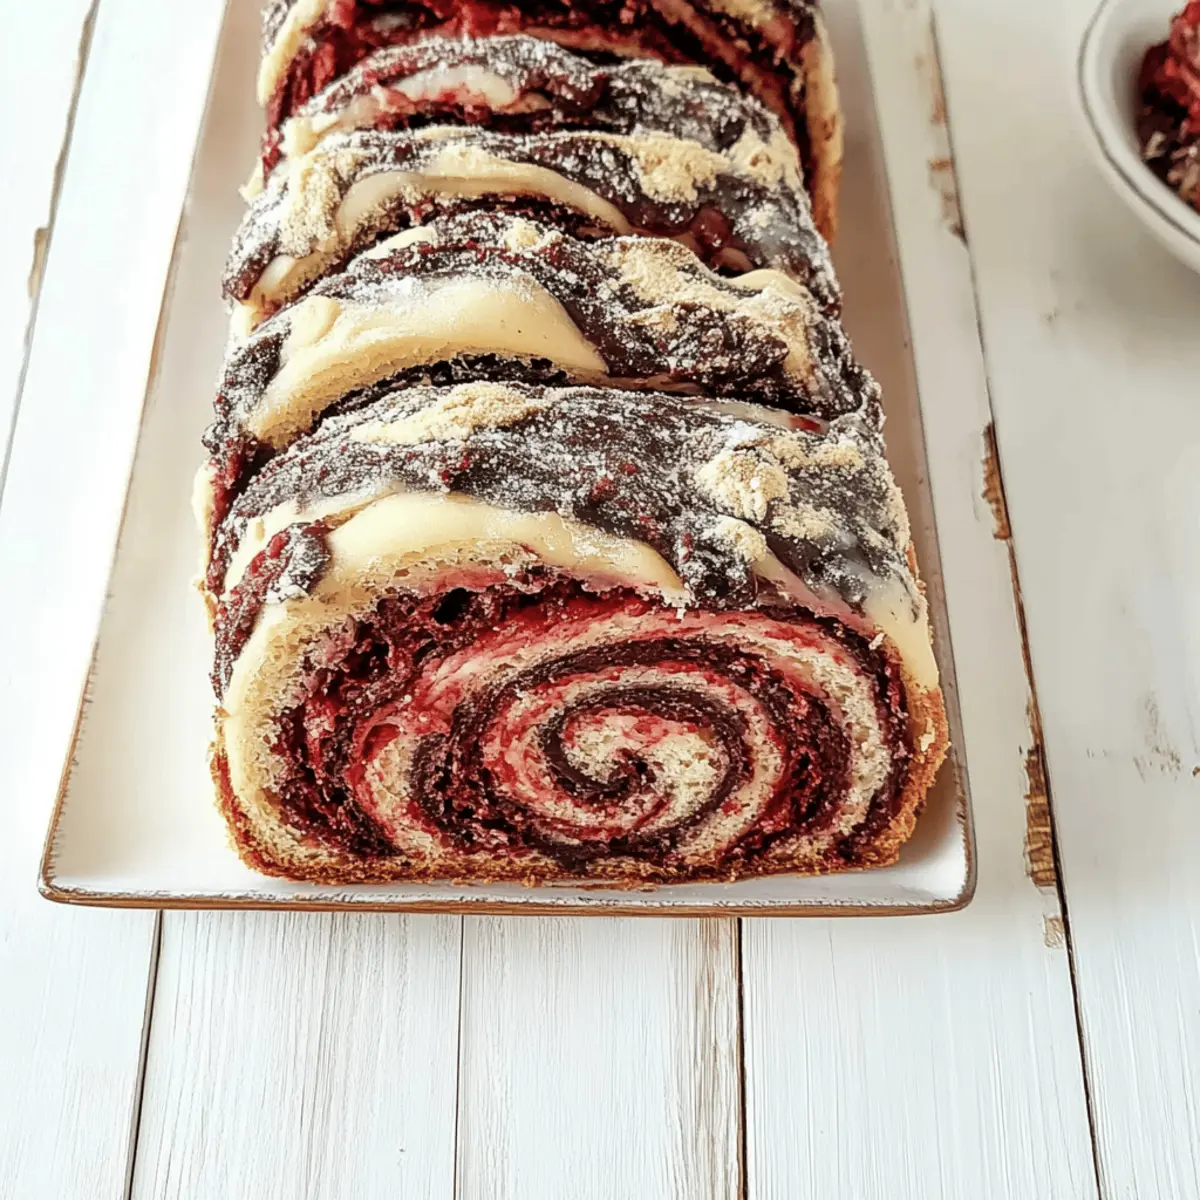
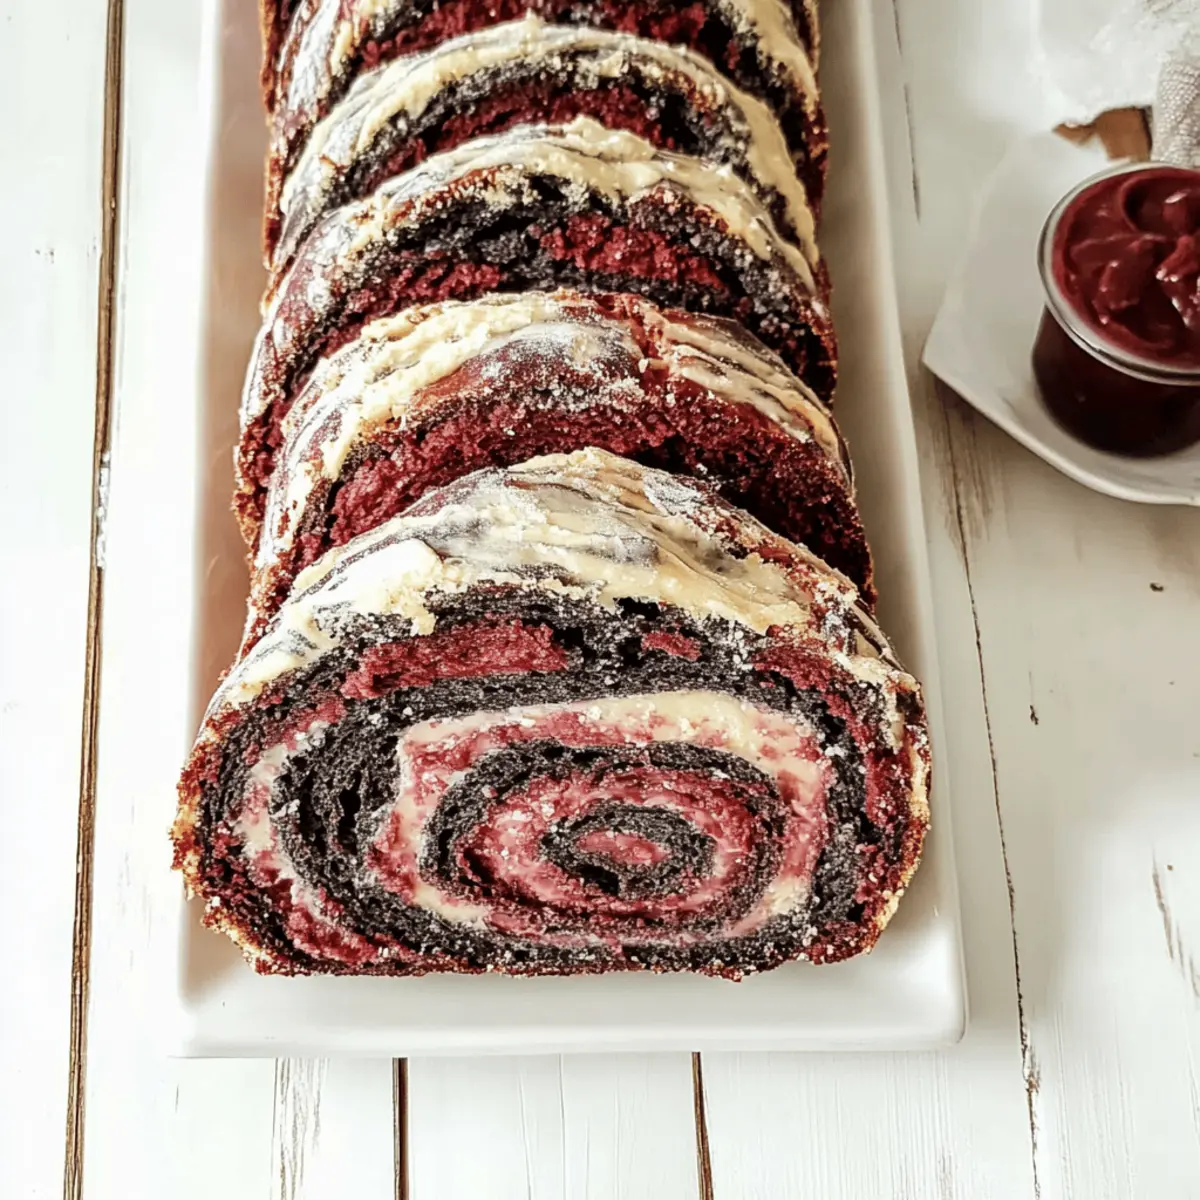
Unique Appearance: The striking red and black marbled effect makes this bread perfect for Halloween gatherings or any spooky celebration.
Quick Prep Time: With just 5 minutes of active work, you’ll bring a fun culinary experience to life without breaking a sweat.
Crowd-Pleasing Flavor: This bread offers an inviting sweetness, making it an ideal complement to savory dishes or a delightful snack on its own.
Interactive Baking: Get the family involved in the process! Kids will love helping color the dough and seeing the transformation as it bakes.
Versatile Use: Serve it as a festive addition to your table or use it for delicious sandwiches that are sure to impress. Why not try it alongside Cranberry Pistachio Shortbread for dessert?
Embark on a delightful baking adventure with this Vampire Bread and watch as everyone enjoys a slice of spooky goodness!
Vampire Bread Ingredients
• Get ready to bake the spookiest bread ever!
For the Dough
- All-purpose flour – Essential for the bread structure; remember, using bread flour will give you a chewier texture.
- Sugar – Adds sweetness; you can swap this out for brown sugar for a deeper flavor.
- Warm water – Activates the yeast; make sure it’s not too hot or too cold to get the best rise.
- Active dry yeast – The magical ingredient that helps the dough rise; check the expiration date for best results.
- Vegetable oil – Keeps the bread moist; olive oil can be a flavorful substitute.
- Salt – Enhances flavors; don’t skip this, as it balances the sweetness.
For the Coloring
- Red food coloring – Gives the vampire effect; feel free to experiment with natural alternatives like beet juice!
- Black food coloring – Complements the red; this adds dramatic flair and is perfect for Halloween vibes!
Bring your kitchen to life with this fun and eerie recipe for Vampire Bread, and watch as the smiles grow along with the dough!
Step‑by‑Step Instructions for Vampire Bread
Step 1: Prepare the Yeast
In a small bowl, combine ½ cup of warm water with the packet of active dry yeast, stirring gently. Allow this mixture to sit for 5 minutes until it becomes frothy, which indicates that the yeast is activated and ready to work its magic on your Vampire Bread.
Step 2: Mix Dry Ingredients
In a large mixing bowl, combine 2 cups of all-purpose flour, ½ cup of sugar, and 1 teaspoon of salt. Whisk these dry ingredients together until evenly mixed, creating a light, fluffy base that will give your Vampire Bread a lovely texture once baked.
Step 3: Combine Wet and Dry
Pour the yeast mixture and ¼ cup of vegetable oil into the bowl of dry ingredients. Mix with a wooden spoon or spatula until a cohesive dough forms, ensuring there are no dry patches left. This step should take about 2-3 minutes as the ingredients start to blend nicely together.
Step 4: Color the Dough
Divide the dough into two equal portions. In separate bowls, add red food coloring to one portion and black food coloring to the other. Knead each dough until the colors are vibrant and evenly distributed, which should take about 3-5 minutes for each portion.
Step 5: Create the Marbled Effect
Roll out both colored dough pieces into rectangles on a lightly floured surface. Layer them on top of one another, then twist or fold the dough gently to create a beautiful marbled effect. This design is what will make your Vampire Bread visually striking!
Step 6: Shape the Loaf
Once marbled, shape the twisted dough into a loaf. Gently tuck the ends under to create a neat finish and place it in a greased loaf pan. This shape will help your Vampire Bread rise evenly and bake beautifully in the oven.
Step 7: Let the Dough Rise
Cover the loaf pan with a clean kitchen towel and place it in a warm spot to rise for about 2 hours, or until the dough has doubled in size. This rising step is crucial for achieving the soft, fluffy texture of your Vampire Bread.
Step 8: Preheat the Oven
Once the dough has risen adequately, preheat your oven to 350°F (175°C). This temperature is ideal for baking your bread until golden brown and ensures that the inside is fully cooked, without burning the outside.
Step 9: Bake the Bread
Place the loaf pan in the preheated oven and bake for 30 minutes. Keep an eye on your Vampire Bread; it should develop a lovely golden brown crust and will be done when a toothpick inserted in the center comes out clean.
Step 10: Cool and Slice
After baking, remove the loaf from the oven and allow it to cool in the pan for about 10 minutes. Then, transfer the bread to a wire rack to cool completely. Once cooled, the Vampire Bread is ready to be sliced and served, revealing its spooky marbled interior!
How to Store and Freeze Vampire Bread
Room Temperature: Keep Vampire Bread at room temperature in a sealed plastic bag or airtight container for up to 3 days to maintain freshness and flavor.
Fridge: For longer storage, wrap the bread tightly in plastic wrap and refrigerate for up to a week. This helps preserve its unique texture and taste.
Freezer: To freeze, slice the Vampire Bread and place it in an airtight container or freezer bag for up to 3 months. Thaw slices individually for quick use.
Reheating: When ready to enjoy, reheat slices in a toaster or in the oven at 350°F (175°C) for about 5-7 minutes, ensuring that wonderful aroma fills your kitchen once again!
Vampire Bread Variations & Substitutions
Feel free to put your unique spin on this delightful Vampire Bread; let your creativity run wild!
-
Gluten-Free: Substitute all-purpose flour with a 1:1 gluten-free flour blend for a delicious twist.
Experimenting with gluten-free options can add a new dimension to your baking while allowing everyone to enjoy this spooky treat. -
Vegan: Use plant-based milk instead of warm water and replace vegetable oil with melted coconut oil.
Transforming this recipe into a vegan delight ensures everyone can partake in the fun without missing out on that lovely, fluffy texture. -
Additional Flavors: Add 1 teaspoon of cinnamon or nutmeg for a warm, spiced flavor that'll deepen the taste of this festive bread.
Imagine the aromatic blend filling your kitchen, bringing a cozy warmth that enchants everyone who enters. -
Stuffed Options: Consider filling your Vampire Bread with chocolate chips or dried cranberries before shaping the loaf.
This sweet surprise will create a burst of flavor in each slice, turning ordinary bread into a phenomenal treat. -
Herb-Infused: Mix in dried herbs like rosemary or thyme for a savory twist that pairs wonderfully with soups or stews.
The aromatic combination will elevate your bread, making it a versatile addition to any meal. -
Color Variations: Try using natural food colorings made from beet juice and activated charcoal for a guilt-free twist on the color theme.
This not only achieves that vibrant appearance but adds a touch of health consciousness to your delicious creation. -
Sweet Glaze: Drizzle a simple icing made from powdered sugar and almond milk on top for an extra layer of sweetness.
This glazed finish can truly make your Vampire Bread come alive, perfect for serving at festive gatherings!
Why not accompany your Vampire Bread with a side of Garlic Crack Bread for an irresistible combination that keeps guests smiling?
Expert Tips for Vampire Bread
• Activate Properly: Ensure the warm water isn’t too hot, as scorching it can kill the yeast, resulting in flat Vampire Bread.
• Dough Consistency: If the dough feels too sticky while mixing, gradually add a bit more flour until it reaches a manageable texture, ensuring a perfect rise.
• Creative Coloring: Experiment with the intensity of the food coloring; don't be afraid to mix colors to achieve your desired spooky look.
• Rising Time: Allow the dough to rise in a warm, draft-free place for the best texture; a cold environment will slow down the yeast activity.
• Baking Watch: Keep an eye on the bread while baking; if the crust browns too quickly, lightly cover it with foil to prevent burning while the inside cooks through.
What to Serve with Vampire Bread?
Imagine the joy of bringing a feast to life that sends shivers down your spine while delighting your taste buds!
-
Garlic Butter Dip: Perfect for slathering, this rich dip enhances the bread’s flavor and adds an aromatic twist to each bite.
-
Crispy Roasted Vegetables: Their savory crunch brings balance to the sweet Vampire Bread, making your meal vibrant and appealing!
-
Creamy Tomato Soup: A warm bowl of this classic pairs beautifully, accentuating the sweet notes of the bread and offering comfort on chilly nights.
-
Herbed Goat Cheese Spread: The tangy creaminess complements the sweetness of the bread, creating a delightful contrast that’s bound to impress.
-
Spooky Salad: Toss fresh greens and colorful veggies with a fun Halloween twist. The freshness brightens the plate and adds nutritional balance.
-
Mulled Cider: This warm, spiced drink perfectly complements the unique flavors of the bread while evoking autumn vibes all around your table.
-
Chocolaty Graveyard Dirt Cake: For dessert, this themed cake ties in wonderfully with the spooky bread, delighting family and friends with a fun finish!
Serve up these inspired pairings alongside your Vampire Bread, and you’ll create a meal that’s as enchanting as it is delicious!
Make Ahead Options
These Vampire Bread are perfect for meal prep, allowing you to create delightful treats with minimal last-minute effort! You can prepare the colored dough (both red and black) up to 24 hours in advance. Simply follow steps 1 to 5, then tightly wrap each portion of colored dough in plastic wrap and refrigerate. This keeps the dough fresh and vibrant while saving you time. When you're ready to enjoy your spooky bread, simply take the dough out, shape it into a loaf, allow it to rise for about 2 hours as instructed, and then bake as directed. With this make-ahead option, you'll have delicious, visually striking Vampire Bread ready to grace your table with ease!
Vampire Bread Recipe FAQs
What type of flour is best for Vampire Bread?
For Vampire Bread, all-purpose flour is ideal as it provides the perfect balance of structure and tenderness. If you prefer a chewier texture, you can substitute with bread flour, which will give your bread a delightful bite.
How should I store Vampire Bread?
At room temperature, Vampire Bread can be kept in a sealed plastic bag or airtight container for up to 3 days to maintain its freshness. For longer storage, wrap it tightly in plastic wrap and refrigerate for up to a week, ensuring it remains soft and flavorful.
Can I freeze Vampire Bread?
Absolutely! To freeze your Vampire Bread, slice it first for convenience. Place the slices in an airtight container or freezer bag, and they’ll be good for up to 3 months. When you’re ready to enjoy, just thaw individual slices, and reheat them in a toaster or on a baking sheet in the oven at 350°F (175°C) for about 5-7 minutes.
What should I do if my dough doesn’t rise?
If your dough fails to rise, it could be due to inactive yeast. Make sure the water you use to activate the yeast is warm but not too hot, as temperatures around 110°F (43°C) are ideal. If the dough is still unresponsive after rising for the stipulated time, knead in a bit of additional yeast (about 1 teaspoon) and give it another chance to rise in a warm, draft-free spot.
Can I make Vampire Bread gluten-free?
Yes, if you’re looking to make this recipe gluten-free, substitute the all-purpose flour with a gluten-free all-purpose flour blend. Make sure the blend contains a binding agent like xanthan gum for the best results. Be aware that the texture and flavor might vary slightly from traditional bread, but it will still be delicious!
Vampire Bread: Bake Up Spooky Deliciousness at Home
Equipment
- Mixing bowl
- Loaf pan
- Whisk
- wooden spoon or spatula
Ingredients
For the Dough
- 2 cups all-purpose flour Essential for the bread structure
- ½ cup sugar Adds sweetness
- ½ cup warm water Activates the yeast
- 1 packet active dry yeast Check the expiration date
- ¼ cup vegetable oil Keeps the bread moist
- 1 teaspoon salt Enhances flavors
For the Coloring
- 1 bottle red food coloring Gives the vampire effect
- 1 bottle black food coloring Adds dramatic flair
Instructions
Step-by-Step Instructions
- In a small bowl, combine warm water with the packet of active dry yeast, stirring gently. Allow to sit for 5 minutes until frothy.
- In a large mixing bowl, combine all-purpose flour, sugar, and salt. Whisk together until evenly mixed.
- Pour yeast mixture and vegetable oil into the dry ingredients, mixing until a cohesive dough forms.
- Divide the dough into two portions. Add red food coloring to one and black food coloring to the other, kneading until colors are vibrant.
- Roll out both colored dough pieces, layer them, twist or fold gently to create a marbled effect.
- Shape the twisted dough into a loaf and place in a greased loaf pan.
- Cover with a towel and let rise for about 2 hours, or until doubled in size.
- Preheat your oven to 350°F (175°C).
- Bake for 30 minutes until golden brown and a toothpick comes out clean.
- Cool in the pan for 10 minutes, then transfer to a wire rack. Slice and serve.