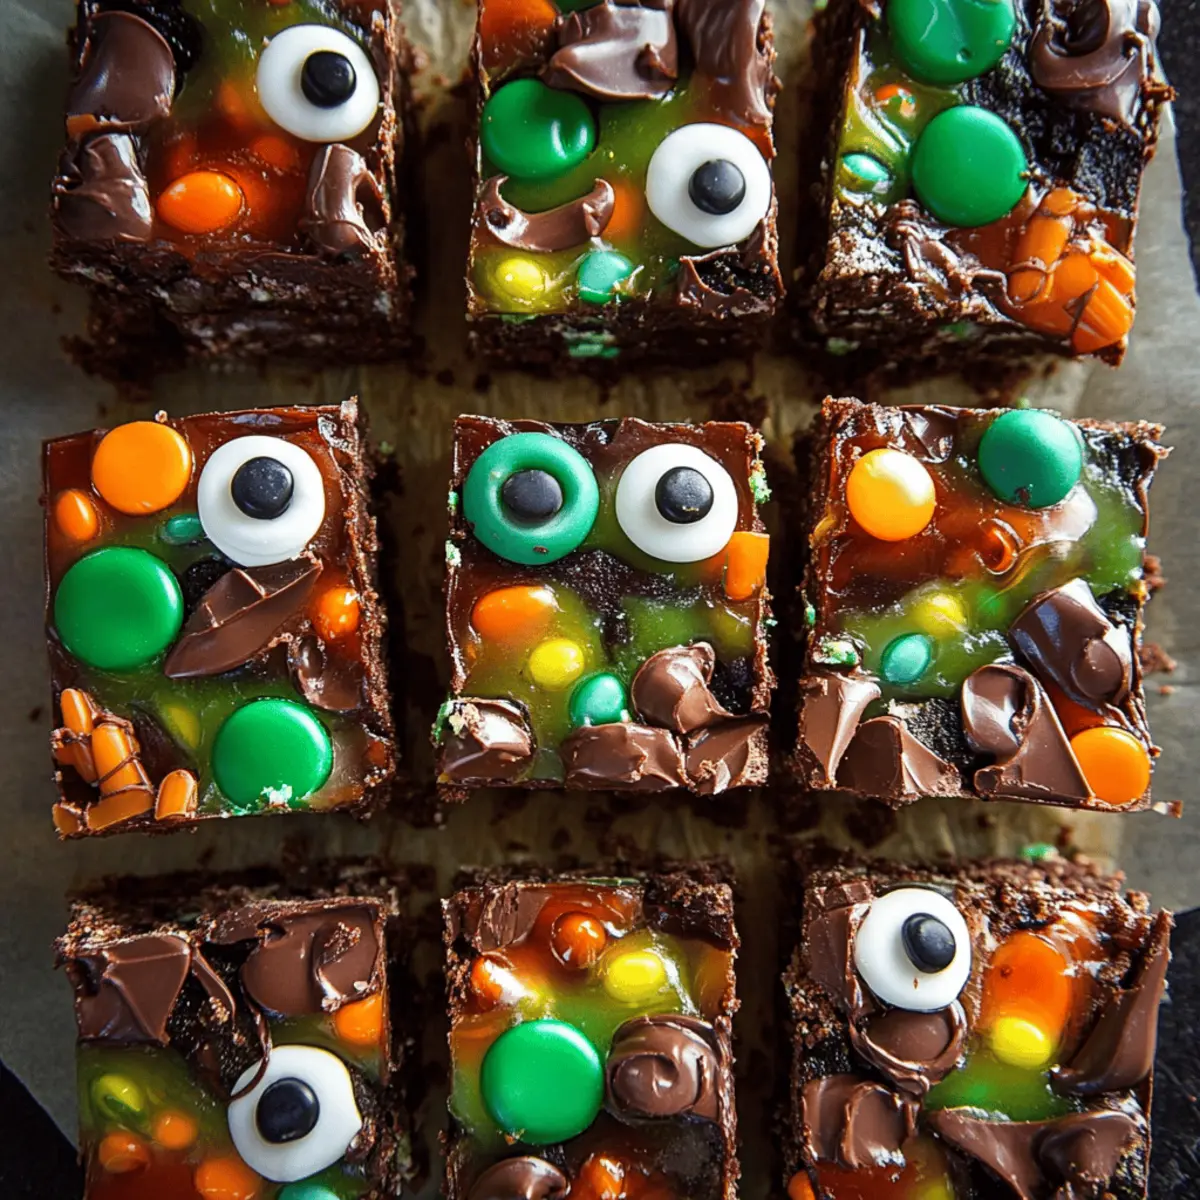
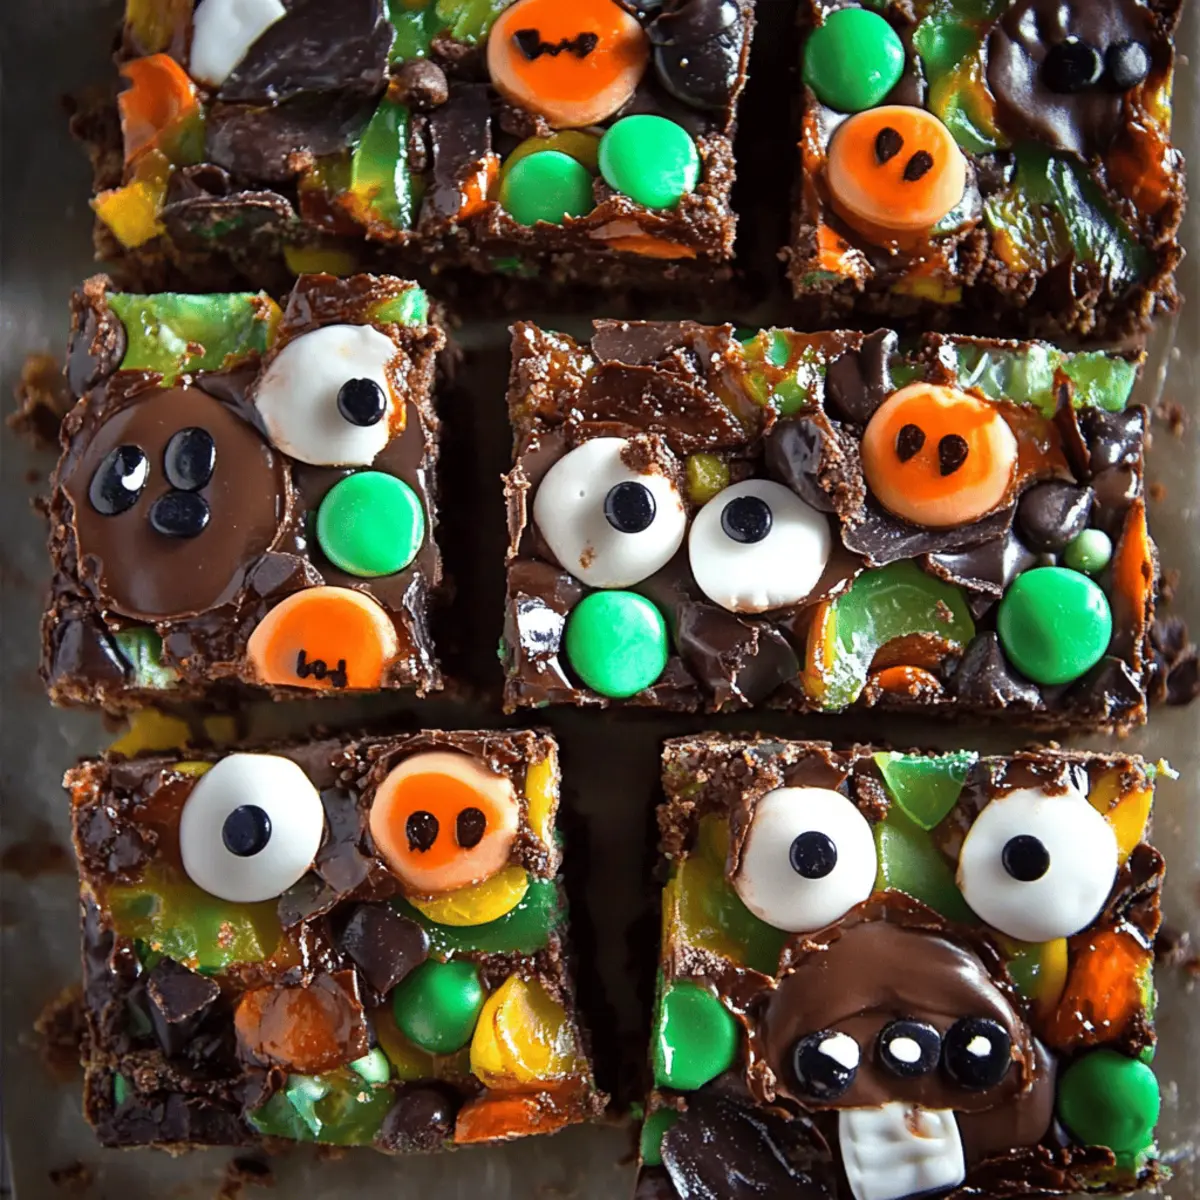
As the Halloween season creeps in, I find myself reminiscing about the delightfully chaotic evenings spent crafting spooky treats with friends. There’s something uniquely satisfying about whipping up a batch of Halloween Rocky Road Slices, an explosion of textures and colors that brings a joyful twist to festive gatherings. This no-bake wonder is not only quick to prepare but also a guaranteed crowd-pleaser, making it the perfect addition to your holiday spread. With layers of semi-sweet chocolate, crunchy peanuts, and playful candy decorations, it’s an indulgent treat that appeals to both kids and adults alike. Plus, they make fantastic party favors—or a sweet way to celebrate the season with family movie nights. Curious about how to concoct this impressive dessert? Let’s dive into the recipe!
Why are Halloween Rocky Road Slices irresistible?
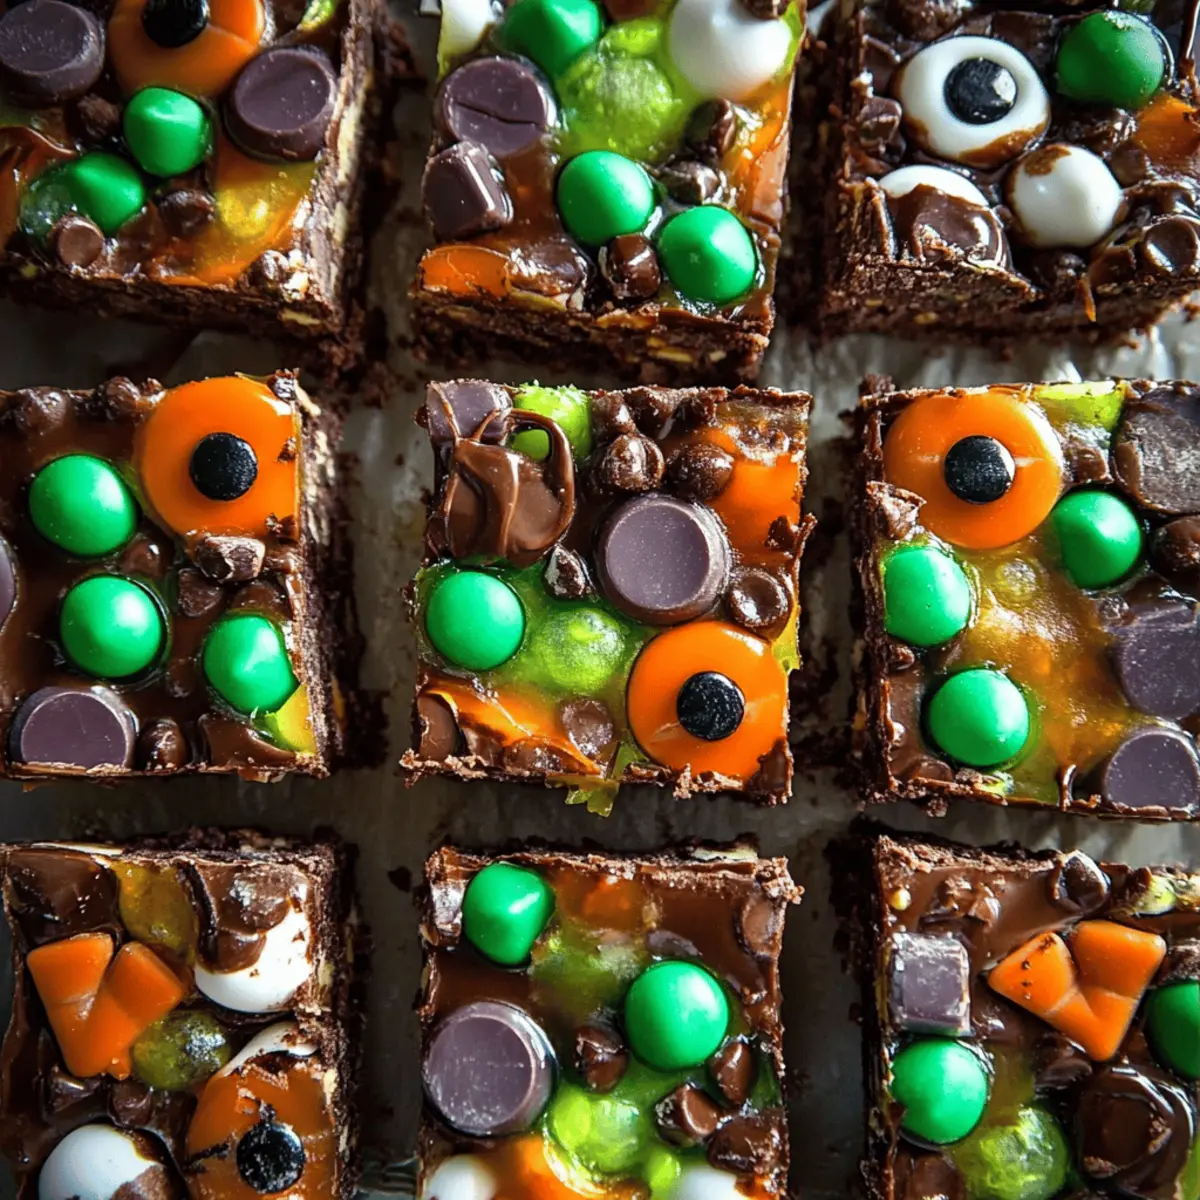
Visual Appeal: The vibrant colors from candy melts and sprinkles create a festive look that’s sure to impress guests.
No-Bake Fun: With minimal cooking involved, this recipe is perfect for those looking to whip up something quick and easy.
Crowd-Pleasing Flavor: The combination of chocolate, peanuts, and marshmallows delivers a rich, satisfying taste that everyone loves.
Festive Creativity: Decorate these slices however you like, making every batch uniquely yours! For more exciting Halloween recipes, check out my Halloween dessert ideas.
Perfect for Sharing: Cut them into pieces for a delightful treat at parties, or package them up as sweet gifts. Enjoy crafting this joyfully spooky favorite!
Halloween Rocky Road Slices Ingredients
For the Base
• Semi-sweet chocolate chips – the star ingredient that gives your slices their rich, luscious flavor.
• Butter – adds creaminess and smoothness to the chocolate mixture.
• Generous pinch of salt – enhances the sweetness while balancing the flavors.
For the Treats
• Roasted peanuts – adds a satisfying crunch and nutty flavor.
• Mini marshmallows – provides that delightful chewy texture and a pop of sweetness.
• Mini Kit Kat bars – contributes layers of crispy texture and chocolate decadence.
For the Decoration
• Candy melts, in each color – brings a playful and festive vibe to your slices.
• Gummy worms – perfect for adding a spooky touch that kids will adore.
• M&M candy – adds color and sweetness to every bite.
• Candy eyes, a mix of small and large eyes – make your slices extra fun and whimsical.
• Halloween sprinkles – sprinkle on top for an additional festive flair.
• Extra melted semi-sweet chocolate – use for drizzling or sticking decorations in place.
Create these Halloween Rocky Road Slices and watch as they disappear at your next gathering!
Step‑by‑Step Instructions for Halloween Rocky Road Slices
Step 1: Prepare the Pan
Start by lining an 8-inch or 9-inch square pan with parchment paper. If you prefer thicker slices, opt for the 8-inch pan; otherwise, use the 9-inch for thinner slices. Make sure the parchment paper hangs over the edges slightly for easy removal later. Set this pan aside, ready to hold your delicious Halloween Rocky Road Slices.
Step 2: Melt the Chocolate Mixture
In a large microwave-safe bowl, combine the butter, semi-sweet chocolate chips, and a generous pinch of salt. Microwave the mixture in 30-second intervals, stirring well in between each session, until the chocolate is completely melted and smooth. This step takes about 1-2 minutes total; you’ll know it's ready when the mixture is glossy and free of lumps.
Step 3: Melt the Candy Melts
If you're using multiple colors of candy melts for decoration, place each color in separate microwave-safe bowls. Heat them for 20 to 30 seconds, stirring after each interval until fully melted. These vibrant colors will not only enhance the visual appeal but will also allow you to create festive swirls later in your Halloween Rocky Road Slices. Set them aside once melted.
Step 4: Prepare the Kit Kat Bars
While your chocolate mixture cools slightly, cut the mini Kit Kat bars into smaller pieces. Set them aside for later incorporation into your rocky road mixture. This step adds a delightful crunchy texture that complements the smoothness of the chocolate, making your Halloween Rocky Road Slices even more irresistible.
Step 5: Combine the Base Ingredients
Once the chocolate mixture has cooled a little, add the roasted peanuts and the chopped Kit Kat pieces. Stir gently to combine—don't worry if some of the candy bars start to melt; this will enhance the overall creamy texture! The combination of flavors and textures at this point is what makes your Halloween Rocky Road Slices so special.
Step 6: Add the Marshmallows
To keep the marshmallows from melting into the chocolate, add them last. Gently fold them into the mixture until well combined. Make sure to distribute them evenly to ensure each bite of your Halloween Rocky Road Slices has that delightful chewy pop from the marshmallows.
Step 7: Transfer to the Pan
Pour the rocky road mixture into your prepared pan, spreading it out evenly. Use an offset spatula to distribute dollops of the melted candy melts throughout the mixture, creating a beautiful marbling effect. Press the mixture gently into the pan, ensuring it’s even and compact. This will help your Halloween Rocky Road Slices hold their shape when set.
Step 8: Mark the Cut Lines
Before decorating, take a knife and gently mark out the cut lines for your slices on the surface of the mixture. Divide it into either 5x5 for 25 pieces or 4x4 for 16 thicker pieces. This will make it easier to slice once chilled and ensure perfectly uniform Halloween Rocky Road Slices.
Step 9: Decorate with Gummy Worms
Now, add your cute gummy worms by pressing them onto the surface of the rocky road mixture, making sure they stick. This spooky touch will add fun and whimsy, perfect for a Halloween treat that kids will love. Place them strategically to avoid the marked cut lines so they stay in place after slicing.
Step 10: Add M&Ms and Sprinkles
Sprinkle the Ghoul M&Ms and candy eyes around the gummy worms, creating a festive scene on your rocky road slices. Feel free to get creative with the placement! Finally, add a sprinkle of Halloween-themed sprinkles over the top for an extra layer of festive flair, making your Halloween Rocky Road Slices even more eye-catching.
Step 11: Chill the Mixture
Place the decorated pan in the refrigerator and allow the rocky road to chill until it is completely set, preferably overnight. This chilling period is crucial for creating firm, delicious slices; you’ll know it’s ready when the chocolate is completely firm to the touch.
Step 12: Slice and Store
The next day, carefully remove your Halloween Rocky Road Slices from the pan using the parchment paper edges. Using a warm knife, cut along your marked lines for neat, even slices. Store the slices in an airtight container in the fridge to keep them fresh, and get ready to share this hauntingly delicious treat!

Make Ahead Options
These Halloween Rocky Road Slices are perfect for busy home cooks looking to save time during the festive season! You can prepare the rocky road mixture up to 24 hours in advance by completing steps 1 through 8, then refrigerating until set. To maintain quality, ensure they are stored in an airtight container to prevent moisture loss. When you're ready to serve, simply remove the slices from the pan, cut along the marked lines, and add any last-minute decorations such as gummy worms and sprinkles. This make-ahead strategy not only saves you precious time but also allows for a stress-free celebration!
Halloween Rocky Road Slices Variations
Feel free to tweak these Halloween Rocky Road Slices to suit your taste and dietary needs; let your imagination run wild!
- Nut-Free: Substitute roasted peanuts with sunflower seeds or pumpkin seeds for a crunchy texture without nuts.
- Gluten-Free: Replace mini Kit Kat bars with gluten-free chocolate bars or fudge pieces. There are plenty of tasty options available!
- Vegan: Use dairy-free chocolate chips and vegan butter alternatives for a plant-based delight. Your friends won't even notice the difference!
- Spicy Twist: Add a sprinkle of chili powder or cayenne to the chocolate mixture for an exciting kick. It's a devilishly good pairing!
- Fruit Infusion: Toss in dried cranberries or chopped apricots for a fruity burst in every bite. The sweetness complements the chocolate beautifully.
- Crispy Treats: Fold in some crushed rice cereal for extra crunch. It adds texture while making your slices even more playful!
- Seasonal Colors: Use assorted candy melts for other holidays, such as red and green for Christmas or pastel colors for Easter.
- Texture Variation: Layer the rocky road mixture with a base of crushed cookies—think Oreos or graham crackers—before adding the chocolate mixture for an extra flavor twist.
These variations can elevate your Halloween Rocky Road Slices and keep the spooky spirit alive! Enjoy crafting your unique treats and for more seasonal delights, take a peek at my charming collection of Halloween dessert ideas!
Storage Tips for Halloween Rocky Road Slices
Fridge: Store your Halloween Rocky Road Slices in an airtight container in the refrigerator for up to 1 week to keep them fresh and indulgent.
Freezer: If you'd like to save some for later, freeze the slices by wrapping them individually in plastic wrap and then placing them in a freezer bag. They can be enjoyed for up to 3 months.
Thawing: When you're ready to enjoy your frozen treats, simply remove them from the freezer and let them thaw in the fridge for a few hours. This helps maintain their delightful texture.
Reheating: If you want to enjoy the chocolatey goodness slightly melted, warm the slices in the microwave for just 5-10 seconds. Be careful not to overheat, as you’ll want to savor that lovely flavor of your Halloween Rocky Road Slices!
Expert Tips for Halloween Rocky Road Slices
-
Choose the Right Pan: Always line your pan with parchment paper for easy removal. An 8-inch pan gives thicker slices, while a 9-inch pan is great for thinner ones.
-
Melting Chocolate Wisely: Be patient when melting chocolate chips in the microwave. Stir at 30-second intervals to prevent overheating, which can lead to a gritty texture.
-
Add Marshmallows Last: Prevent the marshmallows from melting by incorporating them last into the chocolate mixture. This ensures they maintain their chewy texture in your Halloween Rocky Road Slices.
-
Mark Cut Lines Early: Use a knife to lightly mark your cut lines before decorating. This helps maintain clean edges when slicing later.
-
Get Creative with Decorations: Feel free to personalize your Halloween Rocky Road Slices by using different candy for decorations. Avoid crowding the marked cut lines to keep your slices neat.
-
Chill Overnight: For the best results, allow your mixture to chill overnight. This helps the chocolate set completely, ensuring your slices are firm and flavorful when served.
What to Serve with Halloween Rocky Road Slices
Nothing completes a festive gathering like a spread that tantalizes all the senses and sparks joy!
-
Warm Apple Cider: The sweet, spiced aroma of warm apple cider is the perfect drink to complement the rich flavors of your rocky road slices.
Indulge in a mug of this seasonal delight while enjoying the cool autumn evenings. -
Vanilla Ice Cream: A scoop of silky vanilla ice cream provides a creamy contrast to the crunchy, chocolatey slices.
This pairing creates a delightful melt-in-your-mouth experience that everyone will crave. -
Pumpkin Spice Cupcakes: Bringing in holiday flavors, pumpkin spice cupcakes add a festive touch that harmonizes beautifully with your Halloween treat.
The warm spices in the cupcakes will enchant your guests and keep them coming back for more! -
Chocolate Drizzle Popcorn: Light and fluffy popcorn drizzled with chocolate is an irresistible snack that echoes the chocolatey goodness of the rocky road slices.
Its salty-sweet combination perfectly complements the dessert while adding a satisfying crunch. -
Spooky Frozen Yogurt Bark: A lighter option, frozen yogurt bark decorated with crushed Halloween candy offers a fruity contrast to the dense slices.
It’s both delicious and visually appealing! -
Candy Corn Fruit Salad: A colorful fruit salad mixed with candy corn adds a playful, healthier side that balances the rich sweetness of your treats.
This blend of fresh and sweet will leave a refreshing taste on the palate. -
Festive Charcuterie Board: Fill a board with assorted cheeses, nuts, and dried fruits that can enhance the overall flavor profile while providing savory options.
This interactive dining experience encourages guests to mix and match bites as they enjoy the slices together. -
Cinnamon Sugar Donut Holes: Sweeter than they sound, these donuts not only add to the fun but also harmonize wonderfully with the decadent chocolate flavors.
Perfect for sharing at a holiday party!
Halloween Rocky Road Slices Recipe FAQs
What is the best way to choose ripe ingredients for Halloween Rocky Road Slices?
Absolutely! For this recipe, you won't need overly ripe ingredients, but selecting high-quality chocolate chips and fresh peanuts is essential. Look for chocolate chips that have a glossy finish and, when it comes to peanuts, they should be crunchy and without dark spots. Fresh marshmallows should be puffy and soft to avoid a chewy texture once combined.
How should I store my Halloween Rocky Road Slices?
I recommend storing your Halloween Rocky Road Slices in an airtight container in the refrigerator. This will keep them fresh for up to a week. If they are properly stored, they’ll maintain their delightful chocolatey flavor and chewy texture, making them perfect for snacking or sharing with friends.
Can I freeze Halloween Rocky Road Slices for later?
Very! Freezing is a great option if you want to enjoy these slices at a later date. To do this, wrap each slice individually in plastic wrap and then place them in a freezer bag. They can last for up to three months in the freezer. When you're ready to treat yourself, just thaw them in the fridge for a few hours, and they will be as good as fresh!
What should I do if my chocolate mixture is too thick or lumpy?
If your chocolate mixture ends up too thick or lumpy, don't worry! You can add a splash of milk or extra melted butter to the mixture to loosen it. Microwave the mixture in 15-second intervals, stirring well in between, until it reaches your desired consistency. Always remember to be patient and stir gently to avoid burning the chocolate.
Are there any dietary considerations I should keep in mind when making Halloween Rocky Road Slices?
Absolutely! If you’re serving guests with dietary restrictions, consider using dairy-free chocolate chips and marshmallows to make this a vegan-friendly treat. For nut allergies, feel free to omit the peanuts and opt for sunflower seeds instead, which will still add a satisfying crunch without the risk.
How can I make my Halloween Rocky Road Slices even more festive?
You can jazz up your Halloween Rocky Road Slices using themed decorations! Consider swapping out the gummy worms for candy pumpkins or adding chocolate-covered pretzels as “spooky branches.” The more, the merrier—get creative with your toppings and decorations to make every batch uniquely yours!
Spooktacular Halloween Rocky Road Slices You'll Love
Equipment
- Microwave
- 8-inch or 9-inch square pan
- Parchment Paper
- Large microwave-safe bowl
- spatula
- Knife
Ingredients
For the Base
- 1 cup Semi-sweet chocolate chips the star ingredient that gives your slices their rich, luscious flavor.
- ½ cup Butter adds creaminess and smoothness to the chocolate mixture.
- 1 pinch Salt enhances the sweetness while balancing the flavors.
For the Treats
- 1 cup Roasted peanuts adds a satisfying crunch and nutty flavor.
- 2 cups Mini marshmallows provides that delightful chewy texture and a pop of sweetness.
- 4 bars Mini Kit Kat bars contributes layers of crispy texture and chocolate decadence.
For the Decoration
- 1 cup Candy melts in each color for a playful and festive vibe.
- 1 cup Gummy worms perfect for adding a spooky touch that kids will adore.
- 1 cup M&M candy adds color and sweetness to every bite.
- 1 cup Candy eyes a mix of small and large eyes for fun decorations.
- 1 cup Halloween sprinkles to sprinkle on top for an additional festive flair.
- ½ cup Extra melted semi-sweet chocolate for drizzling or sticking decorations in place.
Instructions
Step-by-Step Instructions
- Prepare the pan by lining an 8-inch or 9-inch square pan with parchment paper, ensuring it hangs over the edges.
- In a microwave-safe bowl, combine the butter, chocolate chips, and salt, then microwave in 30-second intervals until melted and smooth, about 1-2 minutes.
- If using multiple colors of candy melts, place each in separate bowls and heat for 20 to 30 seconds, stirring until fully melted.
- Cut the mini Kit Kat bars into smaller pieces and set aside for later addition to the mixture.
- Once cooled, combine the melted chocolate mixture with the roasted peanuts and chopped Kit Kat pieces, stirring gently.
- Add the marshmallows last to prevent melting, gently folding them into the mixture until well combined.
- Pour the mixture into the prepared pan, spreading evenly and dolloping melted candy melts throughout for marbling.
- Mark the cut lines with a knife on the surface for future slicing, either 5x5 or 4x4 sections.
- Press gummy worms onto the surface, avoiding marked cut lines for better adherence after cutting.
- Sprinkle M&Ms and candy eyes around the gummy worms, followed by Halloween sprinkles on top.
- Chill the decorated pan in the refrigerator until firm, preferably overnight.
- Carefully remove from the pan, cut along marked lines, and store in an airtight container in the fridge.