As I pulled the refrigerator door open, the familiar sight of biscuit dough called to me. It’s funny how a simple ingredient can spark creativity, turning an ordinary evening into a pizza party. Today, I'm excited to share my recipe for Mini Pizzas—perfect for those who crave homemade delights but are short on time. With just five minutes of prep and a mere 15 minutes in the oven, these little wonders are not only quick to whip up but also a guaranteed crowd-pleaser at any gathering. Whether you’re hosting a family movie night or a casual get-together with friends, these mini pizzas are a fun way to customize your toppings and satisfy everyone’s cravings. Curious about how to bring this deliciousness to your table? Let’s dive in!

Why Are Mini Pizzas a Must-Try?
Quick Prep Time: With just 5 minutes of preparation, you can have your mini pizzas ready to pop in the oven!
Family-Friendly Fun: Get everyone involved! Kids love customizing their own pizzas, making them a hit at family gatherings.
Versatile Toppings: Choose your favorite toppings, whether it's classic pepperoni or vibrant veggies, making them perfect for every taste.
Crowd-Pleasing Flavor: Who can resist the smell of bubbling cheese and crispy crust? These mini pizzas are guaranteed to be a favorite!
Easy Clean-Up: Using refrigerated biscuit dough means less mess in the kitchen, leaving you more time to enjoy your creation. If you want to explore more quick recipes, check out our easy dinner ideas, perfect for busy evenings!
Mini Pizzas Ingredients
Get ready to gather your ingredients for delicious Mini Pizzas that everyone will love!
For the Crust
• Refrigerated biscuit dough – a convenient base that saves time without sacrificing taste.
For the Sauce & Cheese
• Pizza sauce – just 1–2 tablespoons add a burst of flavor to your mini pizzas.
• Shredded mozzarella cheese – 1 cup creates that gooey, irresistible layer that everyone adores.
For the Toppings
• Pepperoni – a classic choice, but feel free to mix it up with your favorite toppings for a personal touch!
For Baking
• Cornmeal – dusting the baking sheets prevents sticking and adds a delightful crunch.
• Grated Parmesan – a sprinkle for garnish enhances flavor and presentation before serving warm.
Now, you're all set to bring these delightful Mini Pizzas to life!
Step‑by‑Step Instructions for Mini Pizzas
Step 1: Preheat the Oven
Begin by preheating your oven to 400°F (200°C). This crucial step ensures a perfectly cooked crust that is golden brown and crispy. While the oven warms up, gather your baking sheets and line them with parchment paper or dust them with cornmeal for added crunch.
Step 2: Prepare the Dough
On a lightly floured surface, take your refrigerated biscuit dough and gently roll each biscuit into a flat, round shape. Aim for about ¼ inch thickness. You want to achieve a nice, round base that will hold all your delicious toppings. This process should be quick and fun, taking just about 5 minutes.
Step 3: Arrange the Dough Rounds
Dust your prepared baking sheets with cornmeal to prevent sticking, then carefully place the dough rounds on the sheets. Make sure to leave about 1 inch of space between each mini pizza to allow them to expand while baking. This arrangement will also help you create an appealing presentation.
Step 4: Sauce It Up
Add 1–2 tablespoons of pizza sauce to each dough round. Use the back of a spoon to spread the sauce evenly, leaving just a small border around the edges. This layer of rich sauce is essential for the flavor and complements your toppings. Your mini pizzas are already looking inviting!
Step 5: Add the Cheese
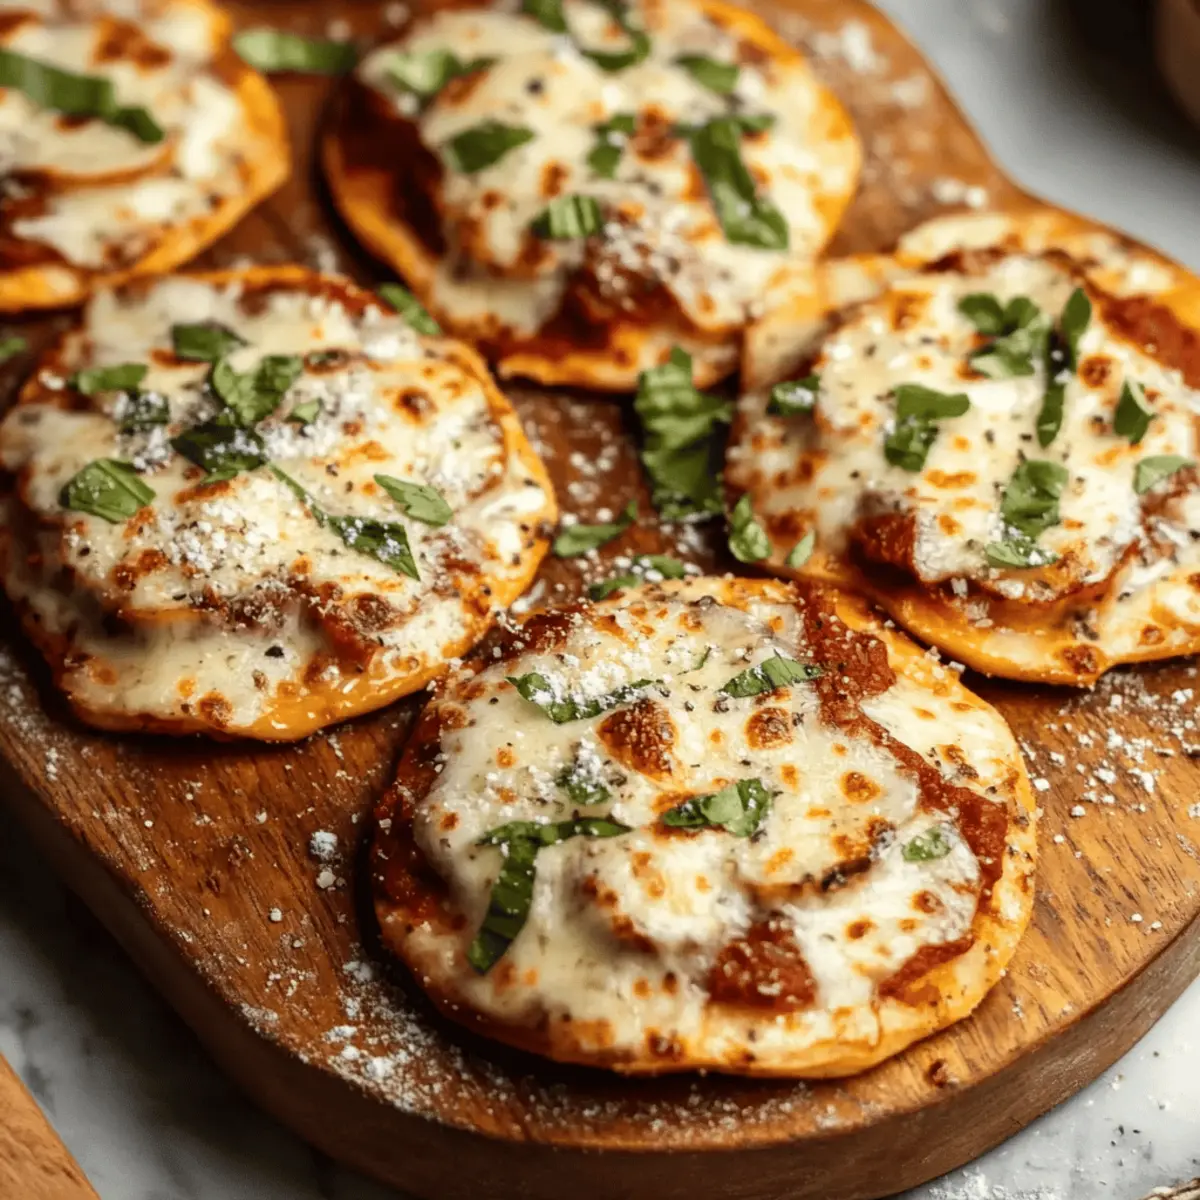
Evenly sprinkle 1 cup of shredded mozzarella cheese over each sauced dough round. Make sure every mini pizza gets a generous layer, as this is what creates that gooey, melty goodness everyone loves. The cheese will melt beautifully as the mini pizzas bake, so don’t be shy!
Step 6: Top It Off
Now it's time to customize! Add pepperoni or any of your favorite toppings on top of the cheese. Feel free to get creative, using colorful veggies, olives, or even pineapple. This personal touch makes the mini pizzas not only delicious but visually appealing as well.
Step 7: Bake the Mini Pizzas
Place the baking sheets in the preheated oven and bake for 15–18 minutes. Keep an eye on them; you’ll know they are done when the crust turns golden and the cheese is beautifully bubbly. For that extra appeal, broil for 1–2 minutes at the end to achieve a delightful brown top.
Step 8: Garnish and Serve
Once out of the oven, garnish your mini pizzas with a sprinkle of grated Parmesan cheese for an added layer of flavor and a touch of elegance. Serve them warm, and watch everyone delight in these delightful mini pizzas that are perfect for sharing!

Mini Pizzas: Deliciously Customizable Fun
Feel free to explore creative variations that elevate your Mini Pizzas into something uniquely yours!
- Gluten-Free: Swap biscuit dough for a gluten-free pizza crust for equally delicious results.
- Vegan: Use dairy-free cheese and plant-based sauce for a tasty vegan option that everyone can enjoy!
- Spicy Kick: Add sliced jalapeños or crushed red pepper flakes for a fiery twist that spice lovers will appreciate.
- Herb-Infused: Mix dried Italian herbs into the pizza sauce for a fragrant flavor boost; rosemary and oregano work wonders together.
- Stuffed Crust: Roll small amounts of cheese into the edges of the biscuit dough for a delightful cheesy surprise with each bite.
- Mini Calzones: Fold the rolled-out dough over the toppings before baking for a fun, pocket-sized pizza bursting with flavors.
- Sweet Twist: Create dessert mini pizzas by using Nutella, strawberries, and a sprinkle of powdered sugar—perfect for a fun treat!
- Healthy Veggie Boost: Load up on colorful veggies like bell peppers, mushrooms, and spinach to pack extra nutrition into your mini pizzas.
For additional sweet options after your savory mini pizzas, don’t forget to check out our fun dessert recipes to cap off your meal!
What to Serve with Mini Pizzas?
Get ready to elevate your mini pizza experience with these delightful pairings that appeal to every palate.
-
Fresh Salad: A crisp green salad offers a refreshing contrast, lightening the meal while adding vibrant color and crunch.
-
Garlic Breadsticks: Savory garlic breadsticks provide a delightful texture, perfect for dipping in any leftover pizza sauce.
-
Vegetable Platter: A colorful assortment of fresh veggies like carrots, bell peppers, and cherry tomatoes adds a nutritious, crunchy element to your meal. Pairing these with a zesty dip can make for a fun snacking experience!
-
Crispy Potato Wedges: Seasoned and baked potato wedges provide a hearty side that complements the lightness of mini pizzas without overwhelming the meal.
-
Fruit Skewers: Fresh fruit skewers bring a sweet finish, balancing the savory flavors of the pizzas while adding a pop of color to your table.
-
Lemonade or Iced Tea: Refreshing lemonade or iced tea offers a delightful beverage option to cleanse the palate and enhance the dining experience.
-
Chocolate Chip Cookies: End on a sweet note with warm, gooey chocolate chip cookies that will leave everyone smiling and satisfied!
Make Ahead Options
These Mini Pizzas are ideal for meal prep, helping you streamline your weeknight dinners! You can prepare the dough rounds up to 24 hours in advance—just roll and arrange them on your baking sheets. Cover with plastic wrap and refrigerate to keep them fresh. Additionally, you can also pre-assemble the pizzas by adding sauce, cheese, and toppings, and then refrigerate for up to 3 days. Just be sure to keep them tightly covered to maintain quality. When you’re ready to serve, pop them straight from the fridge into the preheated oven, adding an extra minute or two to the cook time if needed. Enjoy the deliciousness of homemade Mini Pizzas with minimal evening hassle!
How to Store and Freeze Mini Pizzas
Room Temperature: Mini pizzas can sit at room temperature for up to 2 hours. If you plan to enjoy them later, be sure to store them properly.
Fridge: Store leftover mini pizzas in an airtight container for up to 3 days. To maintain their texture, place a piece of parchment paper between layers if stacking.
Freezer: For long-term storage, freeze the mini pizzas individually on a baking sheet, then transfer them to a freezer-safe bag. They can be stored for up to 2 months.
Reheating: When ready to enjoy, reheat frozen mini pizzas directly from the freezer in a preheated oven at 375°F for about 15 minutes or until heated through. Enjoy every bite of your delightful mini pizzas!
Expert Tips for Mini Pizzas
Dough Thickness Matters: Roll out each biscuit to about ¼ inch thickness. Too thick can lead to undercooked centers, while too thin may burn easily.
Sauce Sparingly: Use just 1–2 tablespoons of sauce per mini pizza. Overloading can make them soggy; balance is key for delicious mini pizzas!
Cheese Coverage: Don’t skimp on the mozzarella! A generous layer ensures gooeyness, while also helping hold toppings in place during baking.
Topping Creativity: Feel free to experiment with toppings! Just remember to keep heavier ingredients in moderation to prevent sogginess.
Watch Closely While Baking: Timing varies by oven. Check at the 15-minute mark to prevent over-baking—golden brown and bubbly is the goal!
Mini Pizzas Recipe FAQs
What type of biscuit dough should I use for mini pizzas?
Absolutely! You can use any brand of refrigerated biscuit dough that you prefer. I often recommend the flaky type for a light, airy crust, but you can also find whole wheat or gluten-free options to suit your dietary needs. The choice is yours—just be sure it’s fresh for best results!
How do I store leftover mini pizzas?
After enjoying your mini pizzas, store any leftovers in an airtight container in the refrigerator for up to 3 days. To keep them fresh and prevent sogginess, place a piece of parchment paper between layers if you're stacking them. This way, come mealtime, they'll still have that delightful taste!
Can I freeze mini pizzas for later?
Yes, you can freeze mini pizzas to enjoy them later! Start by placing them in a single layer on a baking sheet and freeze them until firm (about 1-2 hours). Once frozen, transfer the mini pizzas into a freezer-safe bag or container, where they can keep for up to 2 months. When ready to enjoy, simply reheat them straight from the freezer!
What should I do if my mini pizza crusts are soggy?
If your mini pizzas come out with soggy crusts, it usually means too much sauce or underbaking. Next time, try using 1 tablespoon of sauce instead of 2, or spread it thinly across the crust. Ensure your oven is properly preheated to 400°F and keep an eye on them during baking. Broiling for the last couple of minutes can also help create a crispy finish!
Are mini pizzas suitable for kids with allergies?
Very! Mini pizzas can be tailored to fit various dietary needs. For dairy allergies, use a dairy-free cheese alternative. For gluten concerns, simply replace the biscuit dough with a gluten-free option like cauliflower crust or store-bought gluten-free pizza dough. Always check ingredient labels to ensure safety based on individual allergies.
How can I make mini pizzas healthier?
To create a healthier version of mini pizzas, consider using whole grain biscuit dough or even making your own from scratch using whole wheat flour. Load up on veggies like bell peppers, spinach, or mushrooms for toppings, and choose lower-fat cheese or a plant-based cheese alternative. These adjustments not only enhance nutrition but also add colorful flair!

Mini Pizzas: Quick and Delicious Fun for the Whole Family
Equipment
- Oven
- Baking Sheet
- Parchment Paper
Ingredients
For the Crust
- 1 package Refrigerated biscuit dough A convenient base that saves time without sacrificing taste.
For the Sauce & Cheese
- 1-2 tablespoons Pizza sauce Adds burst of flavor.
- 1 cup Shredded mozzarella cheese Creates gooey layer.
For the Toppings
- to taste Pepperoni Classic choice, can mix with favorite toppings.
For Baking
- 1 tablespoon Cornmeal Prevents sticking.
- to taste Grated Parmesan Enhances flavor before serving.
Instructions
Step-by-Step Instructions for Mini Pizzas
- Preheat the oven to 400°F (200°C) and prepare baking sheets with parchment paper or cornmeal.
- On a lightly floured surface, roll each biscuit into a flat, round shape about ¼ inch thick.
- Dust prepared baking sheets with cornmeal and place the dough rounds on the sheets, leaving space in between.
- Spread 1-2 tablespoons of pizza sauce on each dough round, leaving a small border.
- Sprinkle 1 cup of shredded mozzarella cheese evenly over each sauced dough round.
- Customize with pepperoni or other toppings on top of the cheese.
- Bake for 15-18 minutes until the crust is golden and cheese is bubbly. Broil for 1-2 minutes for browning.
- Garnish with grated Parmesan and serve warm.