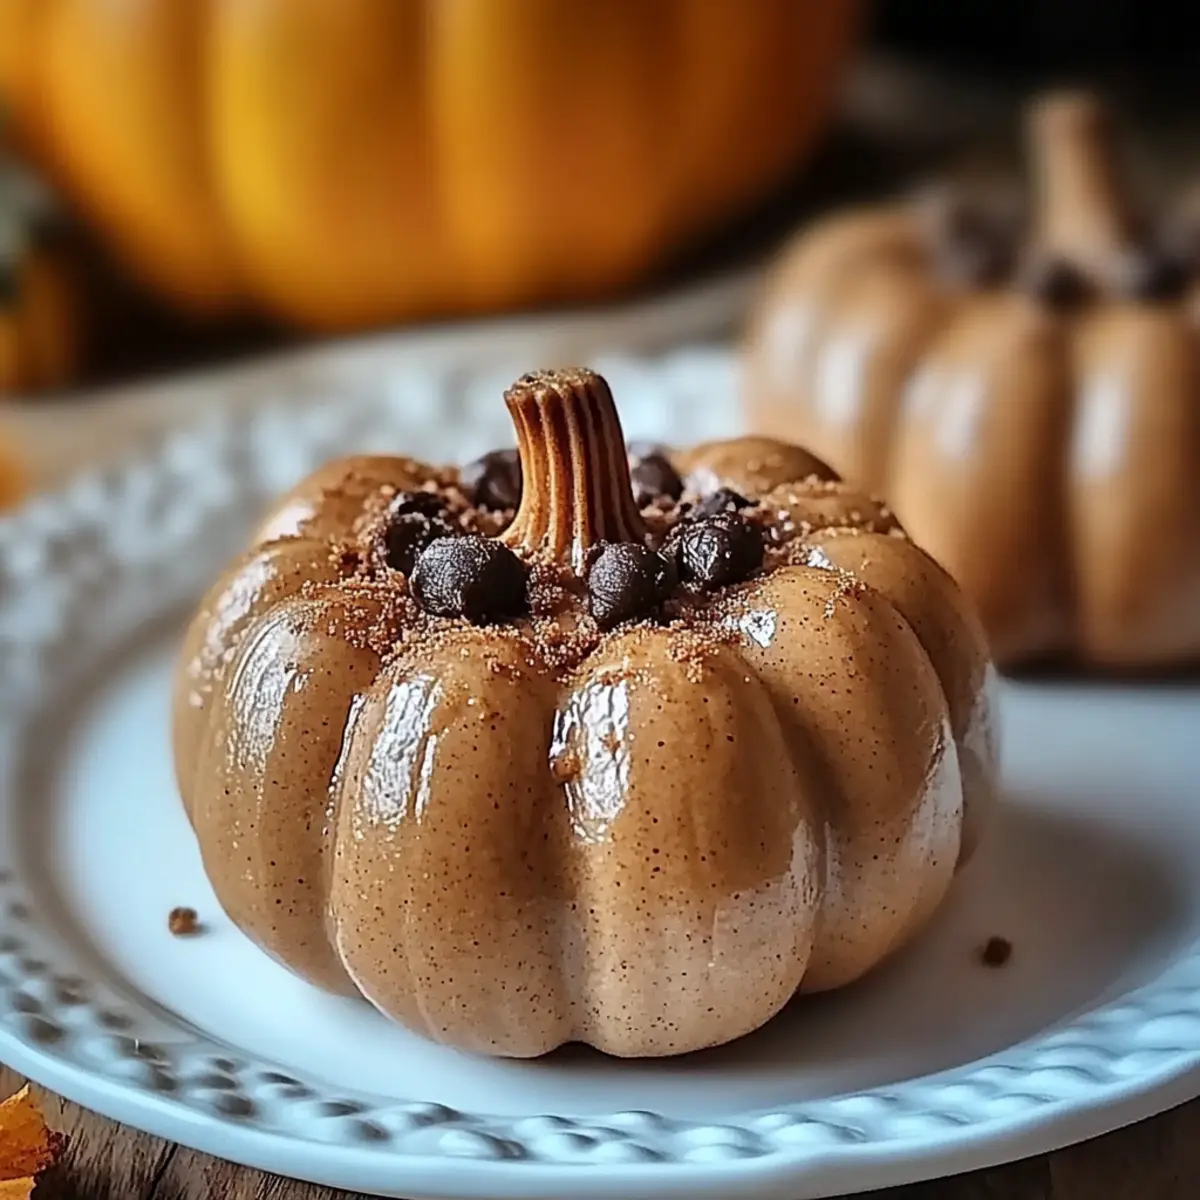
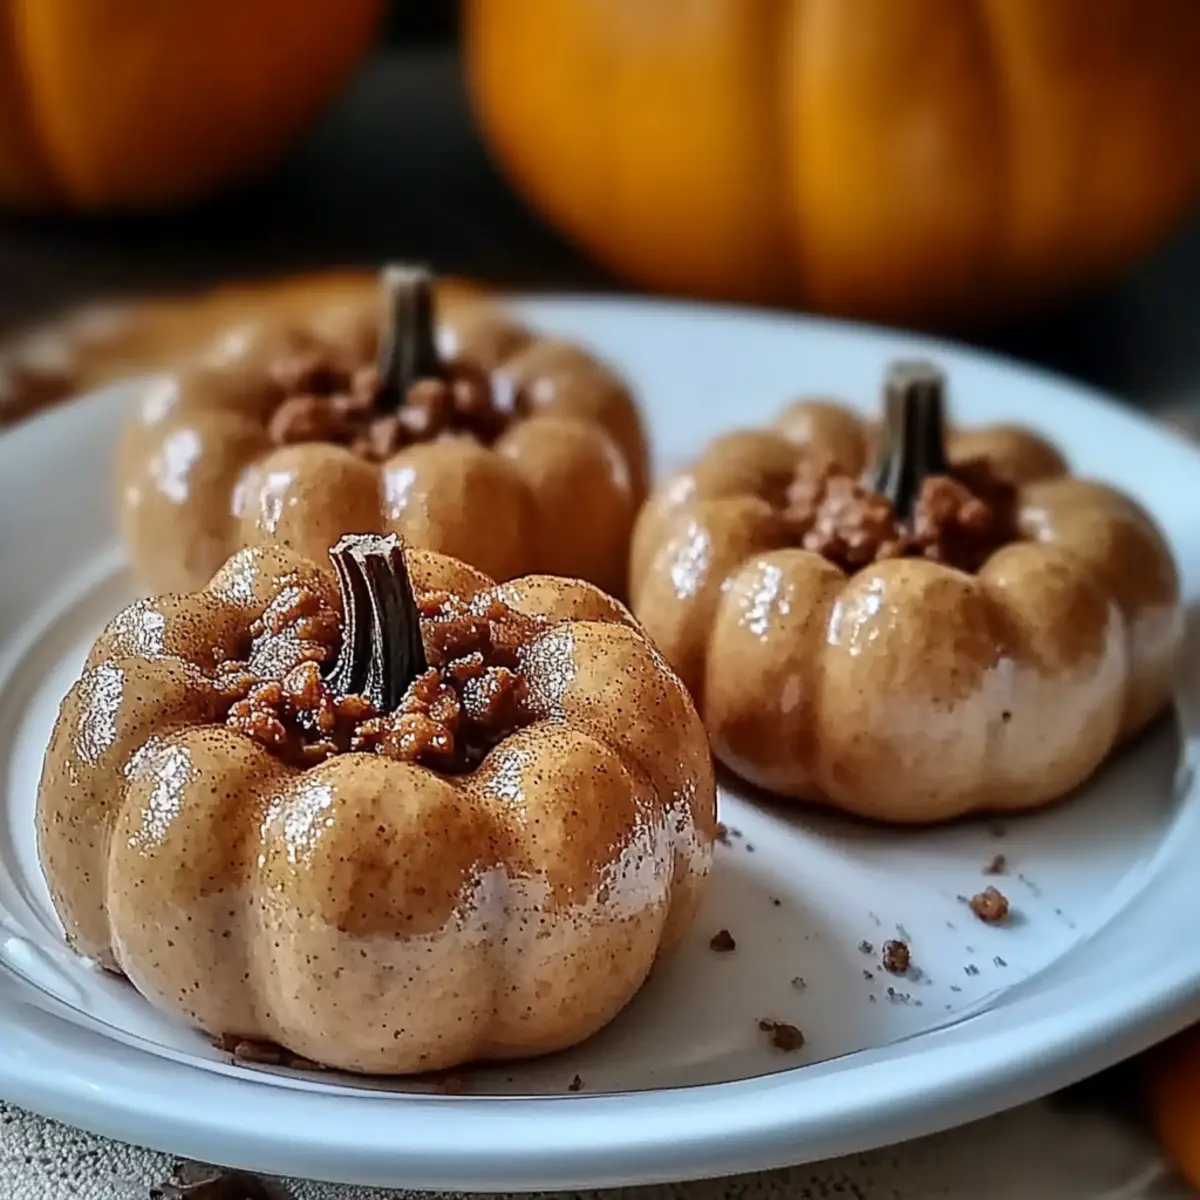
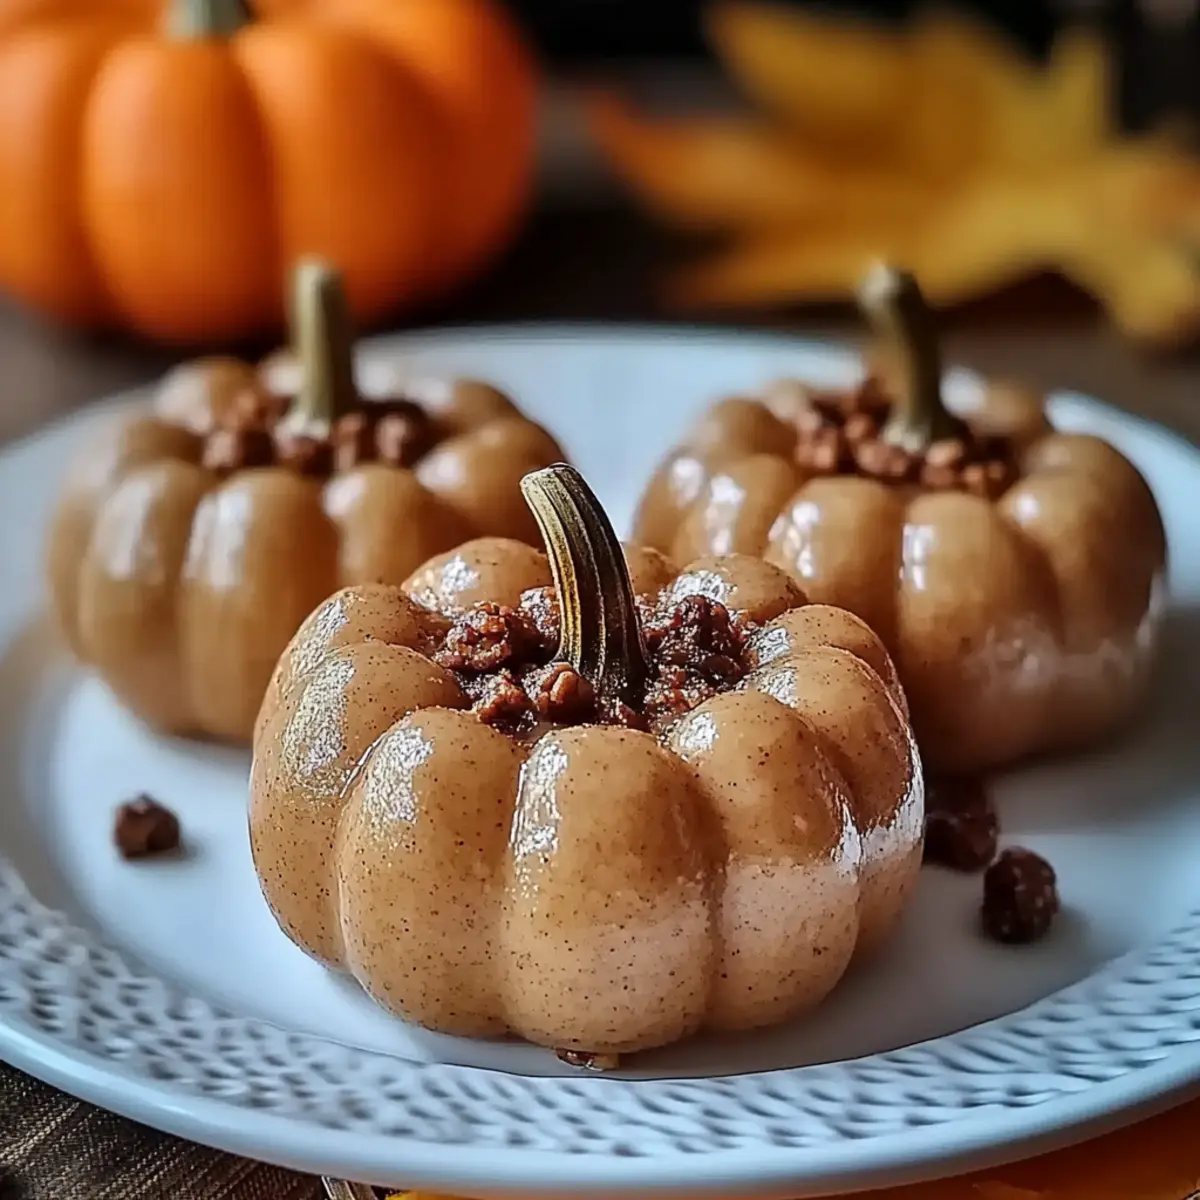
As the leaves turn crisp and the air fills with the scent of autumn, I find myself craving a touch of nostalgia. One of my favorite seasonal treats is these delightful Peanut Butter Pumpkins, a playful twist on traditional dessert. With the perfect combination of creamy peanut butter and the satisfying crunch of rice cereal, this easy recipe is not only a fun way to celebrate the season but also a quick and delightful crowd-pleaser. Whether you’re preparing for a festive gathering or just want to indulge your sweet tooth, these little pumpkin-shaped treats are sure to bring a smile. Plus, they’re freezer-friendly, making them an ideal make-ahead option for busy days. Who wouldn't love a sweet treat that captures the spirit of fall? Let’s dive into the recipe and get our hands a little gooey!
Why are Peanut Butter Pumpkins a Must-Try?
Delightful and Fun: These adorable treats bring joy to any gathering, especially with their festive pumpkin shape.
Easy to Make: With just a handful of ingredients and simple steps, you don't need to be a pro chef to whip these up!
Nostalgic Flavor: The combination of creamy peanut butter and crispy rice cereal evokes childhood memories and pure happiness.
Versatile Treat: Perfect alongside a glass of cold milk or warm apple cider, they fit any fall occasion seamlessly.
Freezer-Friendly: Need to plan ahead? These peanut butter pumpkins can be made ahead and frozen, ready to impress whenever you need them.
Try them out and experience why they might just be your new favorite festive fun treat!
Peanut Butter Pumpkins Ingredients
For the Pumpkin Mixture
• Creamy peanut butter – a rich, nutty base that brings both flavor and texture.
• Powdered sugar – adds sweetness and helps bind the mixture for easy shaping.
• Vanilla extract – enhances the overall flavor with a warm, aromatic note.
• Crispy rice cereal – provides a delightful crunch, making the pumpkins fun to bite into.
For the Coating
• Orange candy melts – create a vibrant, autumnal exterior that makes these treats irresistibly cute.
• Vegetable oil – ensures the candy melts smooth out easily for a perfect coating.
• Green candy melts – used for crafting adorable little leaves atop each pumpkin.
• Mini chocolate chips – serve as charming eyes, adding character to your peanut butter pumpkins!
These Peanut Butter Pumpkins are a festive delight that captures the essence of fall in every bite!
Step‑by‑Step Instructions for Peanut Butter Pumpkins
Step 1: Prepare the Workspace
Begin by clearing and cleaning your kitchen counter to create an organized workspace. Gather all necessary ingredients and equipment, including a large mixing bowl, spatula, parchment-lined baking sheet, and microwave-safe bowl. Having everything ready will make the process smoother and more enjoyable as you create your delightful Peanut Butter Pumpkins.
Step 2: Mix the Pumpkin Base
In a large mixing bowl, combine 1 cup of creamy peanut butter, 1 cup of powdered sugar, and 1 teaspoon of vanilla extract. Using a spatula, vigorously stir the mixture until it's smooth and fully blended, with no lumps remaining. This will be the flavorful base of your Peanut Butter Pumpkins, so ensure the consistency is even and creamy.
Step 3: Fold in the Crispy Cereal
Gently fold in 2 cups of crispy rice cereal into the peanut butter mixture, ensuring it's evenly distributed. Use a spatula to delicately combine until no cereal is left visible; this step adds the enjoyable crunch to your treats. You’ll know it’s ready when the cereal is coated without overmixing, which could crush the cereal.
Step 4: Form the Pumpkins
Take small portions of the mixture and roll them into round balls, about 1-2 inches in diameter, to form pumpkin shapes. Place each ball onto your prepared parchment-lined baking sheet, leaving some space between them. Aim for a smooth surface on each ball to make the final treat appear polished and cute.
Step 5: Chill the Shapes
Cover the baking sheet with plastic wrap and refrigerate your pumpkin shapes for approximately 30 minutes or until they are firm. This chilling step is essential for ensuring the shapes hold their form during the dipping process. They should be slightly hardened to the touch when ready for the next steps.
Step 6: Melt the Coating
In a microwave-safe bowl, combine 1 cup of orange candy melts with 1 tablespoon of vegetable oil. Microwave in 30-second intervals, stirring after each, until the mixture is completely melted and smooth. The oil assists in creating a glossy finish on your Peanut Butter Pumpkins, so mix until you have a silky coating.
Step 7: Coat the Pumpkins
Remove the chilled pumpkin shapes from the refrigerator and dip each one into the melted orange candy coating until thoroughly coated. Tap off any excess coating and return each coated pumpkin to the parchment-lined baking sheet. Ensure that all sides are evenly coated for that adorable pumpkin appearance.
Step 8: Add Features
While the orange coating is still wet, place two mini chocolate chips on each pumpkin for eyes. Then, using melted green candy melts, create small leaves on top by either drizzling with a spoon or using a toothpick to shape them. This step adds personality to your Peanut Butter Pumpkins, making them truly charming.
Step 9: Set the Treats
Allow the coated Peanut Butter Pumpkins to set at room temperature until the candy coating hardens completely, which may take around 15-30 minutes. Ensure they are set and firm before serving or storing, allowing the candy shell to create that delightful crunch when enjoyed.
Peanut Butter Pumpkins Variations
Feel free to personalize your Peanut Butter Pumpkins with these fun twists or ingredient swaps!
-
Nut-Free: Substitute peanut butter with sunflower seed butter for a delightful, allergy-friendly version. The result is just as creamy and flavorful, perfect for school snacks!
-
Chocolate Lovers: Mix in some cocoa powder to the peanut butter mixture for a chocolatey twist. This will take your pumpkins to the next level of indulgence.
-
Crunchy Texture: Swap out crispy rice cereal for crushed pretzels or nuts for an extra crunch. This adds a delightful salty element that pairs wonderfully with the sweet coating.
-
Spicy Kick: Add a pinch of cinnamon or cayenne pepper to the peanut butter mix for a subtle heat boost. It’s a surprising yet delightful flavor enhancement that warms the palate.
-
White Chocolate Coating: Instead of orange candy melts, use white chocolate for a rich and creamy exterior. Drizzle with orange melts for decoration to keep the fun theme intact!
-
Mini Pumpkin Carvings: Instead of rolling them into balls, form the mixture into mini pumpkin shapes or create fun faces with the chocolate chips. This allows you to channel your inner creativity!
-
Healthy Sweetener: For a low-sugar option, use a natural sweetener like agave syrup or honey in place of powdered sugar. Just adjust the quantity as needed for the right texture!
-
Add Fruit: Incorporate crushed freeze-dried strawberries or apples into the mixture for a fruity surprise. This addition brings a refreshing burst of flavor in every bite!
You can make these Peanut Butter Pumpkins your own while still keeping that nostalgic flavor. For even more sweet inspirations, consider trying delicious treats like Chocolate Peanut Butter Mousse Tart or Butterfinger Balls Bake. Enjoy the creative process and let your taste buds lead the way!
What to Serve with Peanut Butter Pumpkins
Create the perfect delightful spread around these charming treats with tasty companions that elevate your snacking experience.
-
Cold Milk: The classic partner! A chilled glass of milk complements the sweetness and smooth texture of the pumpkins, creating a nostalgic pairing that recalls childhood joys.
-
Warm Apple Cider: Embrace the autumn spirit with a cozy cup of warm apple cider. The spicy notes of cider enhance the sweet flavors of the peanut butter pumpkins, providing a comforting harmony.
-
Chocolate-Dipped Pretzels: For a crunchy twist, serve alongside chocolate-dipped pretzels. Their salty sweetness adds contrast, balancing the rich peanut butter filling perfectly.
-
Creamy Vanilla Ice Cream: A scoop of vanilla ice cream brings a creamy richness that melts beautifully against these festive pumpkins, making for an irresistible dessert combo.
-
Fruit Salad: Add freshness with a vibrant fruit salad. The bright flavors of seasonal fruits like apples and pears offer a refreshing contrast to the rich and sweet peanut butter delights.
-
Caramel Sauce: Drizzle some warm caramel sauce over the pumpkins for an extra indulgent touch. This adds a sweet, buttery layer that makes the treats even more delectable.
These additions turn your Peanut Butter Pumpkins into the star of a delightful fall gathering, ensuring everyone's taste buds are celebrated!
How to Store and Freeze Peanut Butter Pumpkins
Fridge: Store leftover Peanut Butter Pumpkins in an airtight container in the refrigerator for up to 1 week to maintain their freshness and flavor.
Freezer: For extended storage, uncoated pumpkin balls can be frozen for up to 3 months. Just seal them in a freezer-safe bag or container, and thaw before coating.
Room Temperature: If you plan to serve them within a day or two, you can keep the coated pumpkins at room temperature for a festive presentation; however, avoid direct sunlight to maintain their quality.
Reheating: There's no need to reheat these treats; enjoy them chilled or at room temperature for the best experience!
Expert Tips for Peanut Butter Pumpkins
Perfect Peanut Butter Mix: Ensure your peanut butter is at room temperature for easier mixing; this helps create a smoother, creamier base for your Peanut Butter Pumpkins.
Crispy Cereal Care: Take care not to overmix when folding in the crispy rice cereal; this will preserve its crunch and texture, essential for the delightful bite.
Chilling Matters: Don’t skip the chilling step! This ensures your pumpkin shapes hold their form during coating, preventing them from falling apart.
Coating Technique: When dipping, allow any excess melted candy to drip off before placing the pumpkins back on the baking sheet for an even finish.
Decoration Details: Use a toothpick for creating intricate shapes with green candy melts to give your pumpkins a personal touch. These little details bring your Peanut Butter Pumpkins to life!
Make Ahead Options
These Peanut Butter Pumpkins are perfect for busy home cooks looking to prep in advance and save time! You can prepare the pumpkin mixture and roll them into shapes up to 24 hours ahead of time. Simply cover the formed pumpkins with plastic wrap and refrigerate them to maintain their freshness. When you're ready to serve, melt the orange candy coating, dip the pumpkin shapes, and let them set, ensuring a visually stunning treat each time. If planned really far ahead, you can even freeze the uncoated peanut butter balls for up to 3 months; thaw overnight in the fridge before coating, and they'll taste just as delicious!
Peanut Butter Pumpkins Recipe FAQs
What is the best way to select ripe ingredients for Peanut Butter Pumpkins?
Absolutely! For the best flavor, choose high-quality creamy peanut butter without added sugars or oils. When selecting candy melts, look for bright, vibrant colors as they provide an eye-catching finish to your treats. Additionally, ensure that your powdered sugar is fresh and finely sifted to avoid lumps in your mixture.
How should I store my Peanut Butter Pumpkins, and how long will they last?
You can store your leftover Peanut Butter Pumpkins in an airtight container in the refrigerator for up to 1 week. This will preserve their delightful flavors and keep them fresh. If you plan to savor some later, I recommend separating layers with parchment paper to avoid sticking.
Can I freeze Peanut Butter Pumpkins, and if so, how?
Absolutely! To freeze uncoated peanut butter balls, simply shape them and place them in a freezer-safe container or bag, ensuring they are sealed tightly. They can be frozen for up to 3 months. When you're ready to enjoy, thaw them in the refrigerator before coating with chocolate. This way, you’ll have an easy treat ready to go for last-minute gatherings!
What should I do if my peanut butter mixture is too crumbly?
If your mixture feels crumbly, try adding a bit more creamy peanut butter and mix thoroughly. This will help bind the ingredients better. You might also want to check that you haven’t added too much crispy rice cereal, as this can affect the consistency. If needed, you can sprinkle in a tiny bit of water to moisten the mixture gently.
Are Peanut Butter Pumpkins safe for pets?
No, it's best to keep these treats away from pets, especially dogs, as peanut butter can be safe in small amounts, but added sugars and chocolate can be harmful. Always make sure to store these delightful snacks out of reach from your furry friends to keep them safe.
Can I use other types of cereal instead of crispy rice?
Very! If you're looking for a change, you can use crispy cornflakes for a different texture or even gluten-free cereal options if you have dietary considerations. Just keep in mind that different cereals may alter the final taste slightly, but experimentation can yield delightful results!

Irresistible Peanut Butter Pumpkins for Your Sweet Cravings
Equipment
- large mixing bowl
- spatula
- Parchment-lined baking sheet
- microwave-safe bowl
Ingredients
Pumpkin Mixture
- 1 cup creamy peanut butter a rich, nutty base that brings both flavor and texture.
- 1 cup powdered sugar adds sweetness and helps bind the mixture.
- 1 teaspoon vanilla extract enhances the flavor with a warm note.
- 2 cups crispy rice cereal provides a delightful crunch.
Coating
- 1 cup orange candy melts creates a vibrant, autumnal exterior.
- 1 tablespoon vegetable oil ensures the candy melts smooth out easily.
- 1 cup green candy melts used for crafting leaves on top of each pumpkin.
- 24 pieces mini chocolate chips serve as charming eyes for the pumpkins.
Instructions
Preparation
- Begin by clearing and cleaning your kitchen counter to create an organized workspace. Gather all necessary ingredients and equipment.
- In a large mixing bowl, combine creamy peanut butter, powdered sugar, and vanilla extract. Stir until smooth and fully blended.
- Gently fold in the crispy rice cereal until evenly distributed.
- Take small portions and roll them into round balls, about 1-2 inches in diameter.
- Cover the baking sheet with plastic wrap and refrigerate the pumpkin shapes for approximately 30 minutes.
- In a microwave-safe bowl, combine orange candy melts with vegetable oil. Microwave in 30-second intervals until melted and smooth.
- Dip each chilled pumpkin shape into the melted orange candy coating until thoroughly coated.
- While the coating is still wet, place two mini chocolate chips on each pumpkin for eyes and create small green candy leaves on top.
- Allow the coated peanut butter pumpkins to set at room temperature until the candy coating hardens completely.