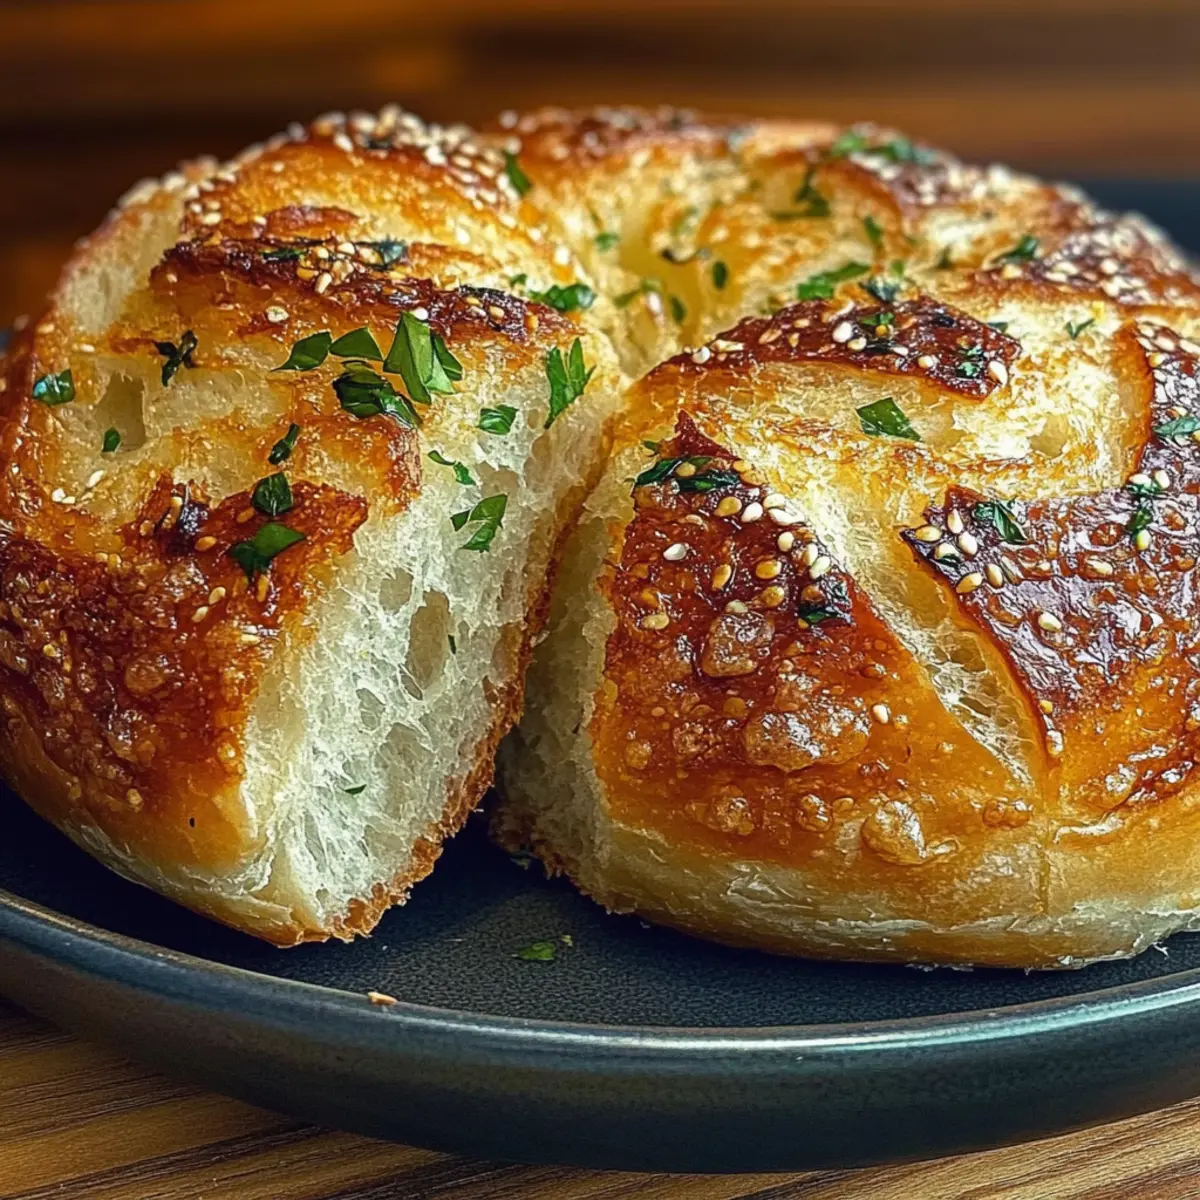
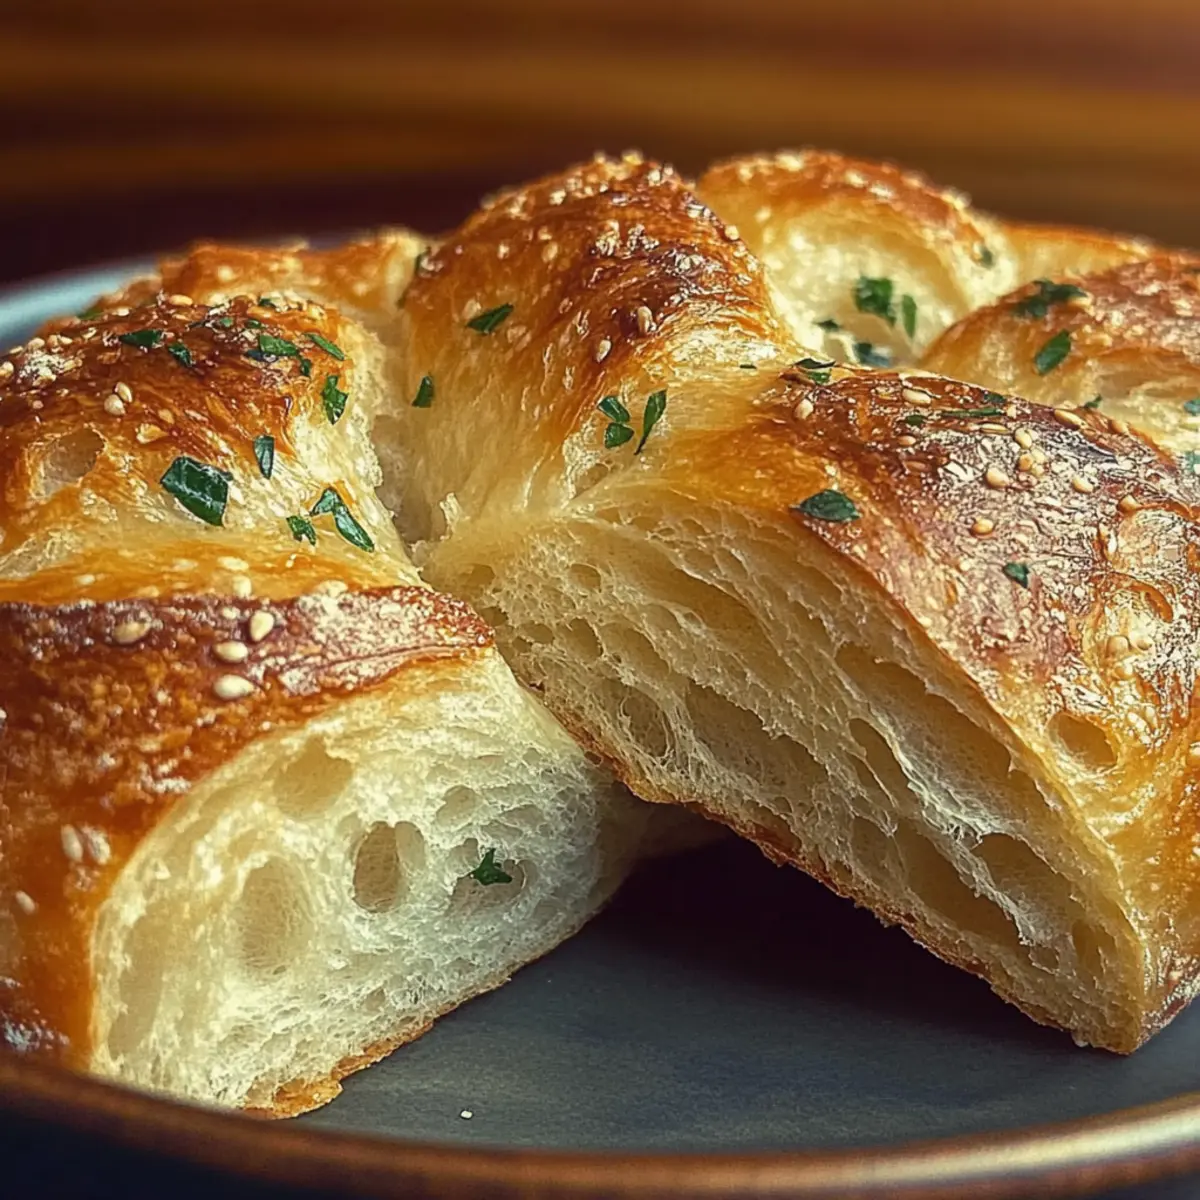
What’s that aroma wafting through your kitchen? It’s the unmistakable scent of Garlic Herb Dutch Oven Bread baking to perfection! This delightful recipe not only fills your home with an inviting fragrance but also delivers a crusty, golden loaf that’s a feast for the eyes. Perfect for cozy dinners or casual brunches, its charm lies in its simplicity—just a handful of ingredients and a little patience. You’ll appreciate how it effortlessly elevates your meals, whether enjoyed on its own or served alongside soups and salads. Plus, the method of baking in a Dutch oven creates a beautifully crusty exterior while maintaining a soft, airy interior. Ready to impress your friends and family? Let’s dive into this satisfying baking adventure together!
Why is Garlic Herb Dutch Oven Bread unforgettable?
Irresistible Aroma: The moment it bakes, your kitchen fills with comforting garlic and herb scents that beckon everyone to the table.
Effortless Preparation: With just a few steps, you can create a stunning loaf that seems to shout, "I love homemade food!"
Impressive Crust: Baking in a Dutch oven yields a crunchy exterior and a fluffy, soft interior that’s simply divine.
Versatile Enjoyment: Perfect as an accompaniment to your favorite soups, or simply spread with butter for a delightful snack!
Time to Shine: While it takes time to rise, most of it is hands-off—perfect for busy cooks who love to multitask.
Crowd-Pleasing Delight: Serve this bread at your next gathering, and watch as everyone can’t resist going back for seconds! Get ready to impress with this Garlic Herb Dutch Oven Bread.
Garlic Herb Dutch Oven Bread Ingredients
• This recipe is a must-try for bread lovers!
For the Dough
• 3 cups all-purpose flour – Essential for the perfect bread structure.
• 1 ¼ teaspoons salt – Enhances flavor and strengthens dough.
• ½ teaspoon instant yeast – Aids in rising, ensuring a light texture.
• 1 ½ cups warm water (about 110°F) – Activates the yeast for a successful rise.
For the Flavor
• 3 tablespoons olive oil – Adds richness and helps create a tender crumb.
• 4 cloves garlic, minced – Infuses the dough with aromatic goodness.
• 1 tablespoon fresh rosemary, chopped – Imparts a delightful earthy flavor.
• 1 tablespoon fresh thyme, chopped – Enhances the herbal complexity.
• 1 tablespoon fresh parsley, chopped – Brightens the flavor profile.
For Dusting
• Additional flour for dusting – Prevents sticking and aids in shaping the dough.
Ready to bake? Gather these ingredients and let’s bring the warmth of homemade Garlic Herb Dutch Oven Bread to your table!
Step‑by‑Step Instructions for Garlic Herb Dutch Oven Bread
Step 1: Prepare the Dry Ingredients
In a large mixing bowl, combine 3 cups of all-purpose flour, 1 ¼ teaspoons of salt, and ½ teaspoon of instant yeast. Stir the mixture with a wooden spoon until all ingredients are well integrated. This will lay the foundation for your flavorful Garlic Herb Dutch Oven Bread.
Step 2: Mix the Wet Ingredients
In a separate bowl, mix 1 ½ cups of warm water (around 110°F), 4 minced garlic cloves, and 3 tablespoons of olive oil along with the chopped herbs—1 tablespoon each of fresh rosemary, thyme, and parsley. Stir until everything is combined, creating a fragrant mixture that will elevate your bread.
Step 3: Combine Wet and Dry Ingredients
Pour the wet mixture into the bowl of dry ingredients. Using a wooden spoon or your hands, mix until a shaggy dough forms, ensuring that no dry flour remains. This step is crucial as it fosters the texture needed for your Garlic Herb Dutch Oven Bread.
Step 4: First Rise
Cover the bowl tightly with plastic wrap or a clean kitchen towel, allowing the dough to rest at room temperature for 12 to 18 hours. You'll know it's ready when the surface is bubbly and the dough has doubled in size. This long rise develops the marvelous flavors in your bread.
Step 5: Shape the Dough
Once risen, turn the dough out onto a generously floured surface. Sprinkle more flour if needed, and shape the dough into a round loaf. Be gentle to maintain its airy structure. This is your masterpiece—let the air pockets give it a soft crumb for the Garlic Herb Dutch Oven Bread!
Step 6: Second Rise
Dust the top of your loaf with a bit more flour and cover it with a kitchen towel. Let it rest for another 1 to 2 hours at room temperature until it is slightly puffed. This additional rise will ensure that your bread has a lovely texture once baked.
Step 7: Preheat the Dutch Oven
About 30 minutes before baking, place a Dutch oven (with the lid) in your oven and preheat it to 450°F (230°C). This step is essential as it creates an optimal environment for your Garlic Herb Dutch Oven Bread, ensuring a crisp, crusty exterior.
Step 8: Bake the Bread
Carefully remove the hot Dutch oven from the oven and remove the lid. Gently place the round loaf inside, then cover it with the lid again. Bake for 30 minutes with the lid on; this traps moisture, allowing the bread to rise beautifully.
Step 9: Finish Baking
After 30 minutes, carefully remove the lid and continue baking for an additional 15 to 20 minutes. Keep an eye on it until the bread turns a gorgeous golden brown and develops a crusty top that beckons you to slice into it.
Step 10: Cool and Slice
Once baked, transfer the Garlic Herb Dutch Oven Bread to a wire rack to cool. Allow it to cool completely before slicing, as this helps maintain the bread's structure and flavor. Enjoy the delightful aromas wafting through your kitchen!
Garlic Herb Dutch Oven Bread Variations
Feel free to unleash your creativity and customize this delightful bread to suit your family's taste buds!
-
Gluten-Free: Substitute all-purpose flour with a 1:1 gluten-free blend for a tasty alternative.
-
Cheesy Delight: Fold in 1 cup of shredded cheese, like cheddar or mozzarella, for a deliciously gooey twist. The melted cheese adds richness, creating an irresistible flavor profile.
-
Herb Explosion: Experiment with different herbs, such as basil, oregano, or chives, to create your unique flavor fusion. Fresh or dried, they all bring character to your bread!
-
Spicy Kick: Add a teaspoon of red pepper flakes to the dough for a hint of heat that harmonizes beautifully with the garlic and herbs.
-
Seed Topping: Before baking, sprinkle a mix of sesame seeds, poppy seeds, or sunflower seeds on top of the loaf for added crunch and visual appeal. They not only enhance the bread's look but also contribute a delightful texture.
-
Onion Boost: Sauté 1 small chopped onion and fold it into the dough for an aromatic, savory touch that will have everyone asking for more. The sweetness of the onions balances perfectly with the garlic!
-
Balsamic Glaze: Drizzle some balsamic reduction over the baked bread just before slicing for a sweet and tangy finish that elevates the entire experience.
-
Bagel-Style: Prior to baking, dunk the loaf in boiling water for 30 seconds to create a bagel-like crust. This adds an extra crunch that’s simply addictive!
Enjoy mixing things up! Each variation brings its own delightful flair, promising a new adventure with every bake. Don’t forget to pair this bread with your favorite soups, or try it alongside a homemade spread for an unforgettable treat. If you’re in the mood for rich flavors, you can also serve it as a side with a hearty Italian Tomato Basil Soup.
Make Ahead Options
These Garlic Herb Dutch Oven Bread preparations are perfect for busy cooks who want to save time without compromising on flavor! You can prepare the dough up to 24 hours in advance; simply follow the recipe up to the first rise and then place the covered bowl in the refrigerator instead of letting it rest at room temperature. This slow, cold fermentation enhances the flavor while you carry on with your day. When you're ready to bake, allow the dough to come to room temperature for about 30 minutes before shaping and proceeding with the second rise. Expect just as delicious results with this make-ahead method, giving you more time to enjoy your meal!
How to Store and Freeze Garlic Herb Dutch Oven Bread
Room Temperature: Store the bread at room temperature in a paper bag for up to 3 days to maintain its crustiness and prevent moisture build-up.
Fridge: If storing longer, place the bread in an airtight container in the fridge for up to a week. Note that this may soften the crust slightly.
Freezer: For extended storage, wrap the bread tightly in plastic wrap and then foil, freezing for up to 3 months. Thaw at room temperature when ready to enjoy.
Reheating: To refresh your Garlic Herb Dutch Oven Bread, reheat in a preheated oven at 350°F (175°C) for about 10 minutes, ensuring it regains its delightful crust.
Tips for the Best Garlic Herb Dutch Oven Bread
Hydration Matters: Ensure your water is warm but not hot. Too much heat can kill the yeast, affecting the rise of your Garlic Herb Dutch Oven Bread.
Don't Rush the Rise: Allow the dough to rest for the full 12 to 18 hours. This long fermentation develops flavors and gives your loaf its airy texture.
Avoid Overhandling: When shaping the dough, handle it gently. Overworking can deflate the air bubbles you've created, resulting in a denser bread.
Preheat Properly: Make sure your Dutch oven is fully preheated before adding the dough. This step is crucial for a perfect, crispy crust.
Cool Before Slicing: Resist the urge to slice immediately after baking. Letting it cool on a wire rack helps set the crumb and flavor.
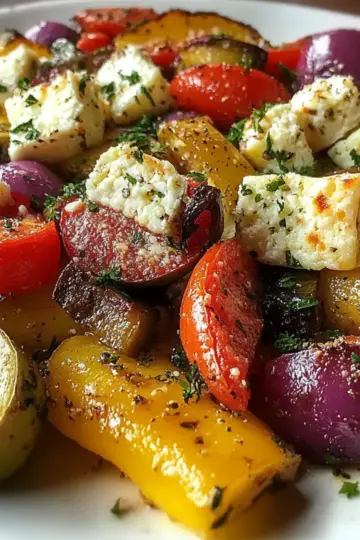
What to Serve with Garlic Herb Dutch Oven Bread
Indulging in a warm slice of bread brings meals to life, and pairing it perfectly can elevate your culinary experience.
-
Creamy Tomato Soup: The rich, tangy flavors contrast beautifully with the garlic herbs, making each dip a new delight. It’s comfort food at its finest!
-
Garden Salad: Fresh greens and vibrant veggies add a refreshing crunch that balances the bread’s softness. Drizzle with lemon vinaigrette for a bright finish.
-
Roasted Vegetables: The caramelized sweetness from the veggies complements the savory notes of the bread, creating a wonderful harmony of taste and texture at the dinner table.
-
Homestyle Chicken Stew: Serving this bread alongside a warm, hearty stew offers a cozy meal, perfect for chilly evenings. Scoop up delicious bites with every slice!
-
Herb-Infused Olive Oil: Dip your bread into a fragrant infusion of olive oil with herbs and spices. It’s a simple yet elegant way to enhance every bite.
-
Wine Pairing: A light Chardonnay or a fruity Pinot Noir pairs exceptionally well, adding sophistication to your meal while harmonizing with the garlic and herbs.
-
Homemade Pesto: Spread or dip your bread into zesty pesto for an Italian flair that tantalizes your taste buds with every savory bite.
-
Chocolate Chip Cookies: End your meal on a sweet note. The contrast of warm, gooey cookies with a slice of fresh bread offers an unexpectedly delicious treat!

Garlic Herb Dutch Oven Bread Recipe FAQs
How do I select the best ingredients for Garlic Herb Dutch Oven Bread?
Absolutely! For the best results, choose all-purpose flour with high protein content to achieve a good structure. Ensure your garlic is fresh and plump, as this will infuse the bread with a delicious aroma. The herbs should be vibrant and fragrant, as wilted or dry herbs will not impart the same flavor profile. Always opt for room temperature water—around 110°F—as this activates the yeast efficiently.
What is the best way to store Garlic Herb Dutch Oven Bread?
To keep your homemade bread fresh, store it at room temperature in a paper bag for up to 3 days. This method allows the crust to stay crisp while avoiding moisture build-up. If you need to store it longer, transfer the bread to an airtight container or wrap it tightly in plastic wrap and foil for fridge storage, where it can last up to a week.
Can I freeze Garlic Herb Dutch Oven Bread?
Yes! Freezing is a great option for preserving freshness. Once the bread has cooled completely, wrap it tightly in plastic wrap and then in foil to protect it from freezer burn. You can freeze it for up to 3 months. When you’re ready to enjoy it, simply thaw at room temperature for a few hours and reheat in the oven at 350°F (175°C) for about 10 minutes to bring back its crusty texture.
What should I do if my dough isn’t rising?
If you find your Garlic Herb Dutch Oven Bread dough isn’t rising, it could be due to a couple of reasons. First, check the freshness of your instant yeast—if it’s expired, it will not work effectively. Additionally, ensure the water temperature is warm, not hot, as excessive heat can kill the yeast. If you’ve done these and it’s still stubborn, place the bowl in a warmer area of your kitchen and give it a bit more time to rise.
Can I make Garlic Herb Dutch Oven Bread without certain allergens?
Very! If you or someone you’re serving has gluten intolerance, you can substitute the all-purpose flour with a gluten-free blend that’s designed for bread making. This adjustment should help retain the structure. For dairy concerns, rest assured that this recipe is dairy-free, as it doesn’t call for butter or milk. Always read label ingredients if using pre-packed items for any hidden allergens.

Garlic Herb Dutch Oven Bread for Cozy Home Baking Vibes
Equipment
- Dutch oven
Ingredients
Dough
- 3 cups all-purpose flour Essential for the perfect bread structure.
- 1.25 teaspoons salt Enhances flavor and strengthens dough.
- 0.5 teaspoon instant yeast Aids in rising, ensuring a light texture.
- 1.5 cups warm water Around 110°F to activate the yeast.
Flavor
- 3 tablespoons olive oil Adds richness and helps create a tender crumb.
- 4 cloves garlic Minced, infuses the dough with aromatic goodness.
- 1 tablespoon fresh rosemary Chopped, imparts a delightful earthy flavor.
- 1 tablespoon fresh thyme Chopped, enhances the herbal complexity.
- 1 tablespoon fresh parsley Chopped, brightens the flavor profile.
Dusting
- additional flour For dusting, prevents sticking and aids in shaping.
Instructions
Preparation
- In a large mixing bowl, combine all-purpose flour, salt, and instant yeast. Stir until well integrated.
- In a separate bowl, mix warm water, minced garlic, olive oil, and chopped herbs until combined.
- Pour the wet mixture into the bowl of dry ingredients. Mix until a shaggy dough forms.
- Cover the bowl tightly and let the dough rest for 12 to 18 hours at room temperature.
- Turn the risen dough onto a floured surface and shape it into a round loaf.
- Dust the loaf with flour, cover it, and let it rest for an additional 1 to 2 hours.
- Preheat your Dutch oven to 450°F (230°C) for 30 minutes before baking.
- Carefully place the round loaf in the hot Dutch oven, cover it, and bake for 30 minutes.
- After 30 minutes, remove the lid and bake for an additional 15 to 20 minutes until golden brown.
- Let the bread cool on a wire rack before slicing.