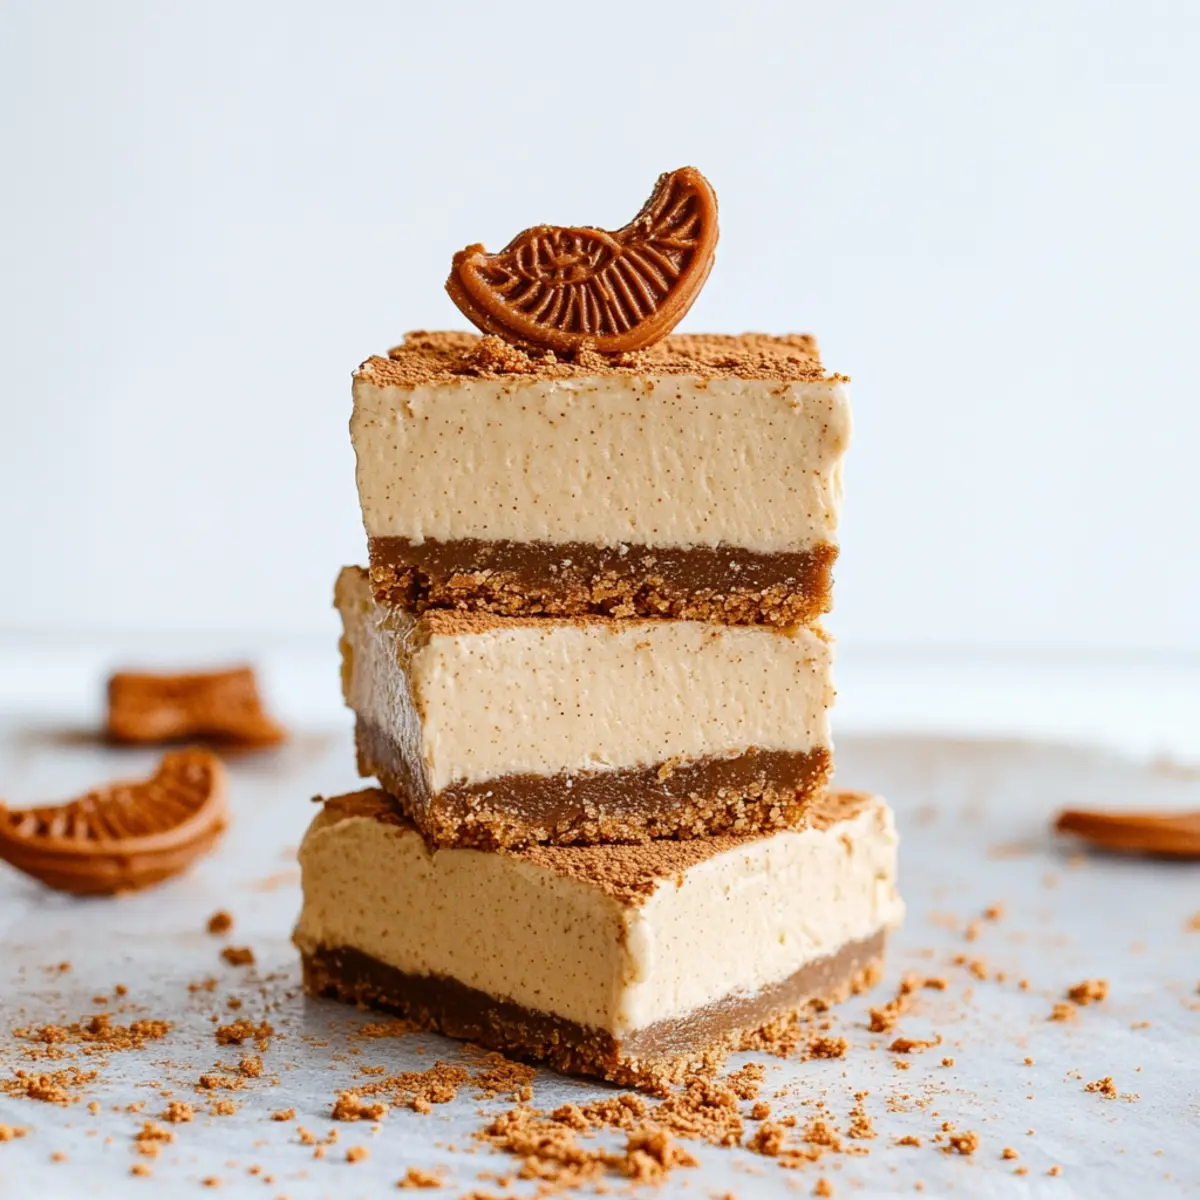
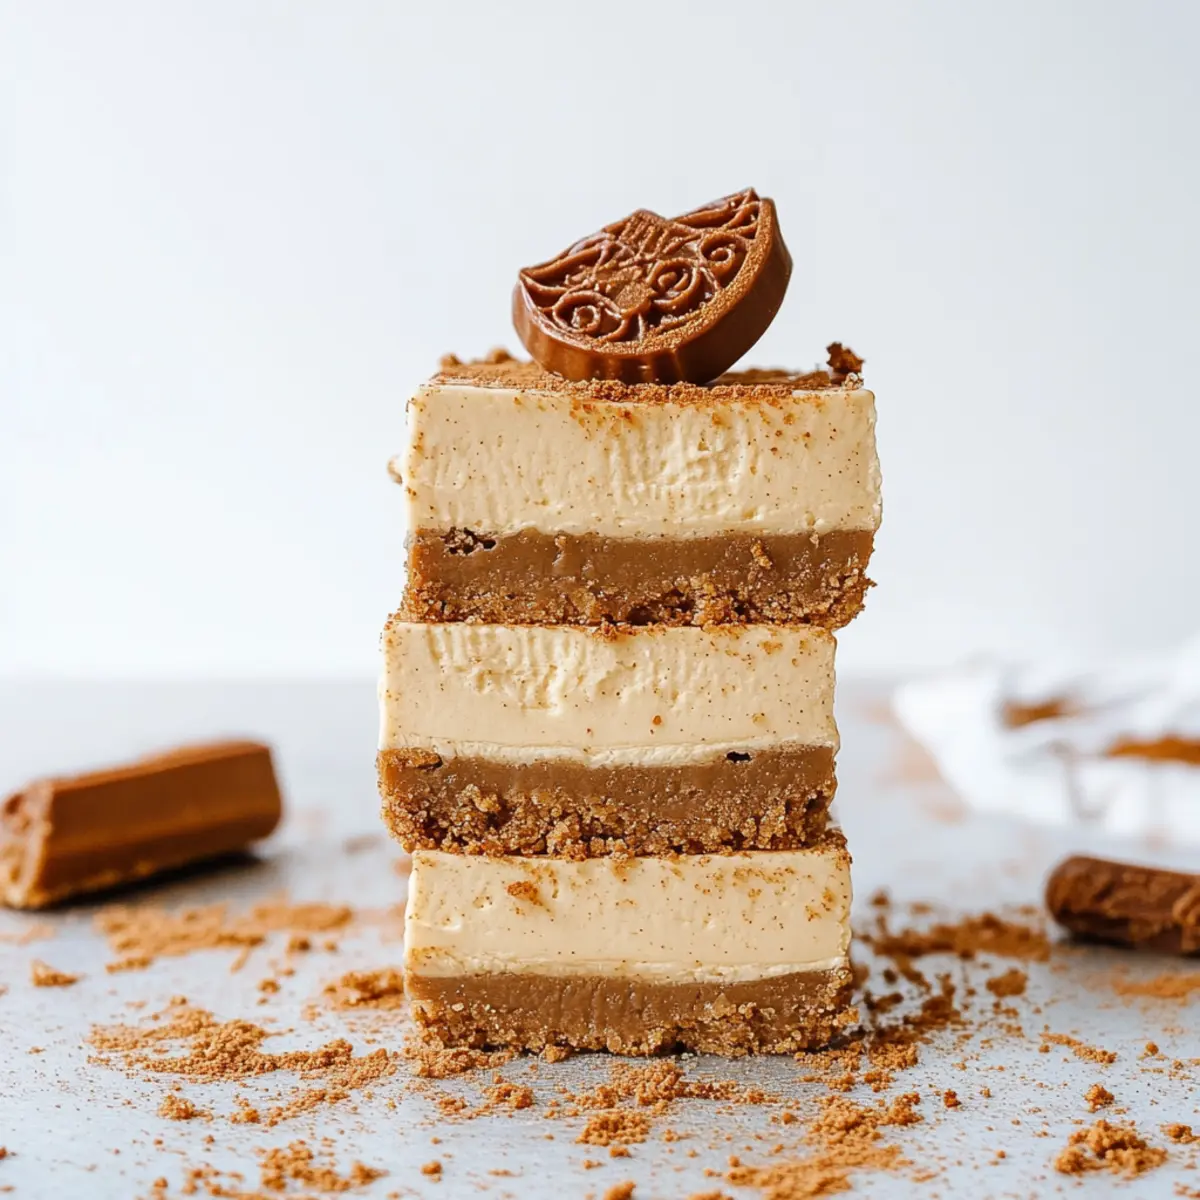
Have you ever found yourself craving a dessert that combines sweetness and simplicity, yet feels indulgent at the same time? Enter these delightful No Bake Biscoff Cheesecake Bars! With their rich Biscoff cookie crust and airy cheesecake filling, this recipe is a total dream come true for Biscoff lovers. It’s amazing how effortlessly I can whip these up without even turning on the oven, saving me time and energy.
What I love most about these bars is how they strike the perfect balance between ease and elegance, making them an ideal treat for both casual gatherings and special occasions. Plus, they’re versatile enough for those watching their gluten intake, as I can easily substitute Graham crackers to keep it gluten-free.
So, if you’re searching for a fast, crowd-pleasing dessert that will impress your friends and family, look no further! Trust me, these No Bake Biscoff Cheesecake Bars are a must-try. Can you already imagine the delightful crunch of that cookie crust paired with the creamy filling? Keep reading for the full recipe and see for yourself!
Why are No Bake Biscoff Cheesecake Bars irresistible?
**Indulgent ** and oh-so-simple, these bars bring a luxurious treat to your table without the hassle of baking. Creamy texture combined with a crispy crust creates a dessert that will have everyone coming back for seconds! Versatile enough for various occasions, they can easily be made gluten-free, ensuring everyone can enjoy. Time-saving yet impressive, these No Bake Biscoff Cheesecake Bars are the perfect answer to your dessert cravings. For an exciting twist, try using elements from other recipes, like the delightful ideas found in our Ravenclaw Blueberry Lemon Cheesecake Bars. Grab your ingredients and dive into this easy, crowd-pleasing delight!
No Bake Biscoff Cheesecake Bars Ingredients
- For the Crust
• Biscoff Cookies – Gives a unique and flavorful foundation to these cheesecake bars.
• Unsalted Butter – Adds richness and helps bind the crust together. - For the Filling
• Heavy Whipping Cream – Provides lightness and creates a fluffy texture for the filling.
• Cream Cheese – The heart of the cheesecake, ensuring a creamy and smooth consistency.
• Granulated Sugar – Sweetens the filling for a well-balanced flavor.
• Vanilla Extract – Enhances the dessert with a beautiful and warm flavor.
• Ground Cinnamon – Adds a touch of spice and warmth (optional for milder taste).
• Salt – Balances the sweetness and enhances overall flavors. - For the Topping
• Biscoff Cookie Butter – Adds a rich, creamy layer on top for extra indulgence.
• Crushed Biscoff Cookies – Perfect for garnish, bringing a crunchy texture and appealing presentation.
Are you ready to treat yourself to these luscious No Bake Biscoff Cheesecake Bars? Let’s get started!
Step-by-Step Instructions for No Bake Biscoff Cheesecake Bars
Step 1
Begin by preparing the crust for your No Bake Biscoff Cheesecake Bars. In a food processor, blend the Biscoff cookies until they are finely crushed, resembling coarse sand. Next, melt the unsalted butter in the microwave or on the stovetop until fully liquid. Combine the crushed cookies with the melted butter and a pinch of salt in a mixing bowl. Stir until the mixture is evenly moistened, then press it firmly into an 8x8 baking pan. Chill the crust in the refrigerator for about 20 minutes to set.
Step 2
While the crust is chilling, whip the heavy cream to airy perfection. Using a large mixing bowl and an electric mixer, beat the heavy whipping cream on medium-high speed until you reach stiff peaks, which should take about 3-5 minutes. Be attentive during this process; the cream should look thick and hold its shape when the whisk is lifted. Once whipped, set the bowl aside, as you'll gently fold this later into the filling.
Step 3
Now it's time to prepare the luscious filling for your No Bake Biscoff Cheesecake Bars. In another large mixing bowl, beat the softened cream cheese using an electric mixer on medium speed until it is smooth and creamy, which should take about 2 minutes. Gradually add in the granulated sugar, vanilla extract, ground cinnamon, and a pinch of salt. Mix until well combined. Finally, add the cookie butter and blend until completely incorporated. Gently fold in the whipped cream from the previous step until the mixture is smooth and light.
Step 4
With your crust ready and the filling prepared, it's time to assemble your No Bake Biscoff Cheesecake Bars. Pour the cheesecake filling over the chilled crust in the baking pan, using a spatula to spread it evenly and smooth out the top. Once the filling is nicely spread, cover the pan with plastic wrap or foil and place it in the refrigerator. Allow it to chill for at least 6 hours, although overnight is even better for optimal flavor and texture.
Step 5
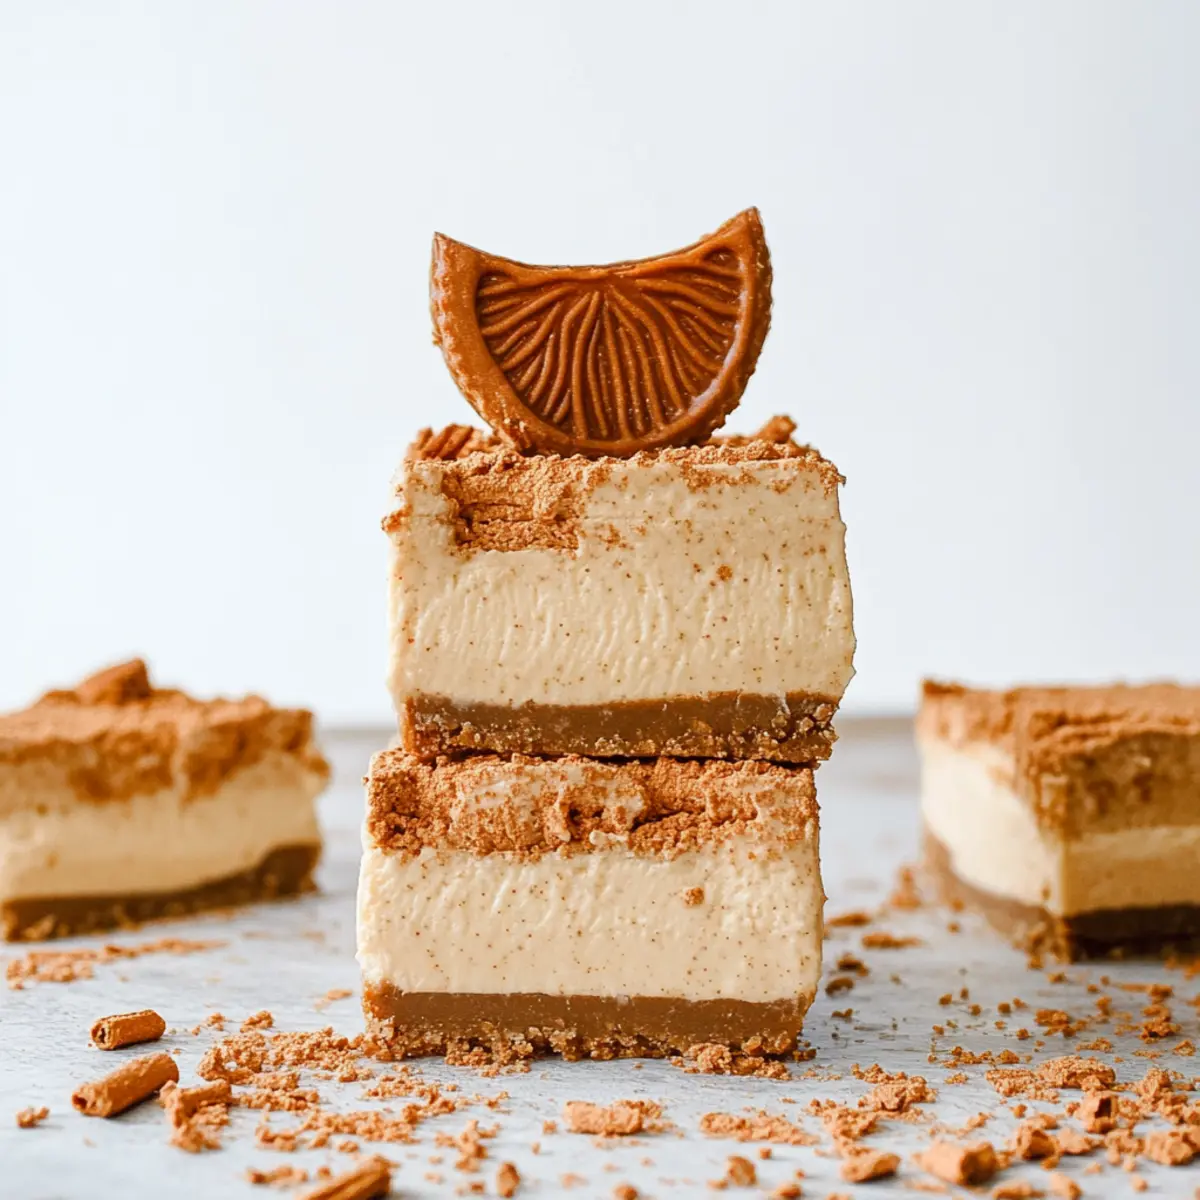
After your cheesecake has set overnight, it's time to add a decadent finish. Warm the Biscoff cookie butter in the microwave for about 15-20 seconds until it is pourable. Carefully remove the cheesecake from the refrigerator and drizzle the warmed cookie butter over the top, smoothing it gently with a spatula for an even layer. Return the cheesecake to the fridge for an additional 30 minutes to allow the topping to firm up. Before serving, sprinkle crushed Biscoff cookies over the top for a delightful garnish that adds a crunchy texture.
No Bake Biscoff Cheesecake Bars Variations
Feel free to get creative and customize these delightful bars to suit your taste!
- Gluten-Free: Use gluten-free cookies in place of Biscoff for a delightful gluten-free option that's equally yummy.
- Decadent Chocolate: Add chocolate chips to the cheesecake filling for a rich, chocolatey twist that complements the Biscoff flavor beautifully.
- Nutty Crunch: Fold in crushed nuts, like pecans or almonds, into the cheesecake mixture to add a delightful crunch and nutty flavor.
- Fruity Delight: Top the cheesecake bars with fresh berries for a pop of color and a refreshing fruity taste that balances the sweetness.
- Spiced Twist: Swap ground cinnamon for pumpkin spice to give your bars a warm autumn flavor that’s perfect for seasonal gatherings.
- Caramel Drizzle: Drizzle caramel sauce over the top of the cheesecake for an irresistible sweet finish that takes the indulgence up a notch.
- Savory Touch: Incorporate a pinch of sea salt into the cookie crust for a delightful contrast that intensifies the sweetness of the cheesecake.
- Vegan-Friendly: Substitute cream cheese and whipping cream with vegan alternatives and maple syrup for a plant-based version that still packs great flavor!
Expert Tips for No Bake Biscoff Cheesecake Bars
- Room Temperature Ingredients: Ensure all ingredients, especially the cream cheese, are at room temperature before mixing to avoid lumps that can ruin your cheesecake texture.
- Smooth Mixing: If your cream cheese is too cold, it can clump; set it out for 30 minutes before using to ensure a smooth filling.
- Chill Time: Allow the cheesecake to set overnight, if possible, for the best flavor and creamy texture. A rushed setting can lead to a less firm consistency.
- Gentle Folding: When incorporating the whipped cream, be gentle to maintain that light and airy texture in your No Bake Biscoff Cheesecake Bars.
- Topping Tips: Warm the Biscoff cookie butter slightly before drizzling it on top; this ensures it spreads easily and creates a beautiful finish.
- Serving Size: Cut the bars into small squares for a delightful treat; they’re rich, so smaller portions can satisfy your sweet tooth without overwhelming!
How to Store and Freeze No Bake Biscoff Cheesecake Bars
Fridge: Store your no bake Biscoff cheesecake bars in an airtight container in the fridge for up to 3-4 days to maintain their creamy texture and flavor.
Freezer: For longer storage, freeze the cheesecake bars wrapped tightly in plastic wrap and foil for up to a month. Thaw in the refrigerator overnight before serving for the best taste and consistency.
Reheating: No need to reheat these bars; enjoy them chilled! For a slightly softer texture, let them sit at room temperature for a few minutes before cutting into squares.
Garnishing: If you have leftover toppings, keep them in a separate container but add just before serving to keep the bars looking fresh and appealing.
What to Serve with No Bake Biscoff Cheesecake Bars?
Imagine the delight of a dessert table full of vibrant flavors that perfectly complement your creamy cheesecake bars!
- Fresh Berries: The tartness of strawberries or raspberries balances the sweetness of the cheesecake, adding a refreshing contrast that brightens every bite.
- Chocolate Ganache: Drizzling a rich chocolate ganache over the bars introduces a silky texture, creating a luxurious layer that enhances the dessert’s indulgent vibe.
- Whipped Cream: Light and airy, whipped cream elevates the dessert with a cloud-like softness, providing a delightful contrast to the creamy filling while adding a touch of elegance.
- Cinnamon Dust: A sprinkle of cinnamon on top of each bar introduces warmth and spice, echoing the flavors in the cheesecake while enhancing its cozy appeal.
- Toasted Nuts: Crunchy, toasted almonds or pecans offer a nutty flavor that pairs harmoniously with the Biscoff base, adding extra texture and richness to each bite.
- Coffee or Espresso: A warm cup of brewed coffee or espresso beautifully complements the sweet and spiced notes in the bars, elevating the dessert experience while providing a comforting balance.
Savoring these pairings makes for an unforgettable experience, allowing the creamy richness of the No Bake Biscoff Cheesecake Bars to truly shine!
Make Ahead Options
These No Bake Biscoff Cheesecake Bars are perfect for meal prep, allowing you to enjoy a delicious dessert with minimal last-minute effort! You can prepare the crust and filling up to 24 hours in advance. Simply whip the cream and mix with the other filling ingredients, then pour it over the crust and chill in the fridge overnight. To maintain quality, ensure they are tightly covered to prevent drying out. When you're ready to serve, warm the Biscoff cookie butter and drizzle it over your cheesecake bars before refrigerating for an additional 30 minutes to set. You'll have a delightful treat, ready to impress, without the stress!
No Bake Biscoff Cheesecake Bars Recipe FAQs
How do I choose ripe, fresh ingredients for my cheesecake bars?
When selecting ingredients like cream cheese, ensure it’s fresh and within the expiration date. For heavy whipping cream, look for a sell-by date a week or more away. Avoid cream cheese with any dark spots or off smells, which indicate spoilage. Use Biscoff cookies that are crisp—if they feel soft, they may be stale.
What’s the best way to store No Bake Biscoff Cheesecake Bars?
These delectable bars can be stored in an airtight container in the refrigerator for up to 3-4 days. Just make sure they are fully chilled before sealing to keep them fresh. Layering parchment paper between the bars can help prevent them from sticking together.
Can I freeze No Bake Biscoff Cheesecake Bars?
Absolutely! To freeze, tightly wrap the cheesecake bars in plastic wrap and aluminum foil to prevent freezer burn. They can be stored for up to a month. When you’re ready to enjoy, simply thaw them in the refrigerator overnight. For the best texture, let them sit at room temperature for about 10-15 minutes before cutting.
What should I do if my cheesecake filling doesn’t set properly?
If your filling hasn’t set well, it might be because the cream cheese and whipped cream weren't well-folded. Make sure the cream cheese is at room temperature, and mix until smooth before folding in the whipped cream gently. In the future, allow the cheesecake to chill overnight for a firmer consistency. If it still doesn't set, consider placing it in the freezer for an hour as a last resort.
Are there any allergy considerations for this recipe?
Yes! This recipe contains dairy (cream cheese, heavy whipping cream), gluten (Biscoff cookies, unless using gluten-free alternatives), and may present issues for those with nut allergies if cookie butter contains nuts. Always check ingredient labels for potential allergens, particularly if you're serving guests with specific dietary needs.
How can I make No Bake Biscoff Cheesecake Bars gluten-free?
For a gluten-free version, simply replace Biscoff cookies with gluten-free cookies or a gluten-free graham cracker alternative. Ensure that all other ingredients are also certified gluten-free, particularly in the toppings or garnishes. Enjoy your delicious bars worry-free!

Indulgent No Bake Biscoff Cheesecake Bars You'll Love
Ingredients
- 1 ½ cups Biscoff Cookies
- ½ cup Unsalted Butter
- 1 cup Heavy Whipping Cream
- 8 ounces Cream Cheese
- ½ cup Granulated Sugar
- 1 teaspoon Vanilla Extract
- ½ teaspoon Ground Cinnamon
- ¼ teaspoon Salt
- ½ cup Biscoff Cookie Butter
- ¼ cup Crushed Biscoff Cookies
Instructions
- Begin by preparing the crust for your No Bake Biscoff Cheesecake Bars. In a food processor, blend the Biscoff cookies until they are finely crushed, resembling coarse sand. Next, melt the unsalted butter in the microwave or on the stovetop until fully liquid. Combine the crushed cookies with the melted butter and a pinch of salt in a mixing bowl. Stir until the mixture is evenly moistened, then press it firmly into an 8x8 baking pan. Chill the crust in the refrigerator for about 20 minutes to set.
- While the crust is chilling, whip the heavy cream to airy perfection. Using a large mixing bowl and an electric mixer, beat the heavy whipping cream on medium-high speed until you reach stiff peaks, which should take about 3-5 minutes. Be attentive during this process; the cream should look thick and hold its shape when the whisk is lifted. Once whipped, set the bowl aside, as you'll gently fold this later into the filling.
- Now it's time to prepare the luscious filling for your No Bake Biscoff Cheesecake Bars. In another large mixing bowl, beat the softened cream cheese using an electric mixer on medium speed until it is smooth and creamy, which should take about 2 minutes. Gradually add in the granulated sugar, vanilla extract, ground cinnamon, and a pinch of salt. Mix until well combined. Finally, add the cookie butter and blend until completely incorporated. Gently fold in the whipped cream from the previous step until the mixture is smooth and light.
- With your crust ready and the filling prepared, it's time to assemble your No Bake Biscoff Cheesecake Bars. Pour the cheesecake filling over the chilled crust in the baking pan, using a spatula to spread it evenly and smooth out the top. Once the filling is nicely spread, cover the pan with plastic wrap or foil and place it in the refrigerator. Allow it to chill for at least 6 hours, although overnight is even better for optimal flavor and texture.
- After your cheesecake has set overnight, it's time to add a decadent finish. Warm the Biscoff cookie butter in the microwave for about 15-20 seconds until it is pourable. Carefully remove the cheesecake from the refrigerator and drizzle the warmed cookie butter over the top, smoothing it gently with a spatula for an even layer. Return the cheesecake to the fridge for an additional 30 minutes to allow the topping to firm up. Before serving, sprinkle crushed Biscoff cookies over the top for a delightful garnish that adds a crunchy texture.
Notes
- Room Temperature Ingredients: Ensure all ingredients, especially the cream cheese, are at room temperature before mixing to avoid lumps that can ruin your cheesecake texture.
- Smooth Mixing: If your cream cheese is too cold, it can clump; set it out for 30 minutes before using to ensure a smooth filling.
- Chill Time: Allow the cheesecake to set overnight, if possible, for the best flavor and creamy texture. A rushed setting can lead to a less firm consistency.
- Gentle Folding: When incorporating the whipped cream, be gentle to maintain that light and airy texture in your No Bake Biscoff Cheesecake Bars.
- Topping Tips: Warm the Biscoff cookie butter slightly before drizzling it on top; this ensures it spreads easily and creates a beautiful finish.
- Serving Size: Cut the bars into small squares for a delightful treat; they’re rich, so smaller portions can satisfy your sweet tooth without overwhelming!