There's something undeniably charming about the delightful duo of soft dough and a sweet surprise nestled right in the middle. My journey to creating the perfect Thumbprint Cookies has been a deliciously rewarding experience, merging nostalgia with a touch of creativity. These classic confections are not only simple to make but also allow you to experiment with different fillings, whether you prefer a lush fruit preserve or rich chocolate ganache. In just about 30 minutes—prep and bake time included—you'll be serving up a treat that’s sure to impress friends and family alike. Whether you’re a seasoned home chef or just starting your culinary adventure, these cookies are a crowd-pleasing way to bring a dash of homemade happiness to any occasion. Are you ready to roll up your sleeves and indulge in this sweet adventure?

Why Are Thumbprint Cookies So Irresistible?
Classic comfort: These Thumbprint Cookies bring a sense of nostalgia to your baking, perfect for sharing warm memories with loved ones.
Quick and easy: With a total time of just 30 minutes, these treats fit into any busy schedule, making them perfect for unexpected guests.
Endless variety: You can switch up the fillings, whether it's fruity preserves or decadent chocolate ganache, ensuring there's a favorite for everyone.
Great for all occasions: Whether it's a casual family gathering or a fancy celebration, these cookies are sure to steal the show.
Baking fun for all: Involve the kids in making these cookies, turning the kitchen into a joyous space filled with laughter and creativity!
Thumbprint Cookies Ingredients
• Get ready to create magic in your kitchen with these delicious Thumbprint Cookies!
For the Dough
- 1 cup softened butter – Bring the butter to room temperature for easy blending and a fluffy texture.
- 1 cup granulated sugar – This not only sweetens but also helps achieve that melt-in-your-mouth consistency.
- 1 egg yolk – Just the yolk gives richness, enhancing the cookie's flavor and texture.
- 1 teaspoon vanilla extract – A splash of vanilla elevates the overall flavor, adding warmth and depth.
- 2 ¼ cups all-purpose flour – The key ingredient for structure, ensuring your cookies have the perfect crumb.
- ½ teaspoon salt – A pinch of salt balances the sweetness and enhances all the flavors.
For the Filling
- ½ cup fruit preserves – Use any flavor you love; tartness from the preserves complements the sweetness of the cookie beautifully.
- ½ cup chocolate ganache – For the chocolate lovers, this rich filling brings an indulgent twist to the classic recipe.
Step‑by‑Step Instructions for Thumbprint Cookies
Step 1: Cream the Butter and Sugar
In a large mixing bowl, use an electric mixer to cream together 1 cup of softened butter and 1 cup of granulated sugar until the mixture becomes light and fluffy, about 3-5 minutes. This step is crucial for the perfect texture of your Thumbprint Cookies, so make sure to scrape the sides of the bowl to fully incorporate the ingredients.
Step 2: Add Egg Yolk and Vanilla
Beat in 1 egg yolk and 1 teaspoon of vanilla extract into the creamy butter-sugar mixture. Mix until everything is well combined, which should take 1-2 minutes. The batter will be smooth and slightly glossy, indicating it's ready for the next step.
Step 3: Combine Flour and Salt
In a separate bowl, whisk together 2 ¼ cups of all-purpose flour and ½ teaspoon of salt. Make sure the flour is well aerated to prevent clumps. Slowly add this dry mixture to the butter mixture, stirring gently until a soft dough forms. This should take about 2-3 minutes of careful mixing.
Step 4: Chill the Dough
Cover the dough with plastic wrap and refrigerate for at least 30 minutes. Chilling the dough not only makes it easier to handle but also produces firmer Thumbprint Cookies that hold their shape when baking.
Step 5: Preheat the Oven and Prepare the Baking Sheet
While the dough chills, preheat your oven to 350°F (175°C) and line a baking sheet with parchment paper. This minimizes sticking and ensures easy cleaning. You'll want to have everything ready to go once the dough is ready to be shaped.
Step 6: Shape the Cookies
Once the dough is chilled, scoop tablespoon-sized portions and roll them into balls between your hands. Place them on the prepared baking sheet, giving about 2 inches of space between each ball. They should look smooth and round, ready to form those delightful thumbprint indentations.
Step 7: Create Indentations
Using your thumb or the back of a spoon, gently press down into the center of each dough ball to create an indentation. Be sure not to press too hard, as you want to create a well for the filling without breaking through the bottom of the cookie.
Step 8: Fill the Indentations
Spoon a small amount of your chosen filling—either ½ cup of fruit preserves or chocolate ganache—into each indentation. Fill them generously but avoid overflowing, as this can cause spillage during baking.
Step 9: Bake the Cookies
Place the baking sheet in the preheated oven and bake for 12-15 minutes, or until the edges of the Thumbprint Cookies are lightly golden. Keep an eye on them as baking times may vary slightly based on your oven.
Step 10: Cool and Serve
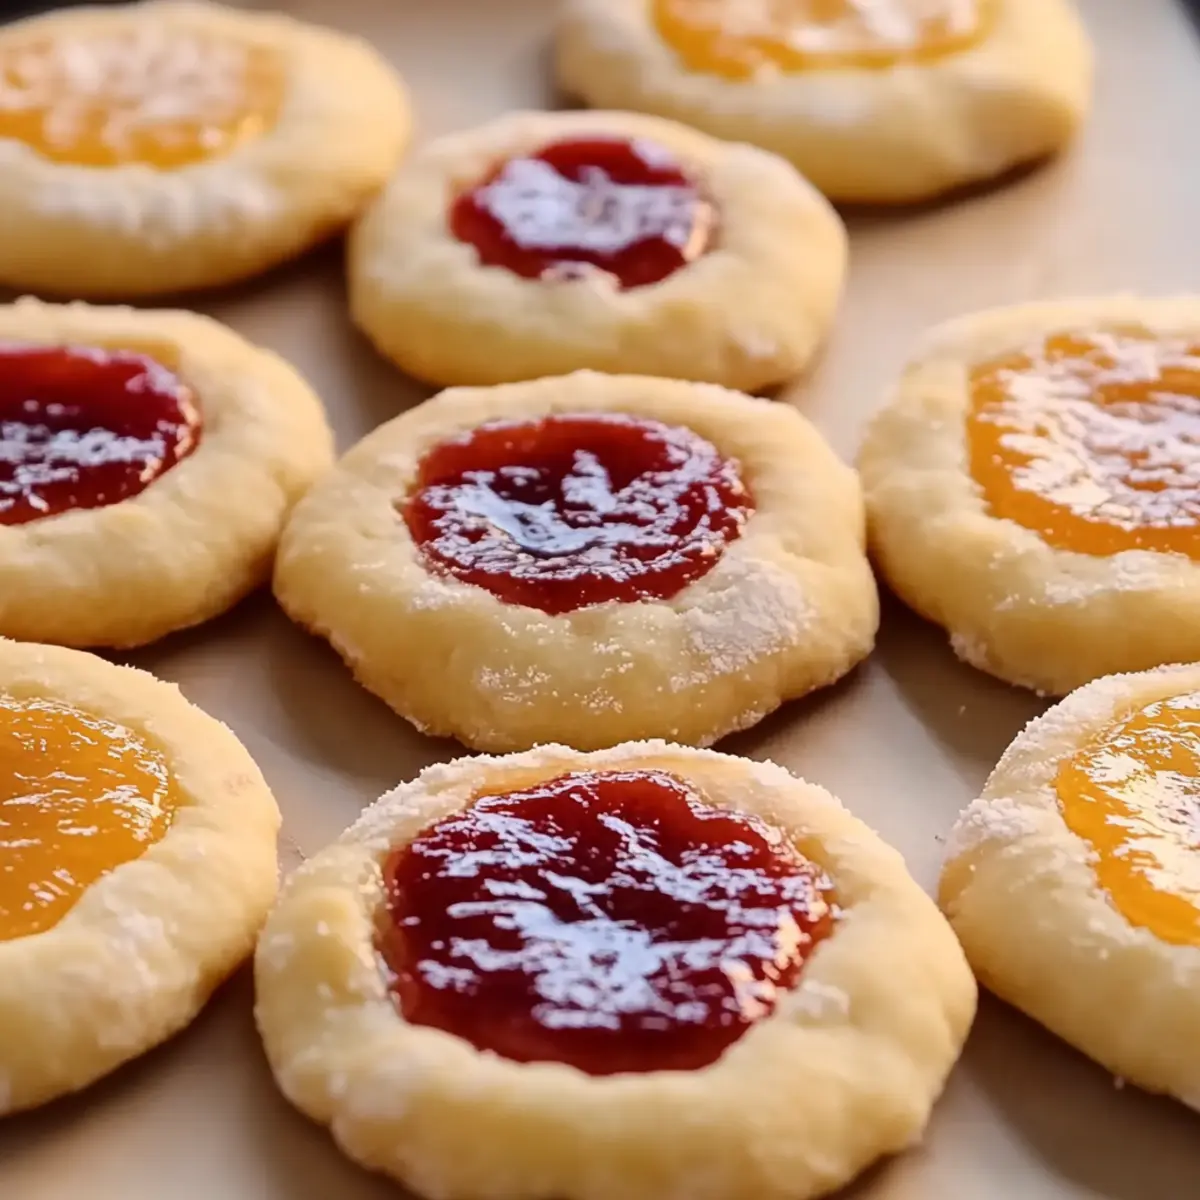
After baking, allow the cookies to cool on the sheet for a few minutes. Once slightly firm, transfer them to a wire rack to cool completely. If desired, dust with powdered sugar before serving to add a charming touch to your delicious Thumbprint Cookies.
How to Store and Freeze Thumbprint Cookies
Room Temperature: Store the cookies in an airtight container for up to 3 days, keeping them fresh and soft while maintaining their delightful flavor.
Fridge: Thumbprint Cookies can be refrigerated for up to 5 days. Ensure they are in a sealed container to prevent absorbing any odors from the fridge.
Freezer: Freeze the cookies in a single layer on a baking sheet, then transfer them to a freezer bag or airtight container for up to 3 months. Thaw at room temperature before serving.
Reheating: If you prefer warm cookies, reheat in the oven at 350°F (175°C) for about 5 minutes, restoring that freshly-baked taste that's sure to impress!
What to Serve with Classic Thumbprint Cookies?
Imagine the joyful crunch of a perfectly baked cookie paired with delightful side treats that enhance every sweet bite.
- Vanilla Ice Cream: A scoop of velvety vanilla ice cream adds a creamy contrast, making each cookie experience even more indulgent.
- Fresh Berries: Ripe strawberries or blueberries provide a refreshing burst of tartness, balancing the sweetness of the cookies beautifully.
- Coffee or Espresso: The rich, bold flavors of coffee or a shot of espresso elevate the cookie’s flavor profile, making for a cozy treat pairing.
- Spiced Hot Chocolate: Cozy up with a mug of spiced hot chocolate, adding warmth and a touch of nostalgia to your sweet moments.
- Whipped Cream: Light and airy whipped cream brings a luscious texture that complements the cookie while adding a whimsical touch to your plate.
- Nutty Granola: For a delightful crunch, sprinkle some homemade granola on top of the cookies—its texture pairs nicely with the soft dough.
- Caramel Sauce: Drizzle warm caramel sauce over the cookies for an unforgettable decadent twist that’ll leave everyone wanting more!
- Fruit Compote: A dollop of homemade fruit compote lends a rustic charm, echoing the flavors within and adding a fresh dimension.
- Sparkling Water: Pair your cookies with bubbly sparkling water; it's a refreshing way to cleanse the palate between bites.
Expert Tips for Thumbprint Cookies
-
Perfect Chilling: Allow the dough to chill for at least 30 minutes; this ensures your Thumbprint Cookies maintain their shape while baking.
-
Avoid Overfilling: When adding the fruit preserves or chocolate ganache, be careful not to overflow the indentations to prevent spills.
-
Uniform Sizing: Use a tablespoon scoop to portion out uniform dough balls for even baking and consistent cookie sizes.
-
Watch the Bake Time: Keep an eye on the cookies as they bake; the perfect golden edge means they’re ready for cooling, usually around 12-15 minutes.
-
Creative Fillings: Don’t hesitate to experiment with different fillings—try nut butters or even caramel for a delightful twist on classic Thumbprint Cookies!
Thumbprint Cookies Variations
Get ready to unleash your creativity in the kitchen and personalize these delightful treats into something uniquely yours!
-
Gluten-Free: Substitute all-purpose flour with a gluten-free blend for a deliciously adaptable cookie that everyone can enjoy.
-
Nutty Twist: Add 1 cup of finely chopped nuts such as almonds or walnuts to the dough for a crunchy texture and toasty flavor that enhances each bite. It's a nut lover’s dream!
-
Citrus Zing: Incorporate the zest of one lemon or orange into the dough for a refreshing burst of flavor that complements the sweetness beautifully. This citrus twist will brighten your cookies in every way!
-
Spicy Kick: Mix in a teaspoon of cinnamon or ginger to the dough for a warm, comforting spice that pairs wonderfully with fruit fillings. Think of holidays, warmth, and cozy vibes!
-
Vegan-friendly: Replace the butter with coconut oil, the egg yolk with a flax egg, and use a vegan chocolate ganache. You'll still achieve that melt-in-your-mouth perfection with a plant-based twist!
-
Sugar-free: Swap the granulated sugar with a natural sweetener like erythritol or coconut sugar for a healthier version that doesn’t compromise on flavor. Enjoy cookies without guilt!
-
Decadent Drizzle: After cooling, drizzle melted dark, white, or milk chocolate over the cookies for an extra layer of indulgence. Transform these simple delights into showstoppers with a choco-coating!
-
Flavorful Fillings: Explore variations with fillings like peanut butter, caramel, or even cream cheese frosting for a taste explosion that caters to every sweet tooth. The options are endless!
Feel free to mix and match these ideas. Each variation opens a new door to deliciousness—let your imagination run wild! And while you experiment, don't forget to check out these great tips for making the best Thumbprint Cookies: Expert Tips for Thumbprint Cookies.
Make Ahead Options
These classic Thumbprint Cookies are perfect for busy home cooks looking to save time! You can prepare the dough up to 24 hours in advance by following the first four steps of the recipe. After forming the dough, wrap it tightly in plastic wrap or place it in an airtight container before refrigerating. When you're ready to bake, simply take the dough out, allow it to soften slightly for easier handling, and follow the remaining steps—shaping, filling, and baking. The cookies will turn out just as delightful and fresh! If you'd like to store baked cookies, they can be kept in an airtight container at room temperature for up to 3 days without losing any of their charm.

Thumbprint Cookies Recipe FAQs
What is the best way to choose ripe fruit preserves?
Absolutely! When selecting fruit preserves for your Thumbprint Cookies, look for those that have a vibrant color and a rich fruity aroma. Avoid preserves with dark spots or excessive thickness, as these may indicate they’re past their prime. Opt for natural preserves without added preservatives for the best taste!
How long do Thumbprint Cookies last at room temperature?
Very! When stored in an airtight container, your delightful Thumbprint Cookies can stay fresh at room temperature for up to 3 days. If you notice any changes in texture or flavor, that may be a sign to enjoy them faster.
Can I freeze Thumbprint Cookies, and how?
Yes, you can! To freeze your Thumbprint Cookies, start by placing them in a single layer on a baking sheet lined with parchment paper, allowing them to freeze for about 1-2 hours until solid. After that, carefully transfer them to a freezer bag or airtight container and label them with the date. They’ll keep well for up to 3 months. When ready to enjoy, thaw at room temperature or reheat in the oven for that fresh-baked taste!
What should I do if my cookie dough is too dry?
If you find your Thumbprint Cookie dough is a bit drier than expected, don’t fret! You can add a teaspoon of milk or water gradually until the dough reaches a soft, pliable consistency. Just blend gently—overworking might toughen the cookies! Give it a gentle mix and try again.
Are Thumbprint Cookies safe for pets, particularly dogs?
While the ingredients in Thumbprint Cookies are generally safe for humans, it's best to keep them away from pets, especially those with dietary restrictions. Ingredients like sugar and chocolate can be harmful to dogs. Always check with your veterinarian if you’re unsure about any human food for your furry friends.
Delicious Thumbprint Cookies Bursting with Flavorful Fillings
Equipment
- Electric mixer
- Mixing bowls
- Baking Sheet
- Parchment Paper
- wire rack
Ingredients
For the Dough
- 1 cup softened butter Bring to room temperature for easy blending.
- 1 cup granulated sugar Helps achieve melt-in-your-mouth consistency.
- 1 egg yolk Gives richness, enhancing flavor.
- 1 teaspoon vanilla extract Adds warmth and depth to the flavor.
- 2 ¼ cups all-purpose flour Key ingredient for structure.
- ½ teaspoon salt Balances sweetness.
For the Filling
- ½ cup fruit preserves Any flavor you love.
- ½ cup chocolate ganache Indulgent for chocolate lovers.
Instructions
Step‑by‑Step Instructions
- Cream together the softened butter and granulated sugar until light and fluffy, about 3-5 minutes.
- Beat in the egg yolk and vanilla extract until well combined, 1-2 minutes.
- In a separate bowl, whisk together flour and salt; slowly add to butter mixture until a soft dough forms.
- Cover the dough with plastic wrap and refrigerate for at least 30 minutes.
- Preheat the oven to 350°F (175°C) and line a baking sheet with parchment paper.
- Scoop tablespoon-sized portions and roll them into balls, placing them on the prepared baking sheet.
- Press down into the center of each dough ball to create an indentation.
- Fill each indentation with fruit preserves or chocolate ganache.
- Bake for 12-15 minutes until the edges are lightly golden.
- Cool on the baking sheet for a few minutes before transferring to a wire rack to cool completely.